3D Animation Pipeline: From Lookdev to Final Shot
Through his project The Bear, Álvaro Martínez shares some steps and tricks that will help you produce a 3D animation shot.
Through his project The Bear, Álvaro Martínez shares some steps and tricks that will help you produce a 3D animation shot.
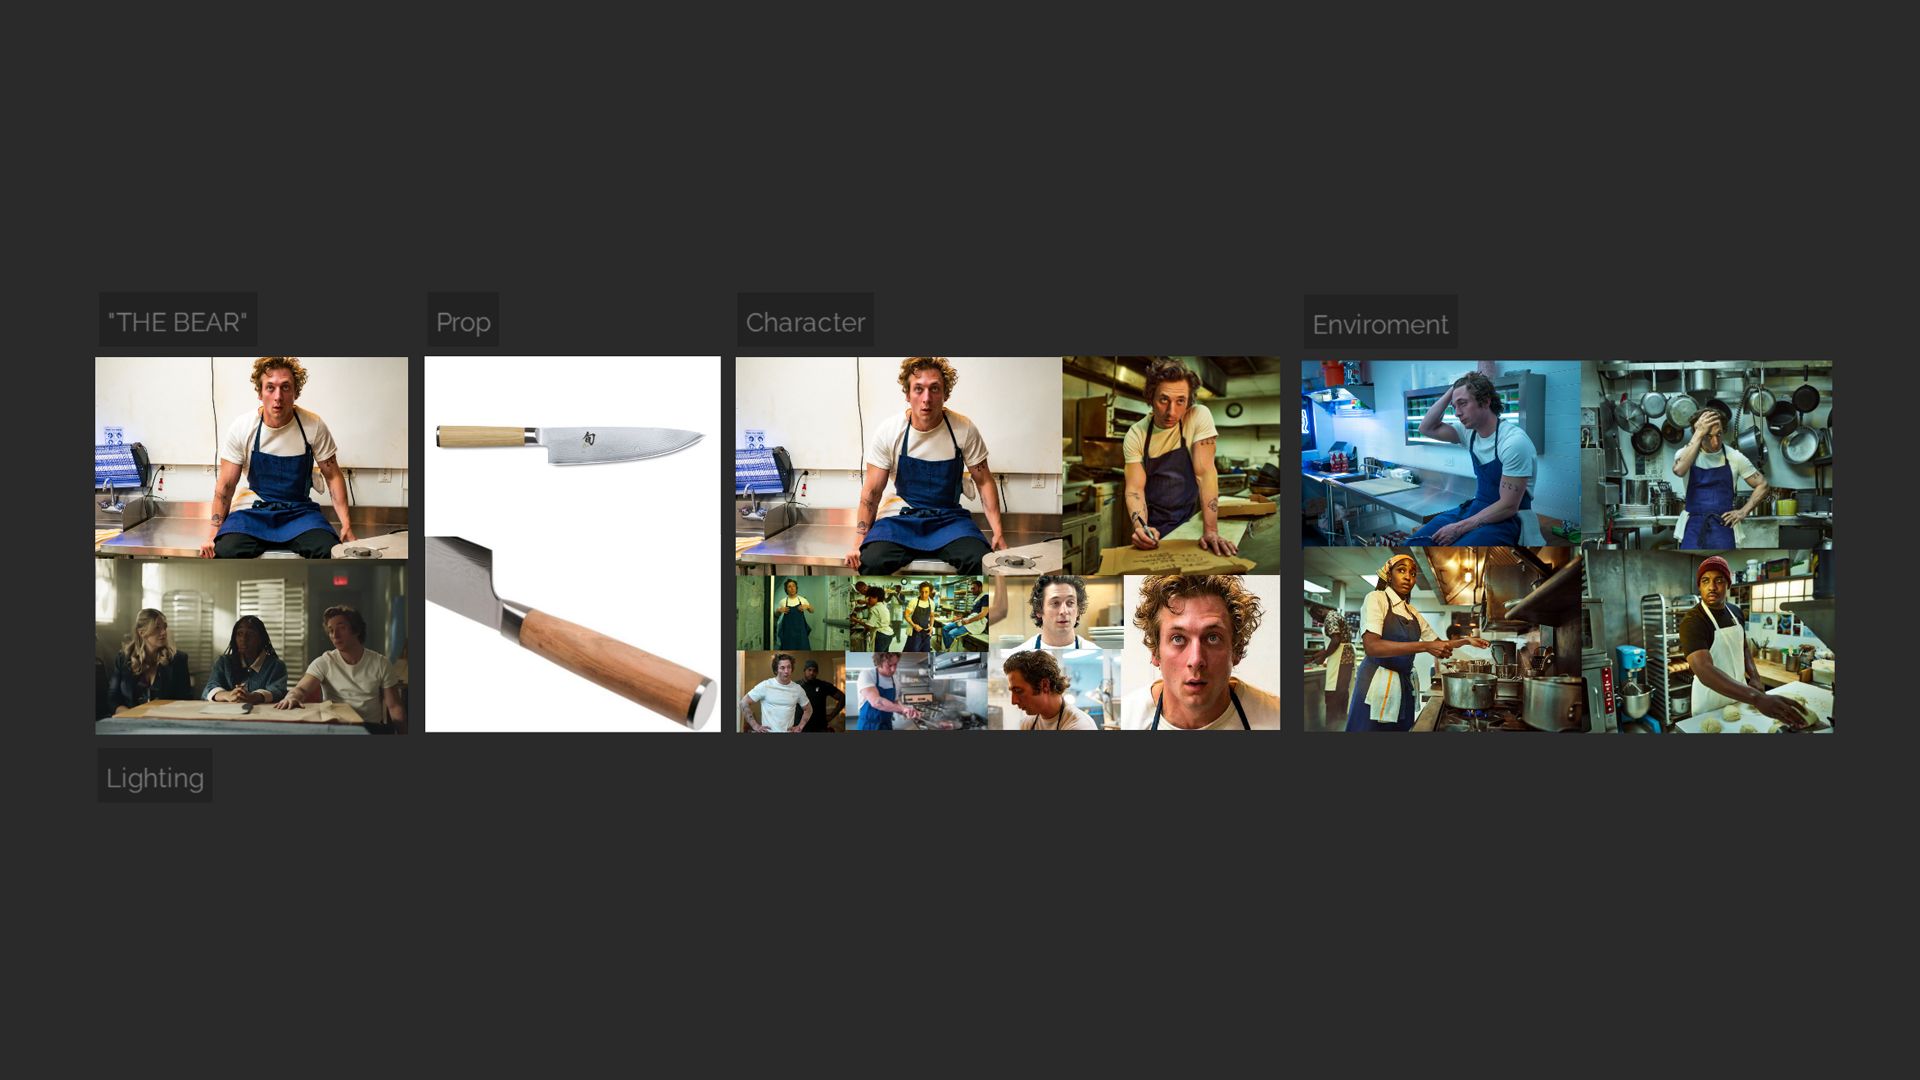
Animum Creativity Advanced School student Álvaro Martínez Martí created a short animation inspired by the TV series, 'The Bear'. In this article, he shares the entire animation pipeline, from look development to the final shot.
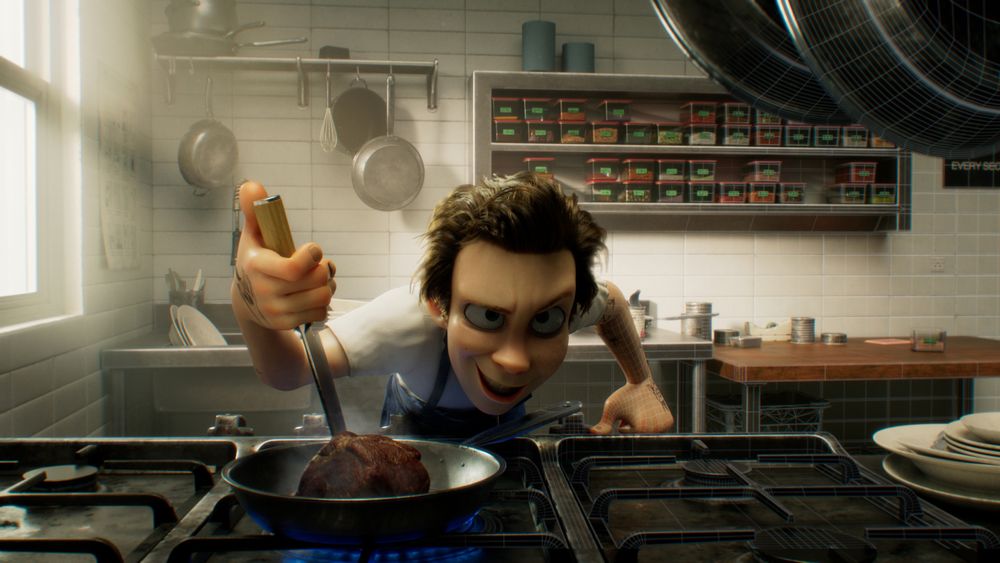
Hello everyone, today I present the process I followed for the production of a 3D animation shot and its lookdev from scratch through the final project titled: The bear. I will try to explain it step by step and you can see the final project on my profile on Rookies.
Every project, once it is decided to start production, begins to be detailed from the pre-production stage. In this initial phase, the entire creation process is planned. Depending on the ambition of the project, there will be more or fewer points to define and a practical method will be sought to solve them. In summary, the pre-production stage serves to anticipate problems and needs, it is crucial to establish the foundations and ensure that the project progresses effectively.
In my case, once the project was proposed and approved, a study and compilation of references were carried out through which the styles and elements needed to assemble the scene were defined. To create all the content, both 3D and VFX skills would be needed. The software chosen for use considering the needs of the project and delivery times were: PureRef, Maya, NCloth, XGen, Arnold, Marvelous Designer, Substance 3D Painter, NukeX and DaVinci Resolve.
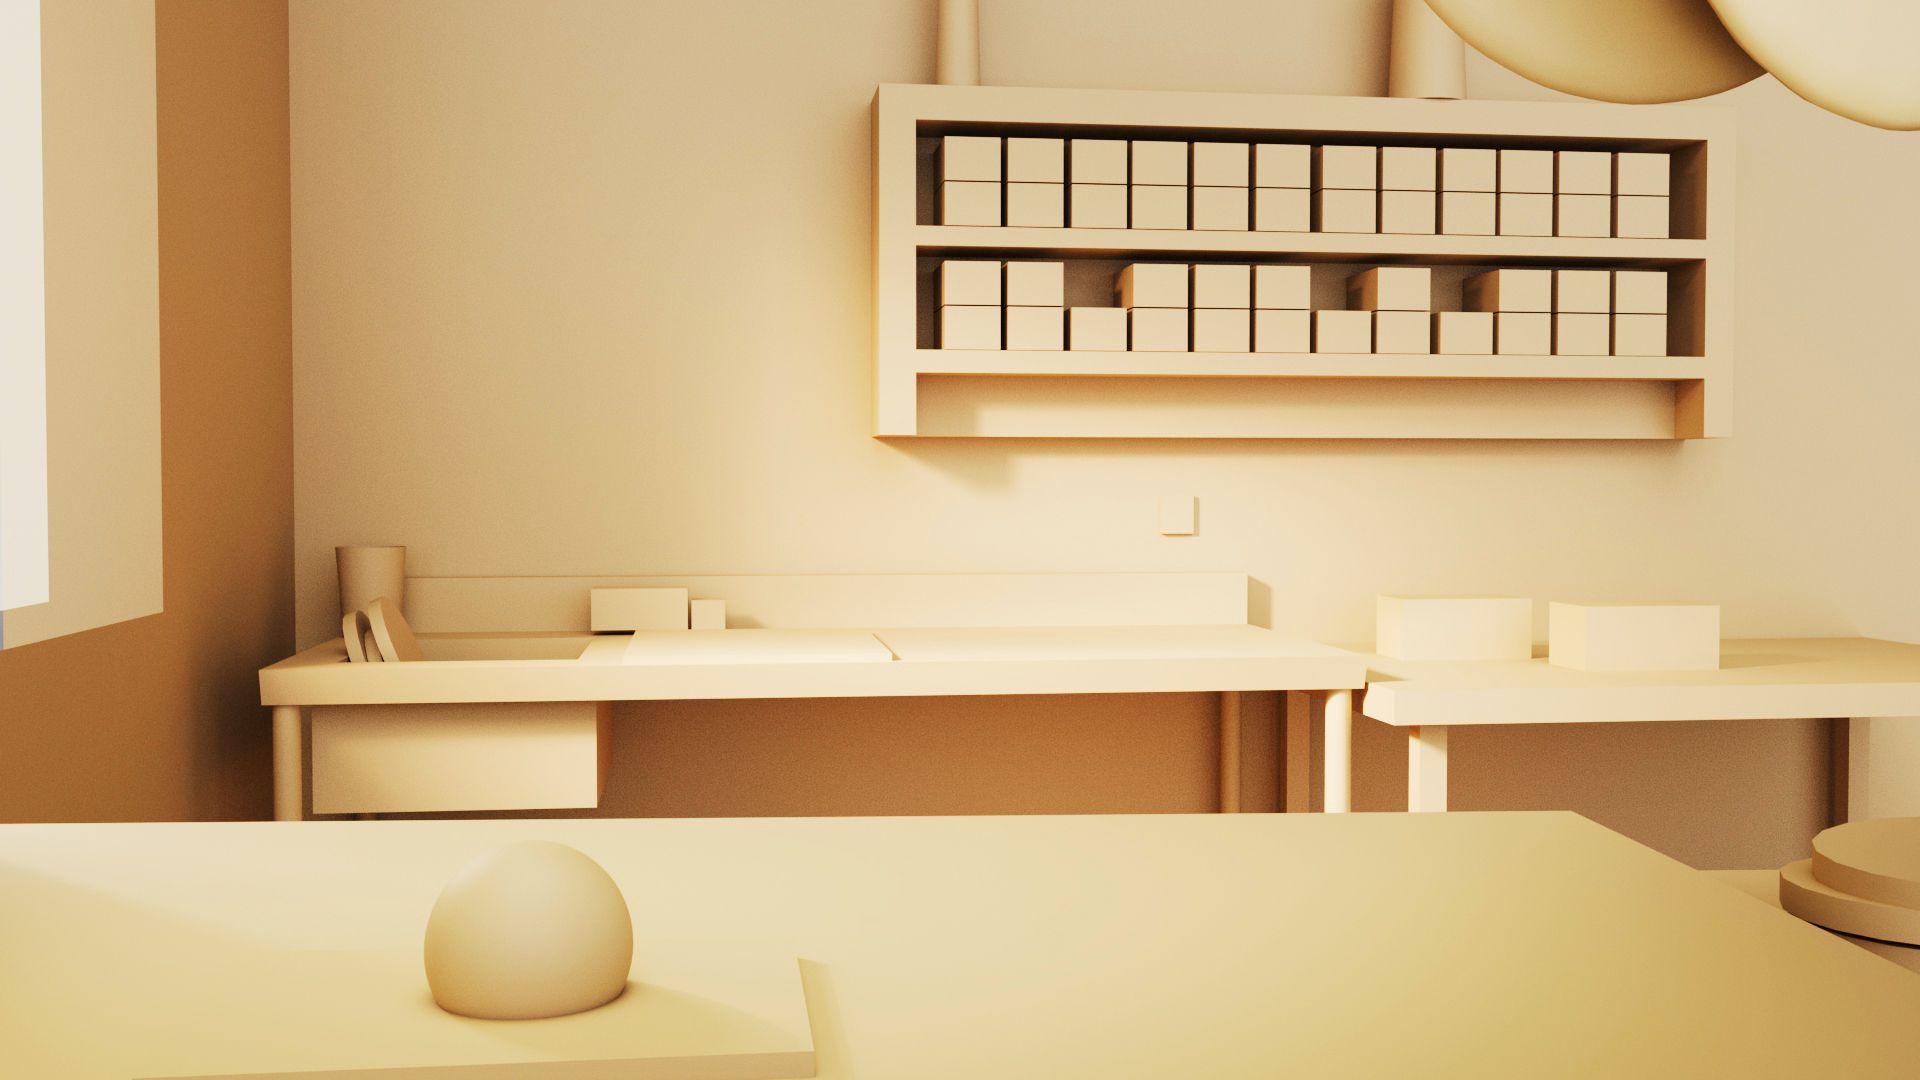
Blocking is essentially a 3D sketch, which is done to get a rough idea of the different elements that will be part of the scene and their dimensions, in it, I also established the camera shot. These elements have a very low resolution and do not have to be exact to our final result, since their functionality is to serve as a guide for development in the initial phases of the modeling, animation or VFX project.
In the initial modeling phase, I focused on constructing the environment. Using the blocking as a reference, I modeled most of the elements of the scene through polygonal modeling in Maya. As the modeling progressed, I made slight adjustments and additions that were not contemplated in the blocking so that everything would adapt better considering a more mature and worked set dressing. To finish filling gaps and gain more variety in the environment, a small library with external assets was generated to be incorporated into the scene.
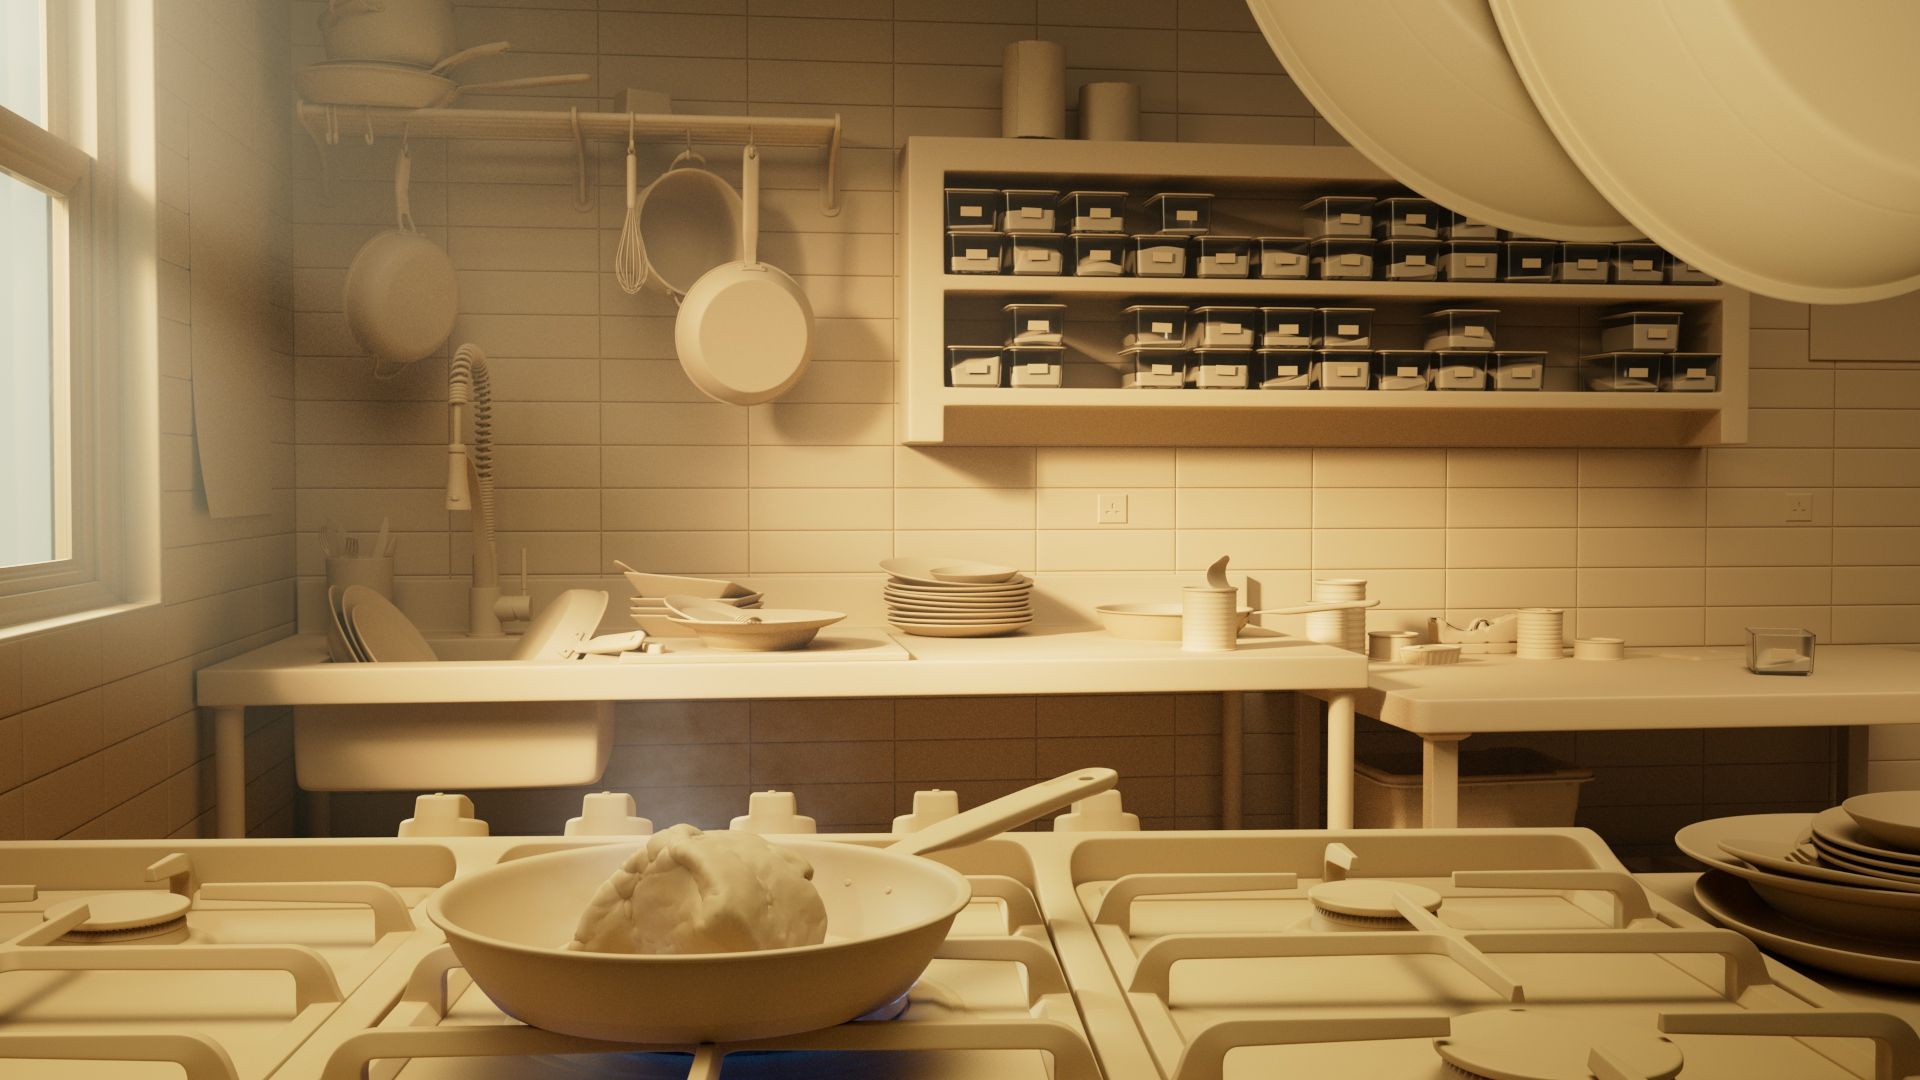
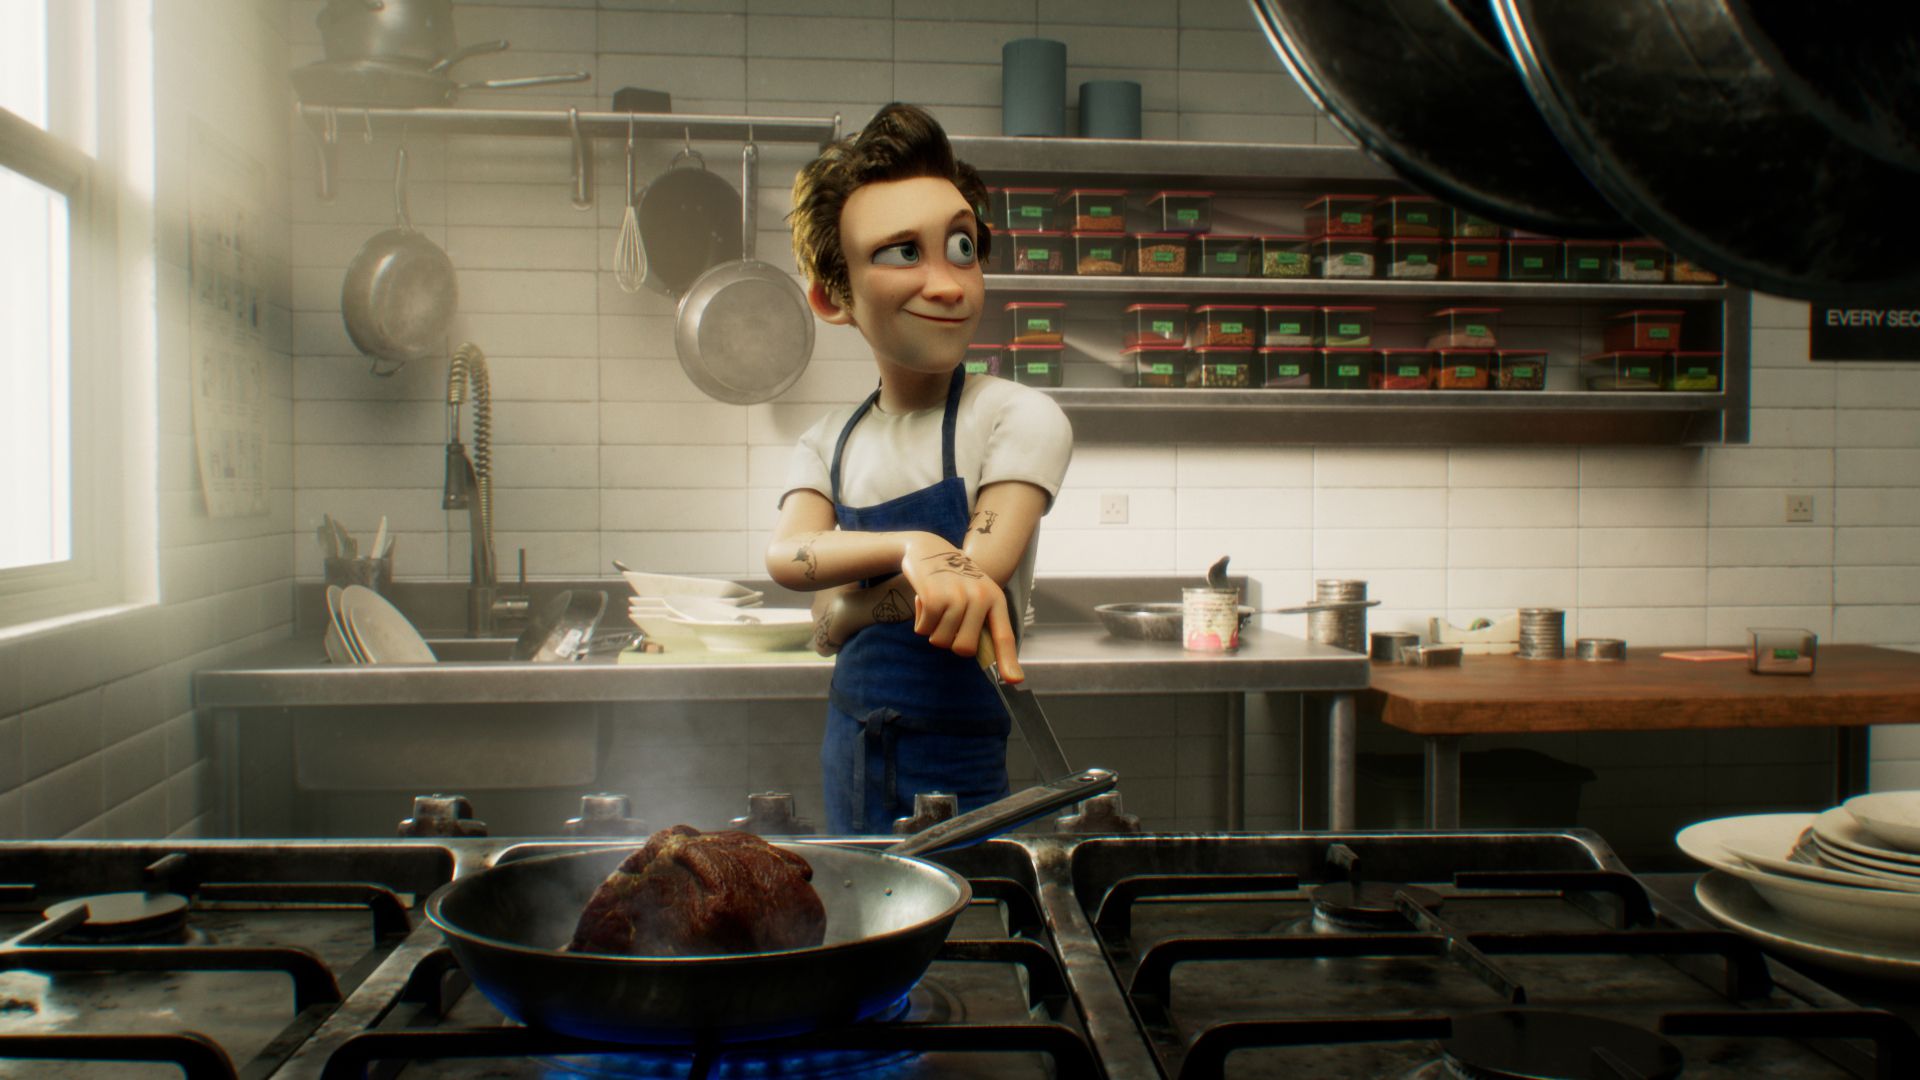
When modeling specific elements such as the set of kitchen fires, it is necessary to take into account the animation sequence so that the character interacts appropriately with the environment. In this case, I designed the kitchen stoves ensuring an adequate support area for the character’s hands and, at the same time, an interaction area with what is being cooked.

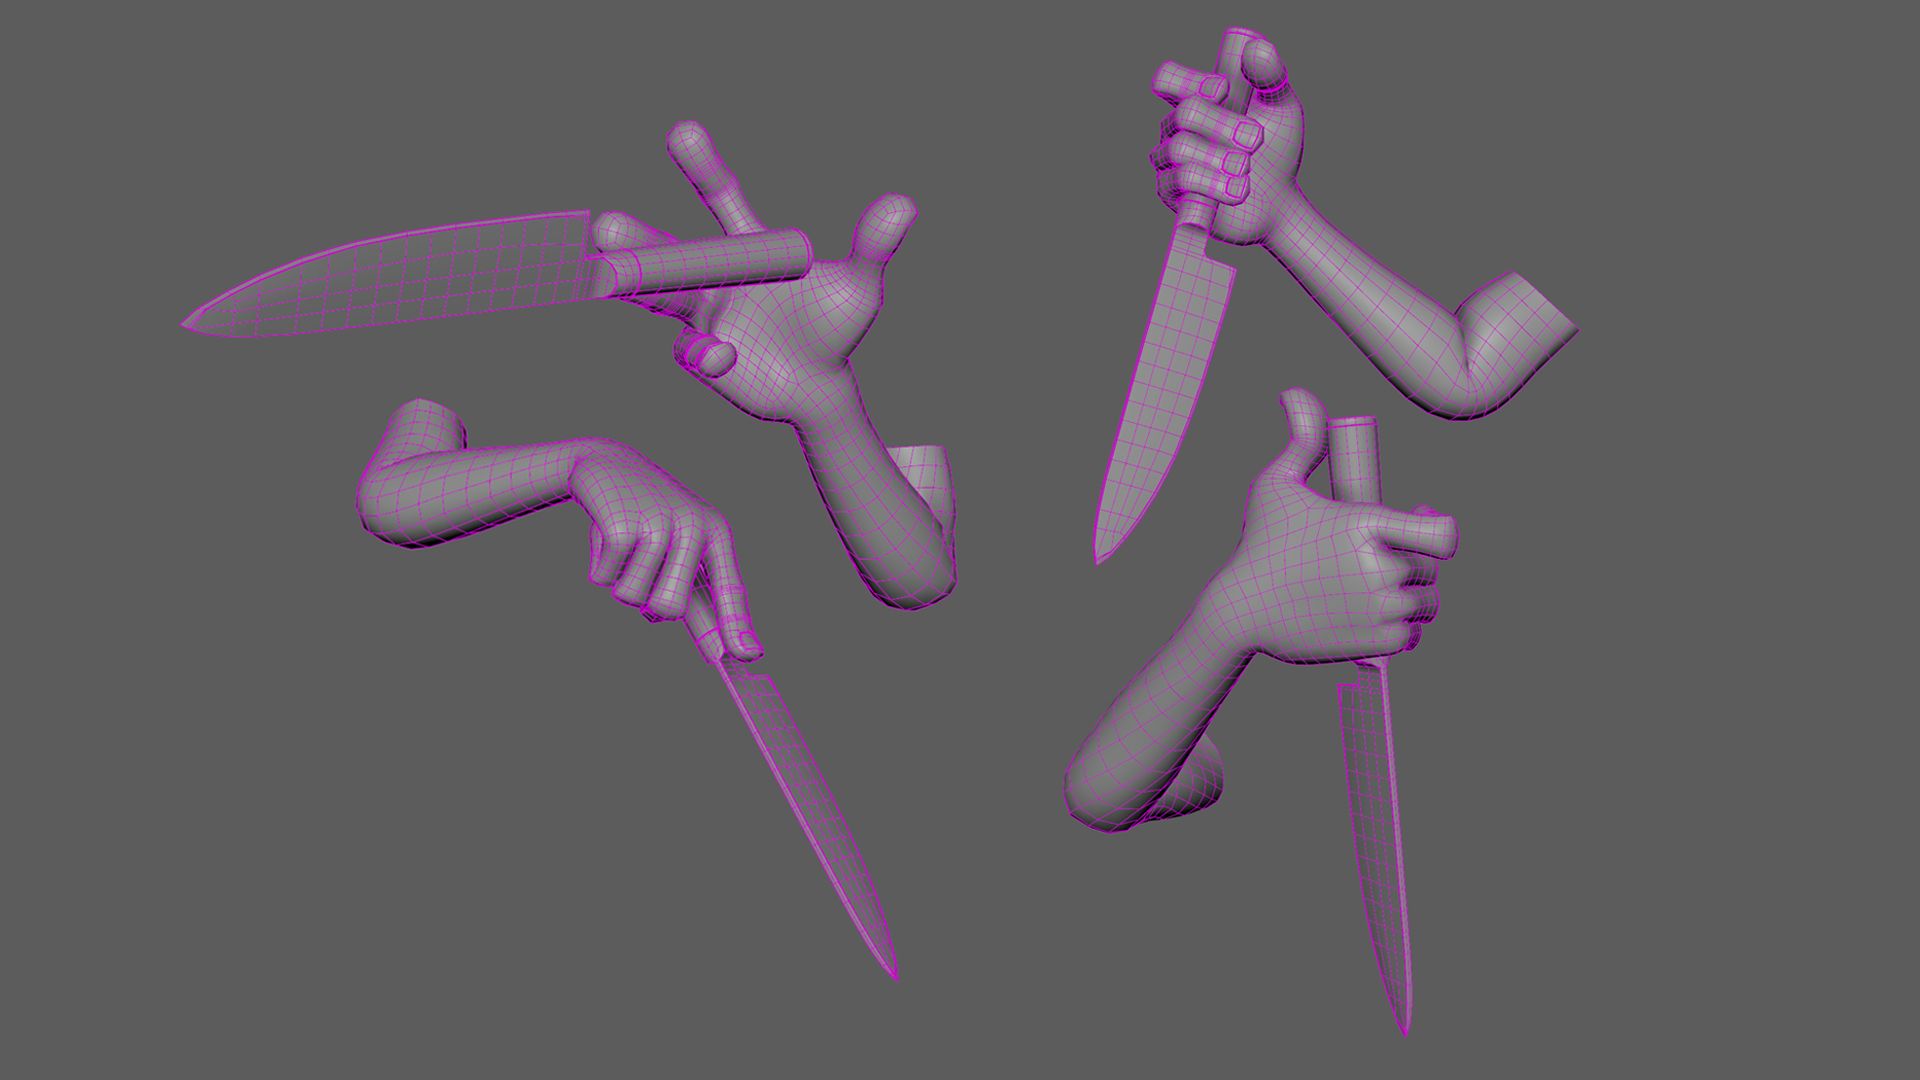
In the case of the knife, the main prop in the animation, it was also modeled considering other elements of the scene. Mainly, the geometry and proportions of the character were taken into account to ensure that the grip of the prop is ergonomic and integrates naturally with the character’s hand.
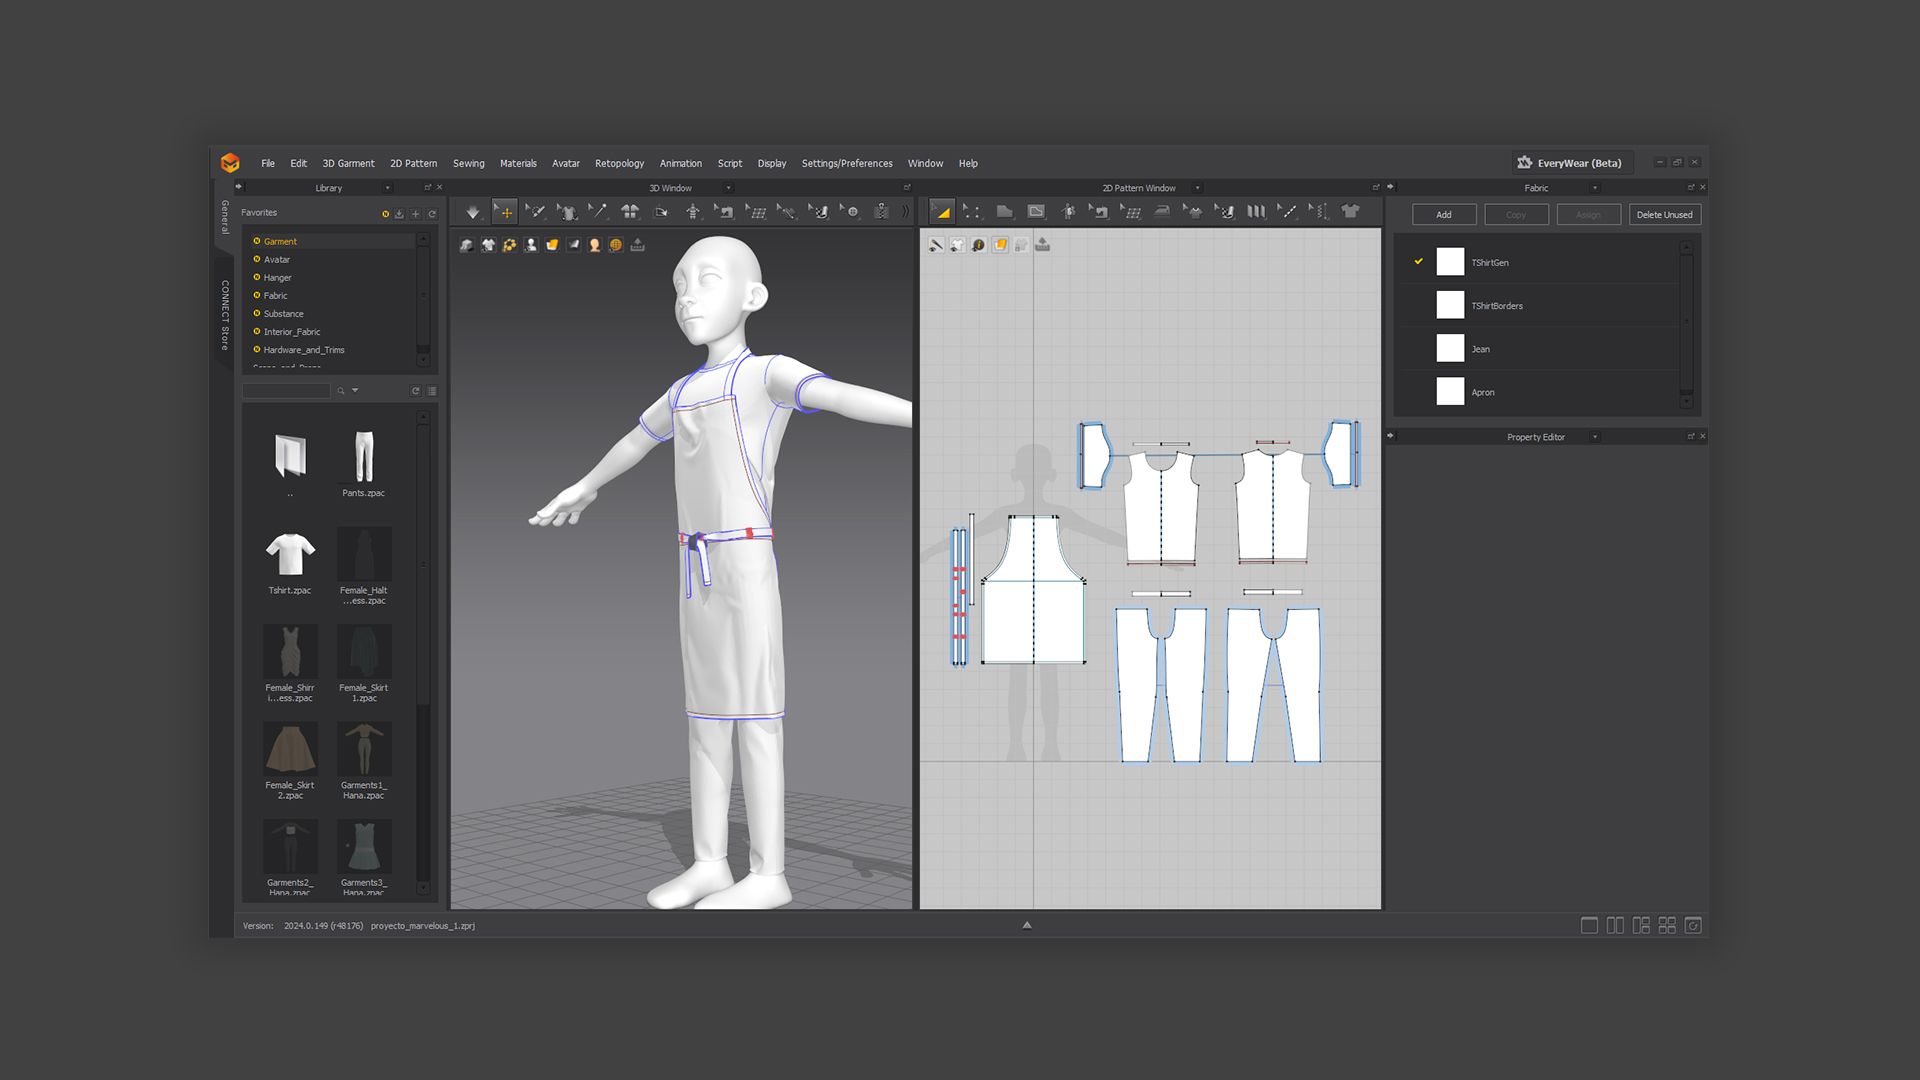
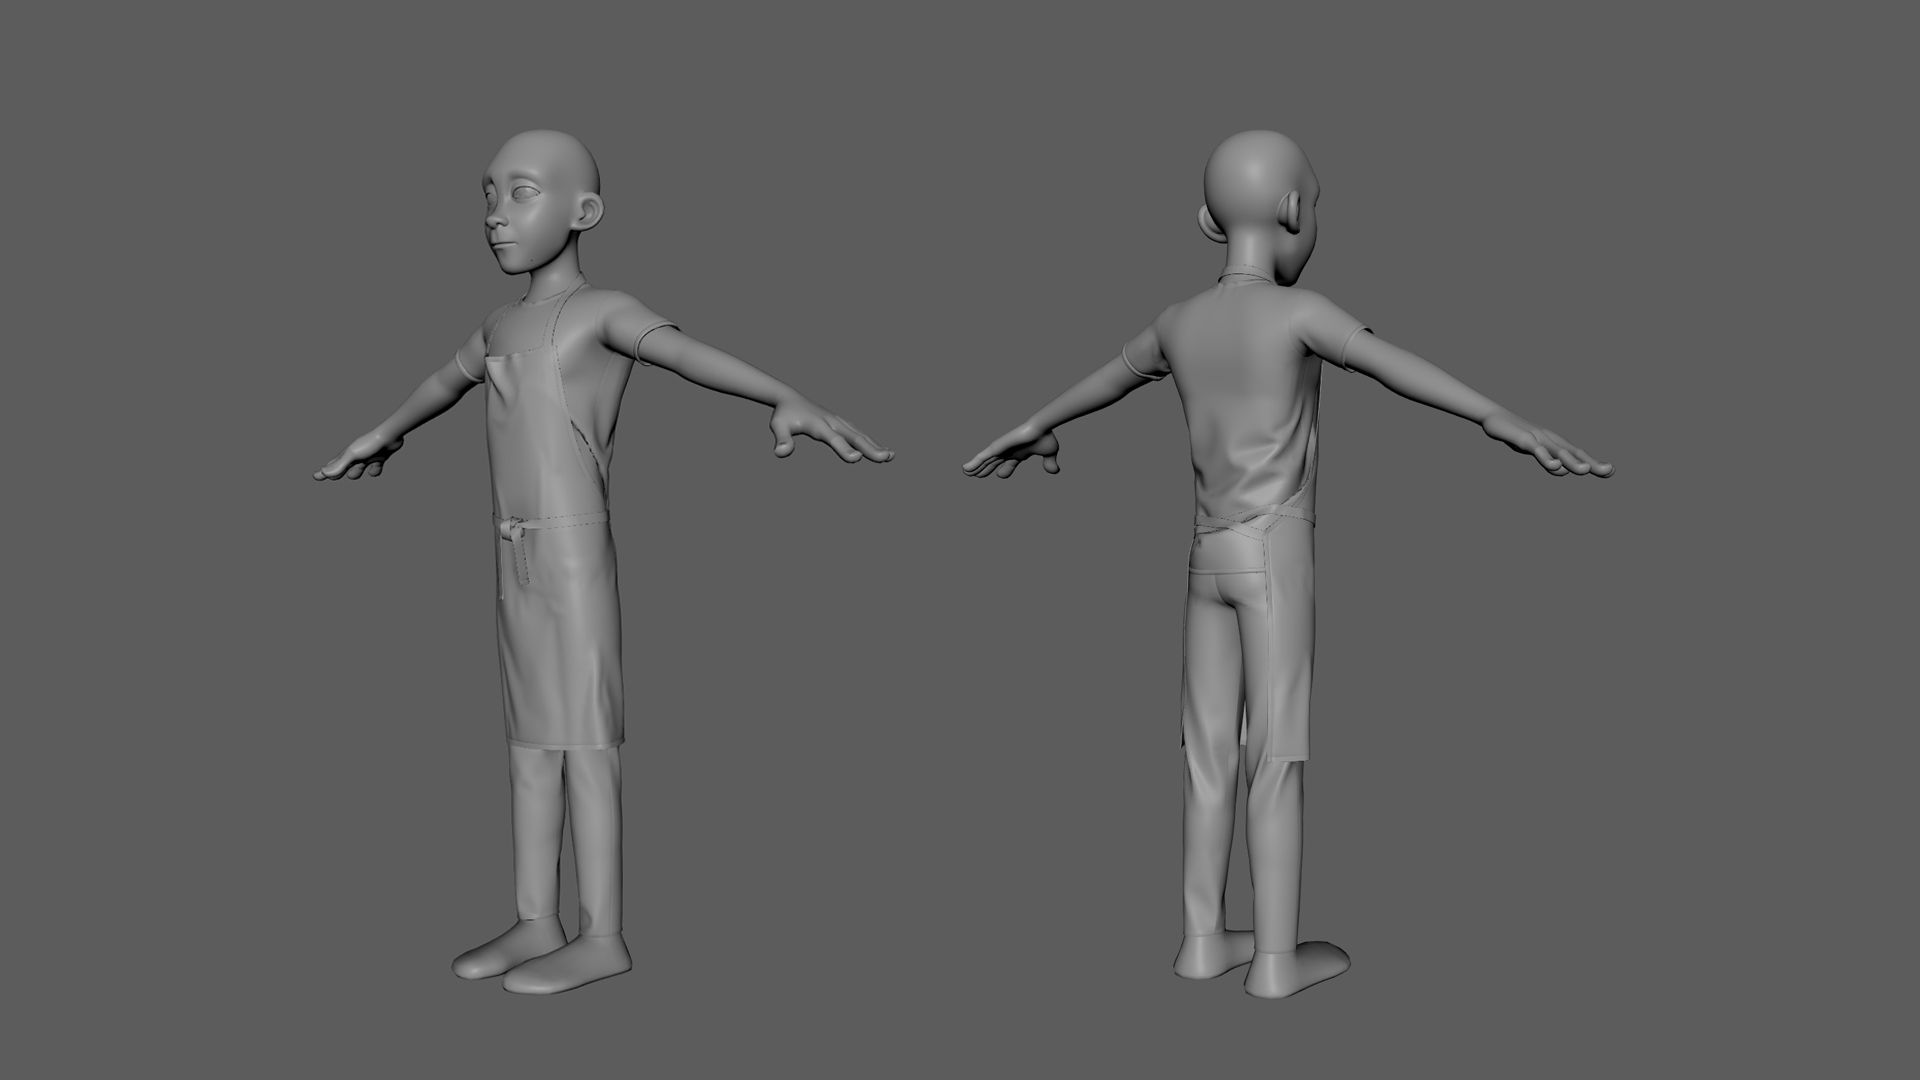
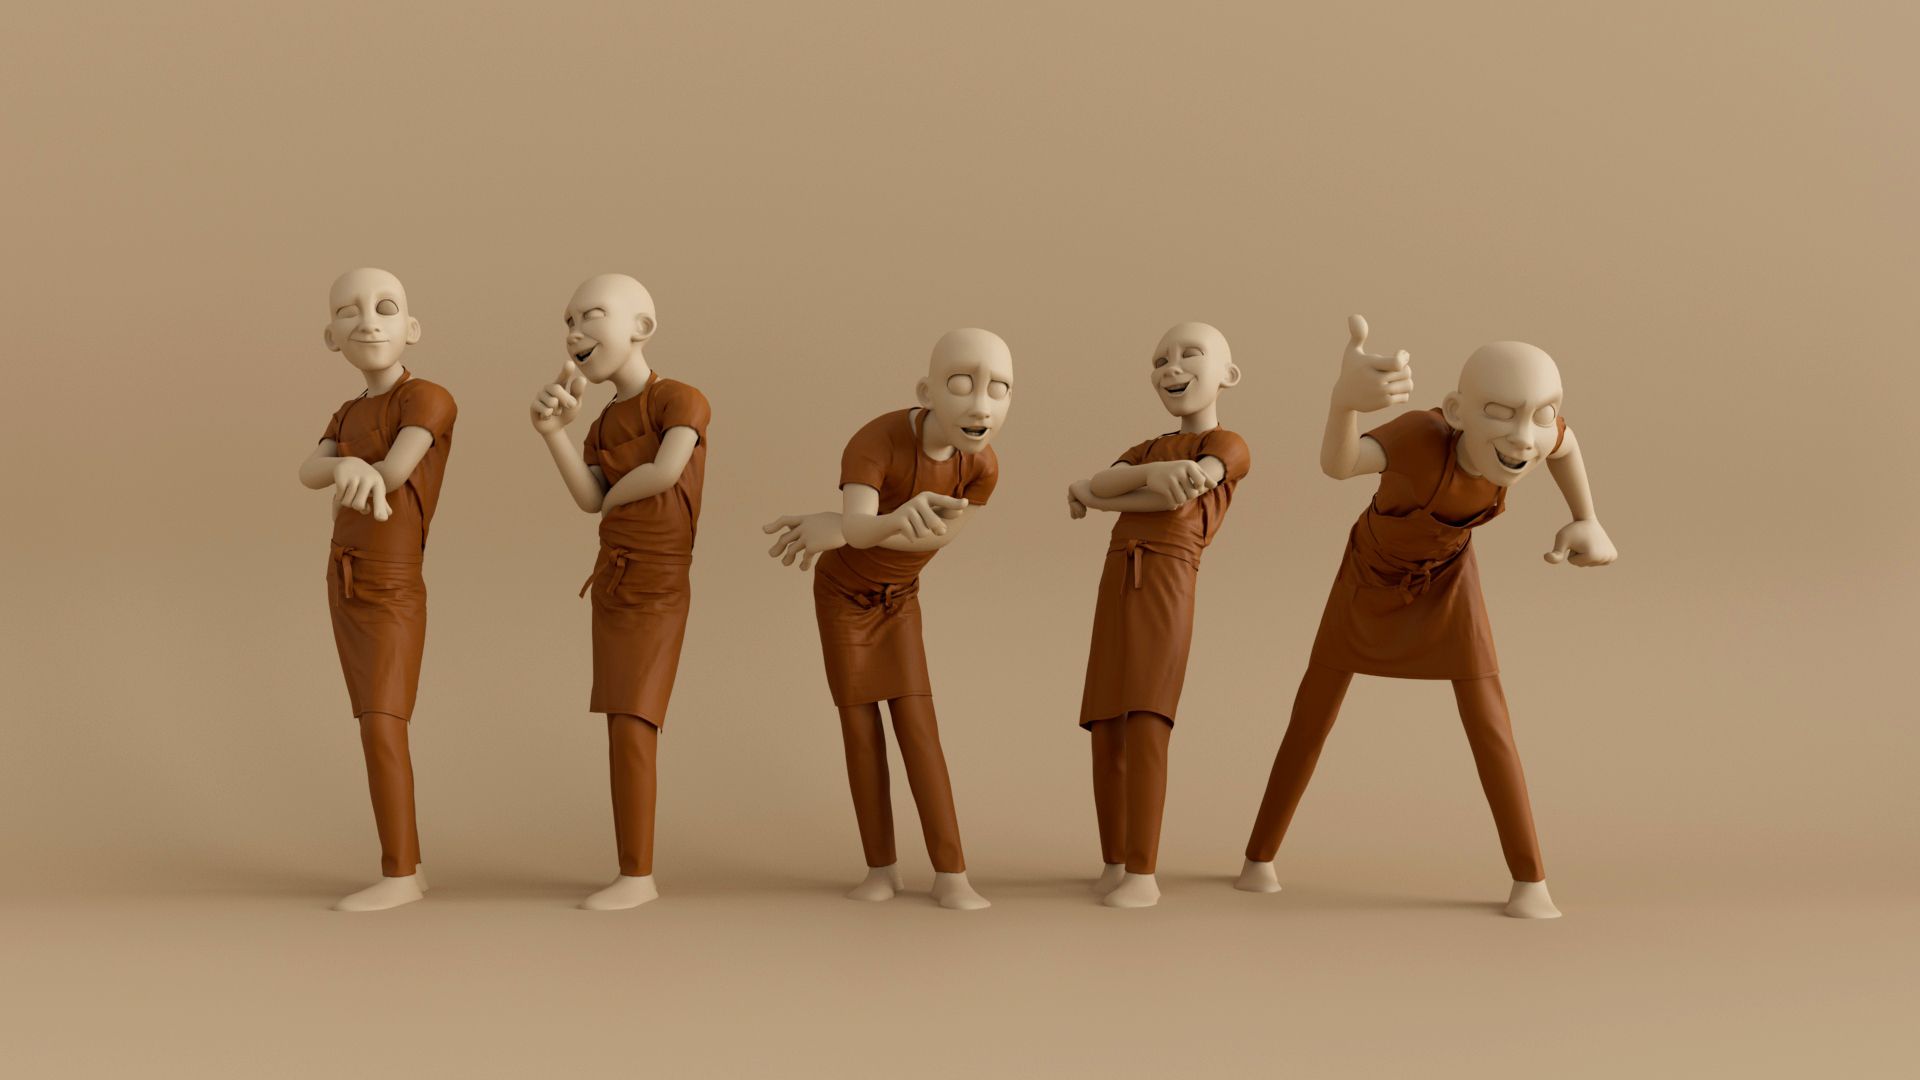
Next, I tackled the creation of clothing following the same methodology as in the prop. However, in this case, a specific software called Marvelous Designer was used, which allows modeling garments from clothing patterns. The set consists of three pieces: a pair of pants and a shirt, both quite simple, and an apron that presents some complexity due to its closure or knot. The knot was made by using anchor points and manually intertwining the two parts of the cord, just as you would with your home apron. Once the desired result has been achieved, the geometry is exported and then optimised through retopology in Maya. From this retopology, two variants are generated: a denser one with a double-sided design intended for rendering and texturing, and a simpler single-sided one to speed up calculations in fabric simulation.
During this phase, meticulous work is done to ensure that visual elements, such as fabrics, behave realistically and integrate coherently into the animation.
Starting from the initial simulation mesh, the fabrics are simulated using NCloth dynamics in Maya. During this process, I encountered some complications due to the abrupt changes in pace present in the animation. These sudden changes caused breaks in the simulation meshes.
To address this issue, as the animation progressed, I made adjustments to the character’s mesh using delta mush deformers in the most subtle way possible so that the viewer does not perceive these adjustments, as they are not at all natural. At the same time, to achieve a smooth and as realistic as possible simulation, it was essential to carefully fine-tune the dynamics parameters considering some very specific frames of the animation. With this strategy, I was able to correct the imperfections of the simulation without affecting the visual perception of the viewer, achieving a more authentic and realistic animation.
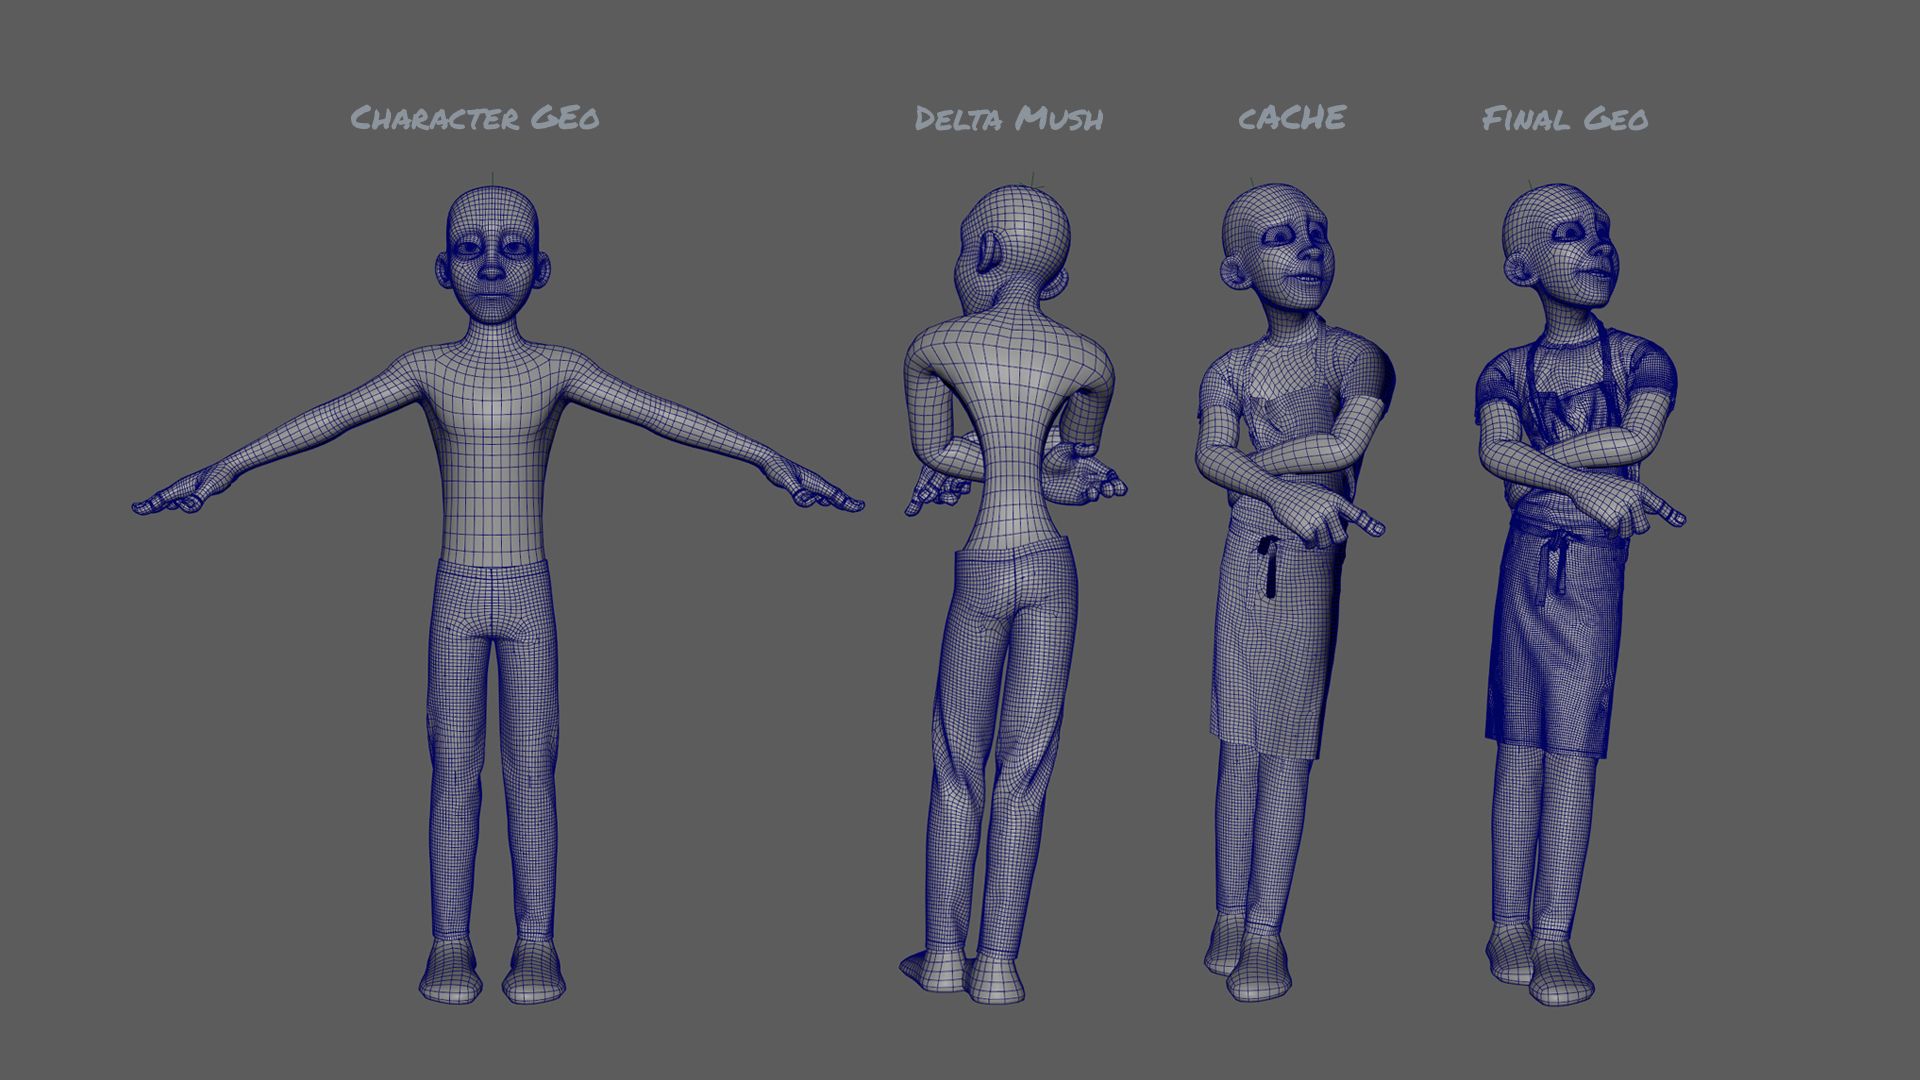
Once the simulation was achieved, we exported the final caches. These cache files optimise our computer’s resources by storing the simulation data, thus preventing the computer from constantly calculating the physics of the simulation. Thus, in the final render files, we can reproduce the animation efficiently and allocate the computer’s resources to other tasks such as lighting. The export of caches is essential to improve the efficiency and quality of the final animation.
To add an even more realistic touch, a small simulation was also incorporated into the meat. This was done so that when the character interacts with it, its movement and behavior are even more authentic.
The grooming process with XGen is meticulous and requires attention to detail to achieve convincing hair. In this case, to create and shape the hair, I used the tool within Maya. To begin the process, a scalp was generated from the base mesh of the character.
Next, guides are placed that will dictate the flow, length, and direction of the base hair on the scalp. I divided these guides into five different collections based on their position, length, and shape (1. bangs and front, 2. crown and nape, 3. sideburns, 4. eyebrows, and 5. eyelashes).
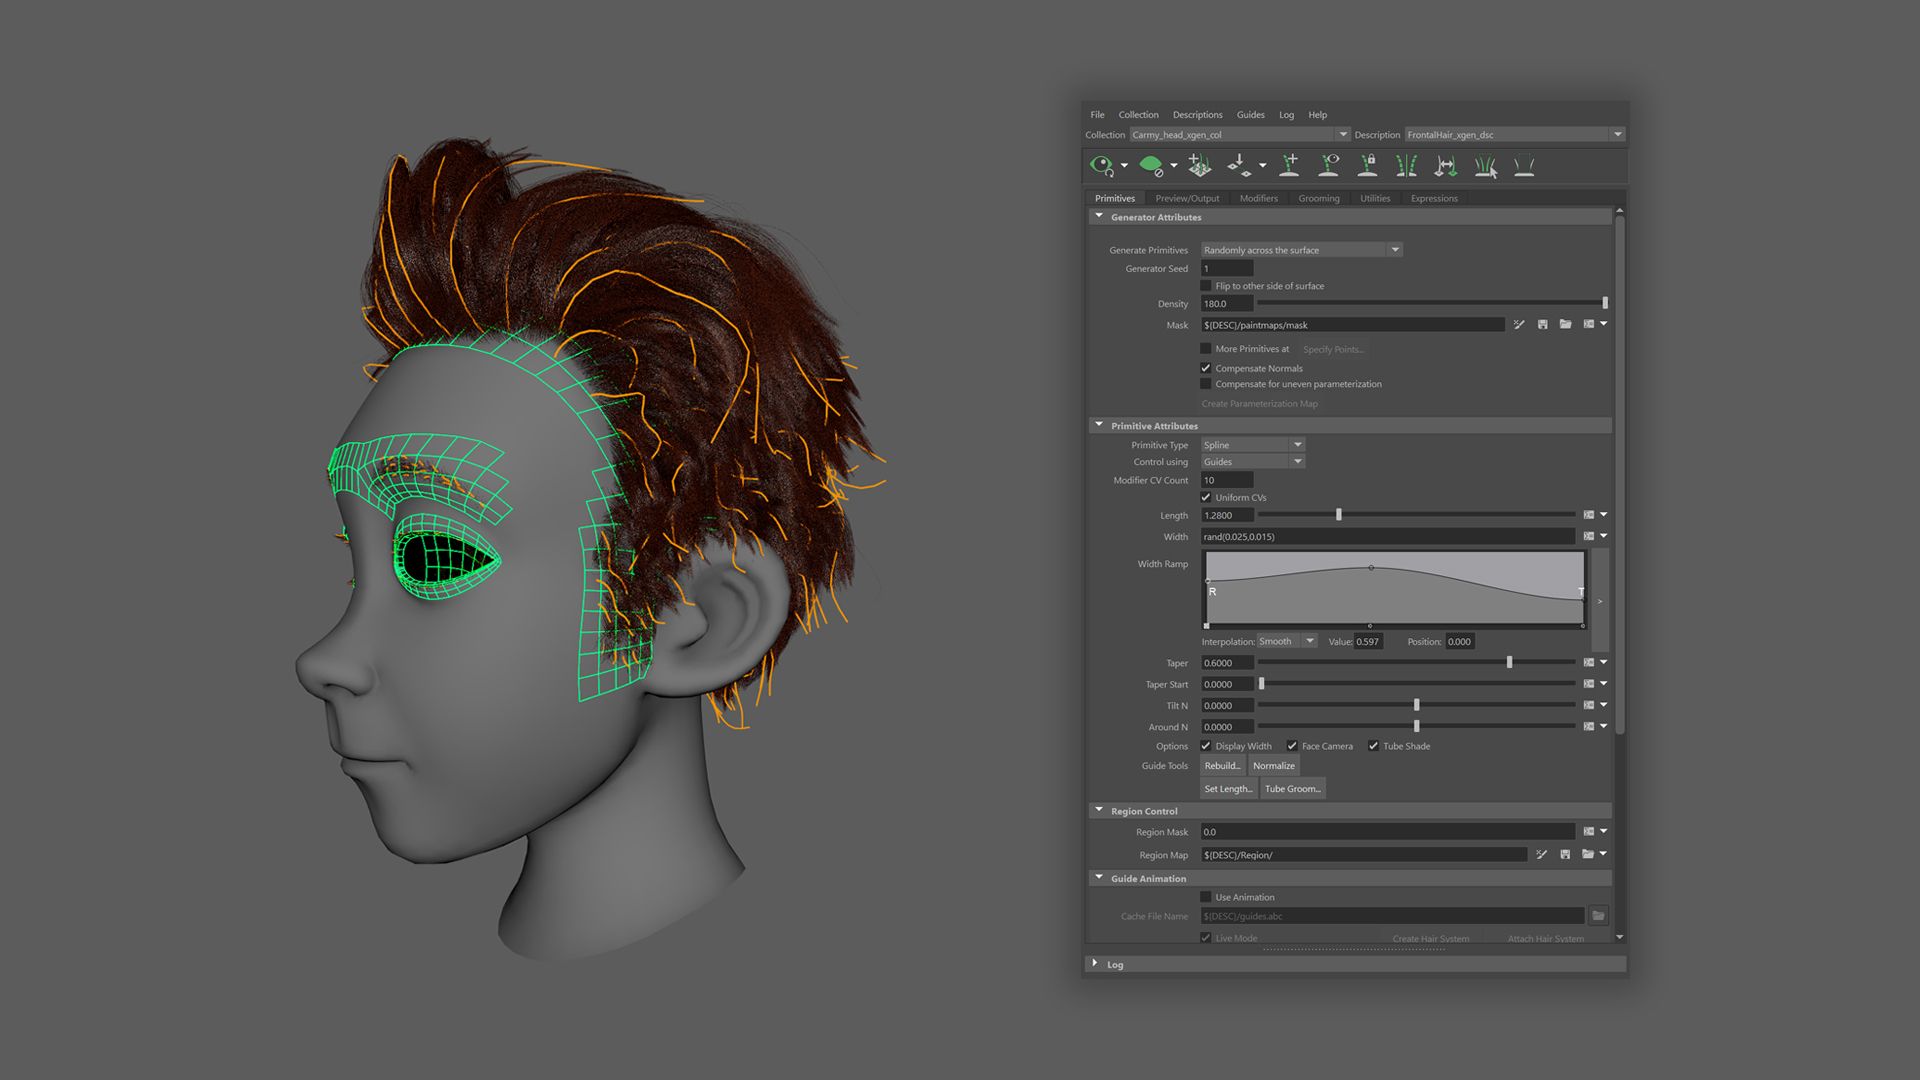
Once the guides are in place, the process of refining the hair’s shape begins. This is achieved through density maps, modifiers, expressions, etc. Through the density maps, I control the amount of hair in specific areas of the scalp, that is, I decide where the hair should be denser or more sparse. For example, we can have a higher density at the crown, less on the sideburns, and none on the eyebrows. These maps can be based on textures or manual paintings. Finally, through modifiers, certain hair parameters such as length, hair thickness, curvature, tufts, waviness, and more are adjusted… These modifiers can and should be combined with mathematical expressions and density maps to achieve more organic or natural results.
Adding simulation to the hair would have added more visual richness to the sequence. Simulation exercises were carried out, but I had to optimize times and decided to propose a much more rigid or slicked hair.
UV coordinates are the flat projection of a three-dimensional model and without them, it is complicated to map textures properly onto 3D surfaces. Therefore, in this phase, it is essential to have them defined. In my case, I have grouped the different geometries using two different methods according to the needs of each geometry: UDIMs and independent UVs. Independent UVs have only one set of UV coordinates while UDIMs involve dividing the texture into multiple sets of coordinates, which means we gain higher resolution, but also greater weight and resource consumption.
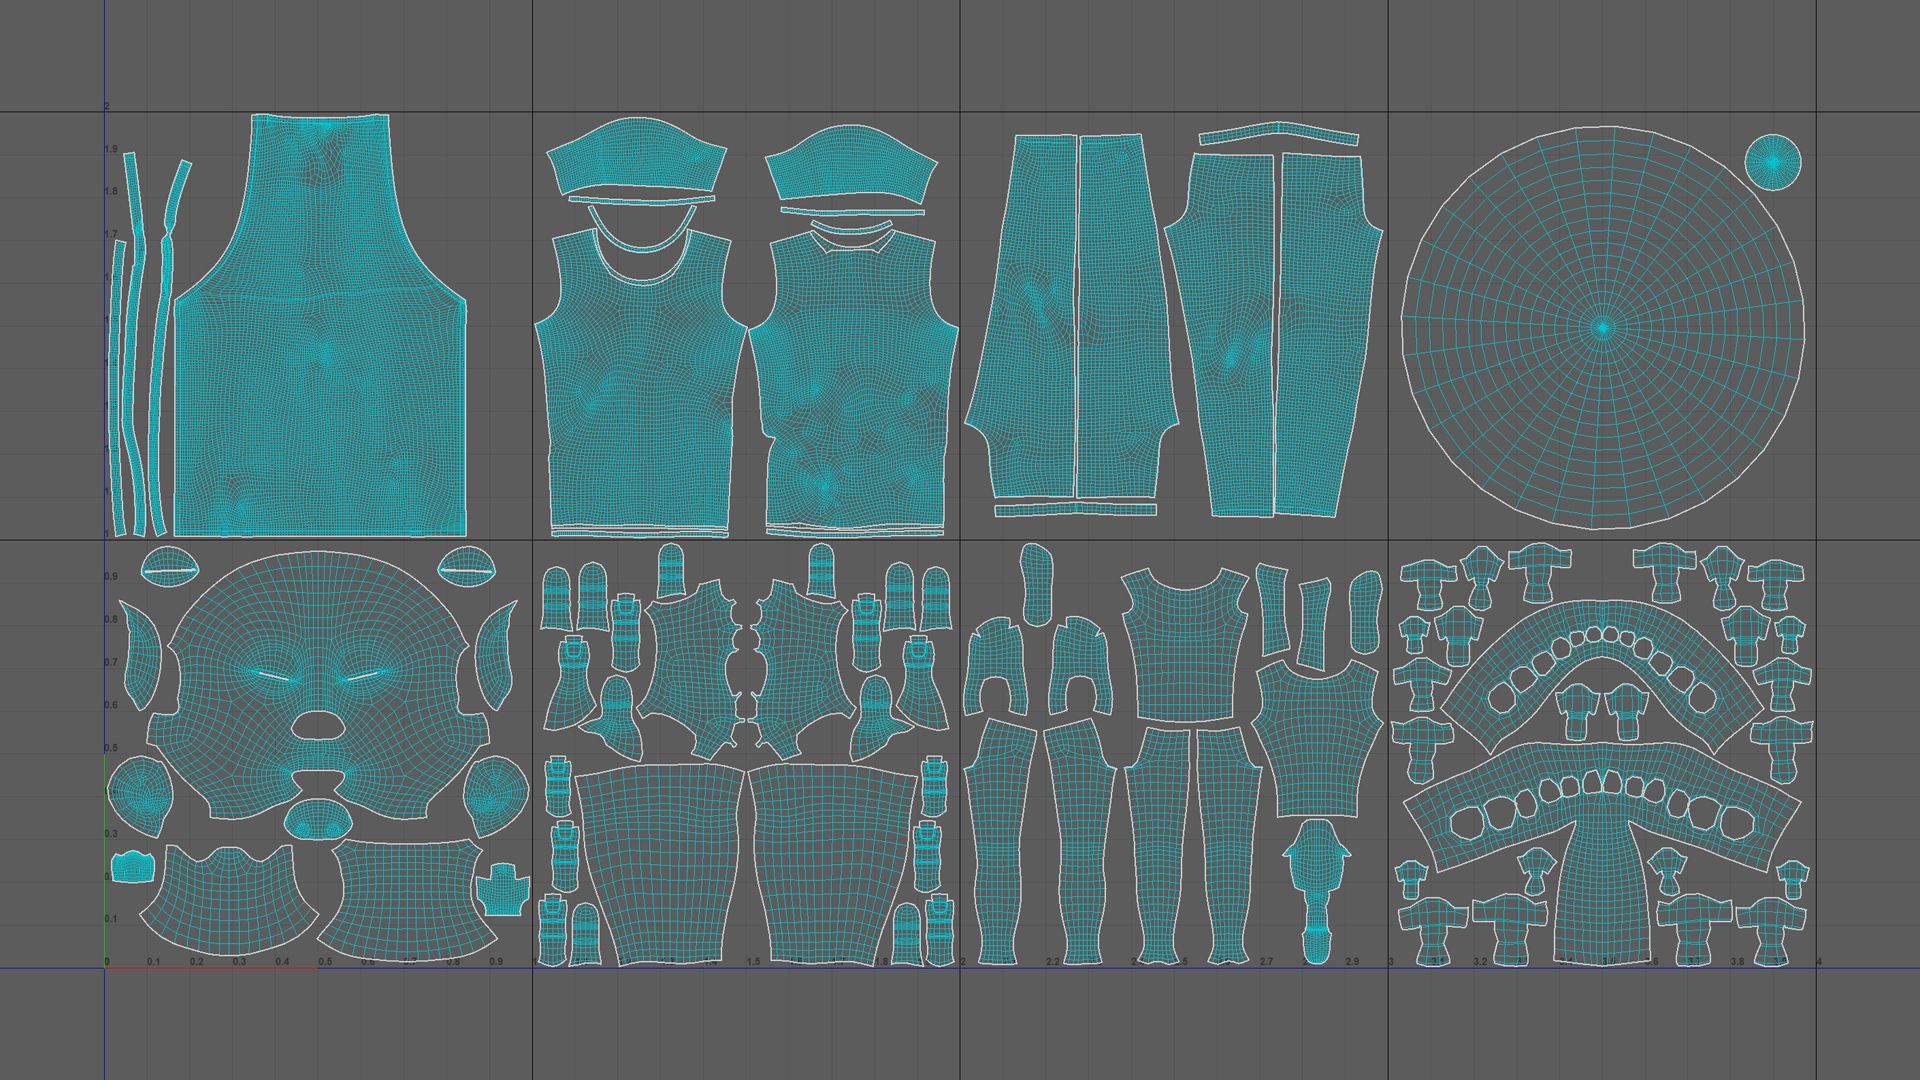
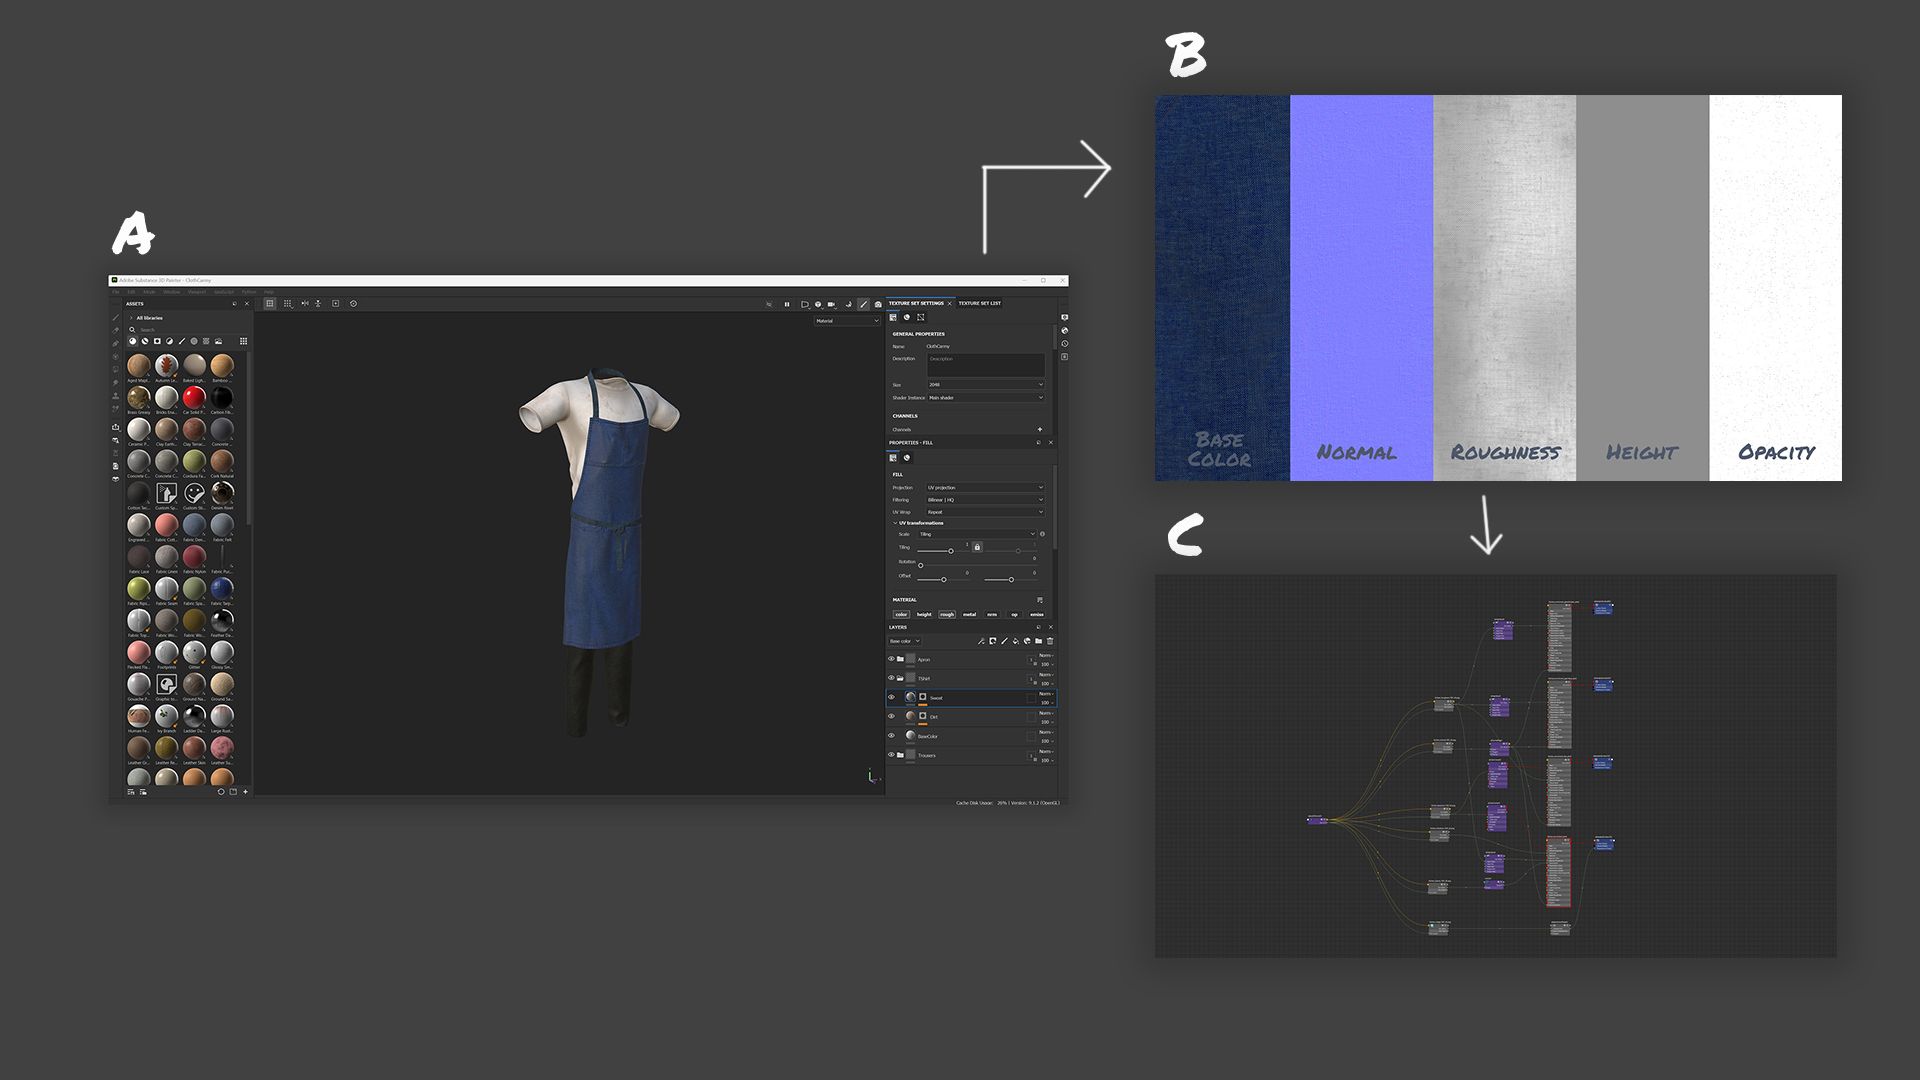
Once we have the UV coordinates and the geometries ready, we proceed to prepare the models for texturing. In my case, I export the geometries in Fbx files to import them later in Substance 3D Painter. From there, I begin the baking process and make sure that the models are ready to receive textures without any problem. Then, the details are painted, mainly taking into account the functioning of the roughness, specular, opacity, base colour and metalness maps. Once the textures are finished, the different maps are exported and we go to Maya, where we configure the shadings for each object where the renders would be done using the Arnold rendering engine.
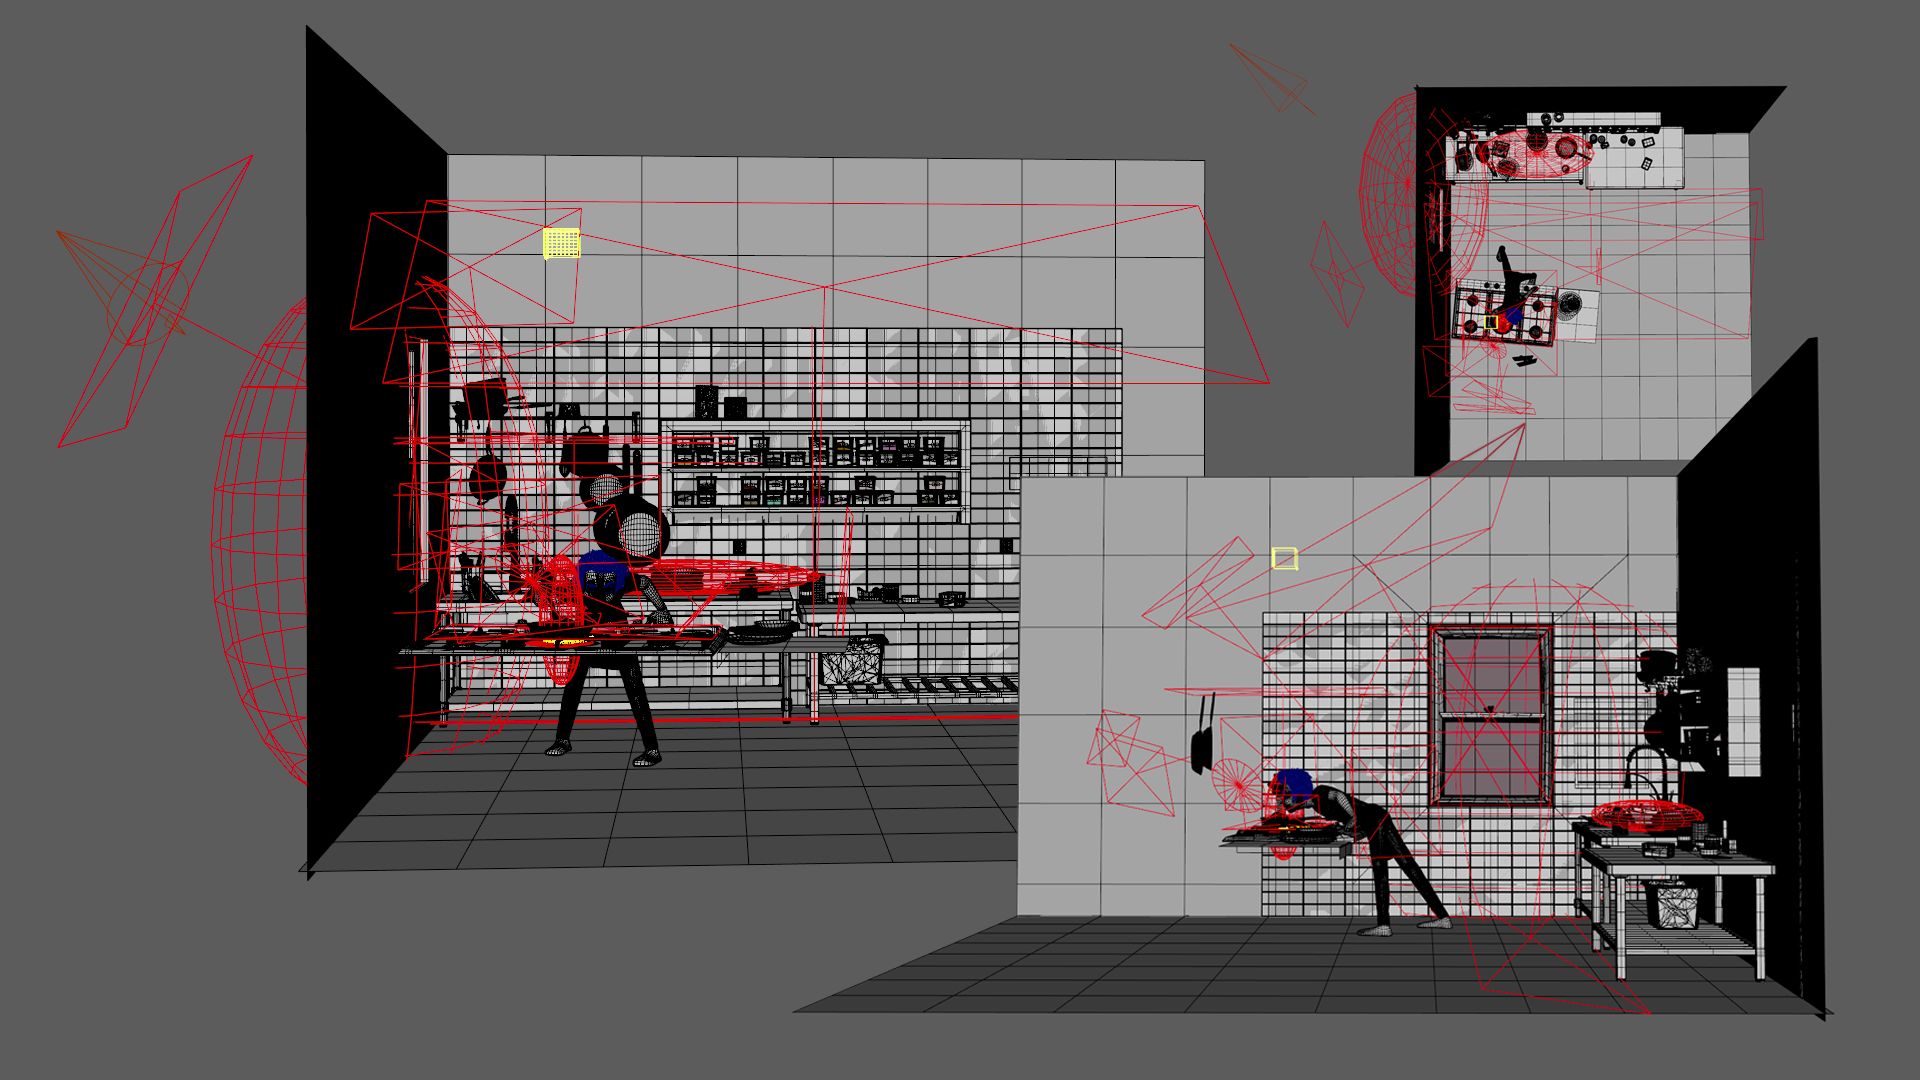
At this point, we have all the elements ready for rendering, but in separate files. To finalise the assembly, we must join all the pieces of the puzzle in a new Maya scene where we will proceed to light and prepare the different render passes.
Once all the geometries are referenced in the new scene, we need to import the animation caches. These caches will be hidden and attached to the base geometry of the character, the clothing, and the meat using a wrap deformer. In this way, our geometry now has movement in a very economical way when processing the render since it does not have to calculate physics. In the case of the prop, the animation has been added using another method. Here a locator has been used that tracks all movements of position and rotation. Then, through a constraint, the geometry of the prop is associated with the locator so that it follows the movement of the character in all directions. With everything assembled, before lighting, we make sure that everything is well set up and works correctly.
From this point on, we must be very careful with the lighting and later in post-production, as at these stages we can either enhance or harm our work if done poorly. To light, a scene from the original series was taken as a reference. In the scene, we identify three types of lights: SkyDome light, Spot Light, and Area lights. Each of these light sources plays a crucial role in creating the atmosphere and visual impact of the final image. It is essential to consider their position, intensity, and colour temperature to achieve the desired effect.
We use SkyDome Light to control the minimum ambient lighting of the scene, which helps us avoid pure blacks, especially in shadow areas. On the other hand, I mainly used Spot Lights to introduce intense lights coming from the window, creating a perimeter light effect, which generates both a subtle rim on the character and a natural light that bathes part of the kitchen.
Finally, with the Area Lights, I complete the lighting of the scene, always keeping in mind the animation sequence to introduce light variations that correspond with the different moments of the animation. Additionally, I also generate volumetric lights independently, which allows me to create specific details and add more depth to the scene. The reason for doing the volumetrics separately is to maintain more precise control during the post-production stage. As a curiosity, I’ll tell you that sometimes I duplicate lights while maintaining their position to adjust their aperture and intensity; this way, I manage to create a halo of light that generates light pollution to the main light, which in my opinion, adds warmth to the scene.
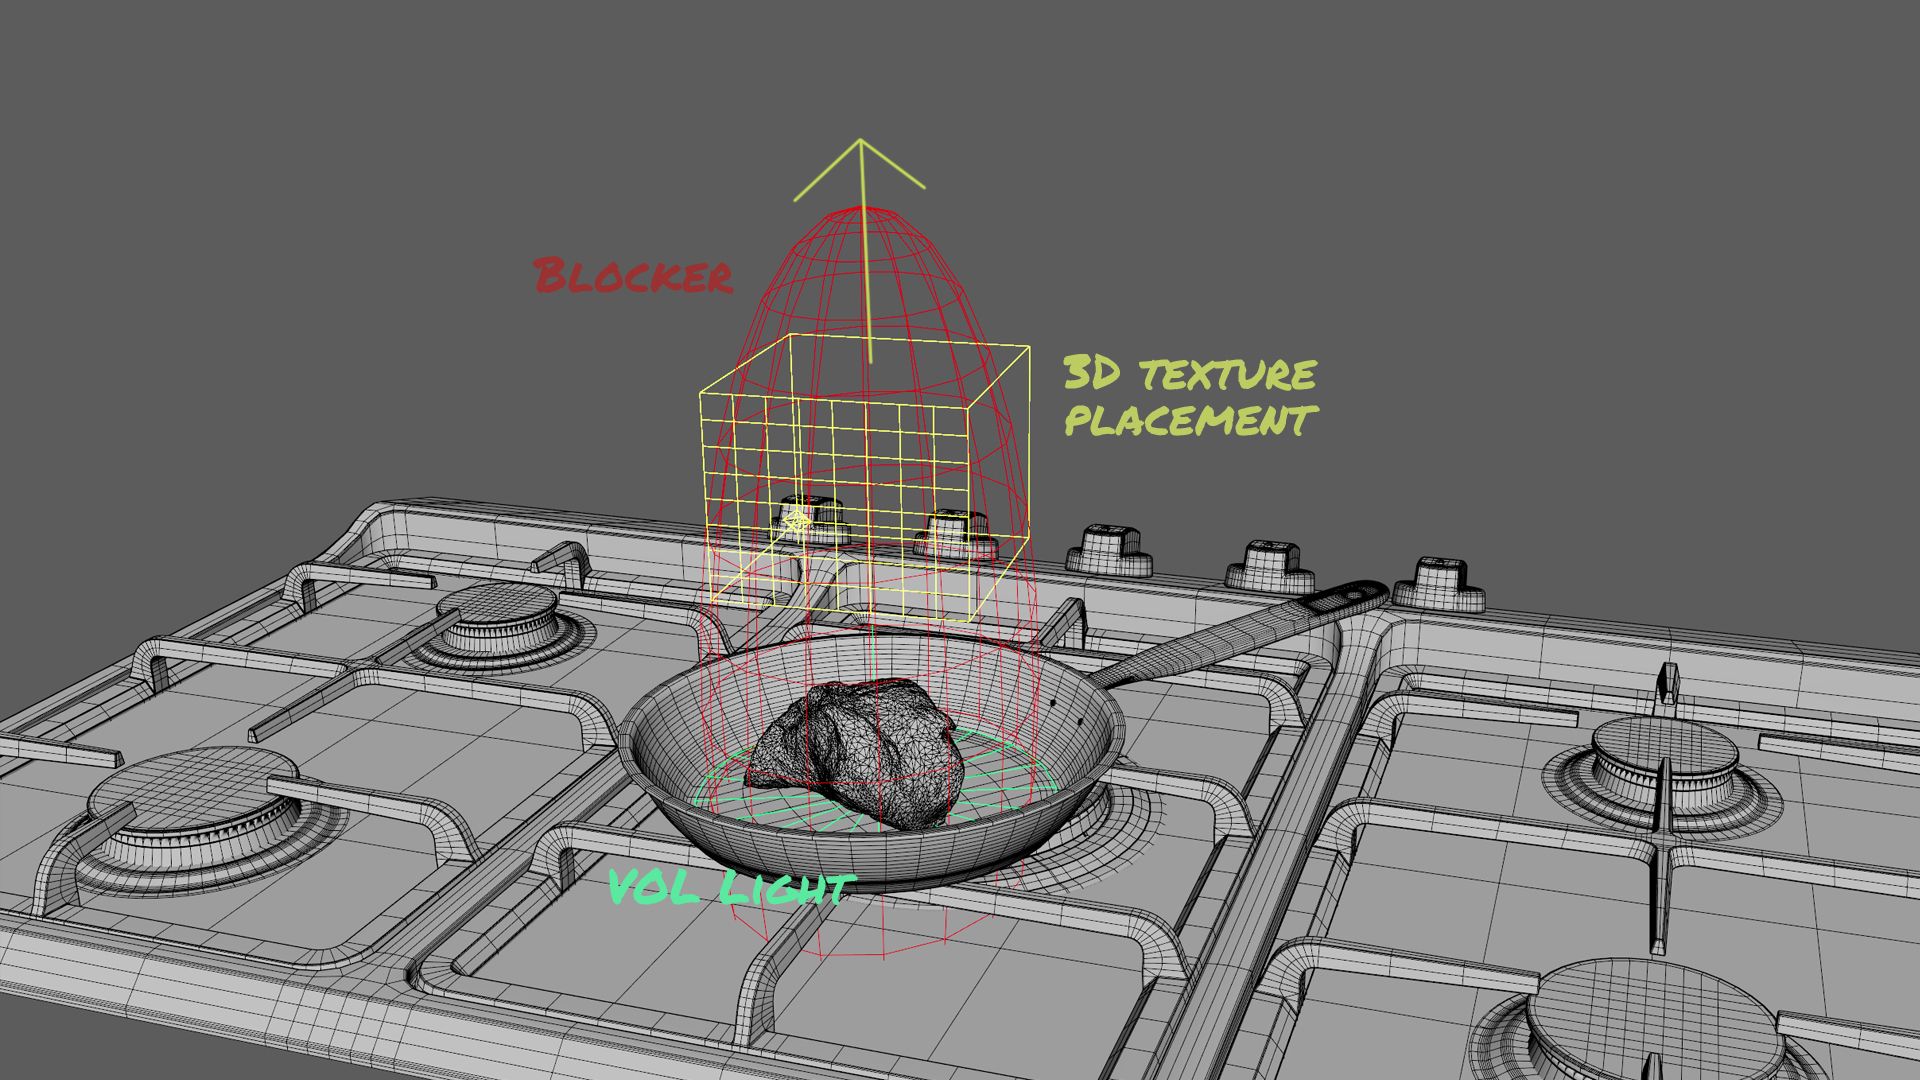
To finish giving the kitchen a touch more life, I implemented animated lights both on the kitchen stoves and for the smoke simulation, in this way we optimise times avoiding having to go through VFX. I simulated the smoke specifically using a volumetric light. This light is regulated with a blocker that sets the limit of its dispersion. To give the sensation of clouds within this light, we use a node called 3D texture placement. This node allows us to create a 3D texture that generates empty spaces in the volumetric light, giving us the feeling of having steam or clouds instead of a volumetric light. In the end, by animating this 3D texture node, we manage to simulate the effect of moving steam.
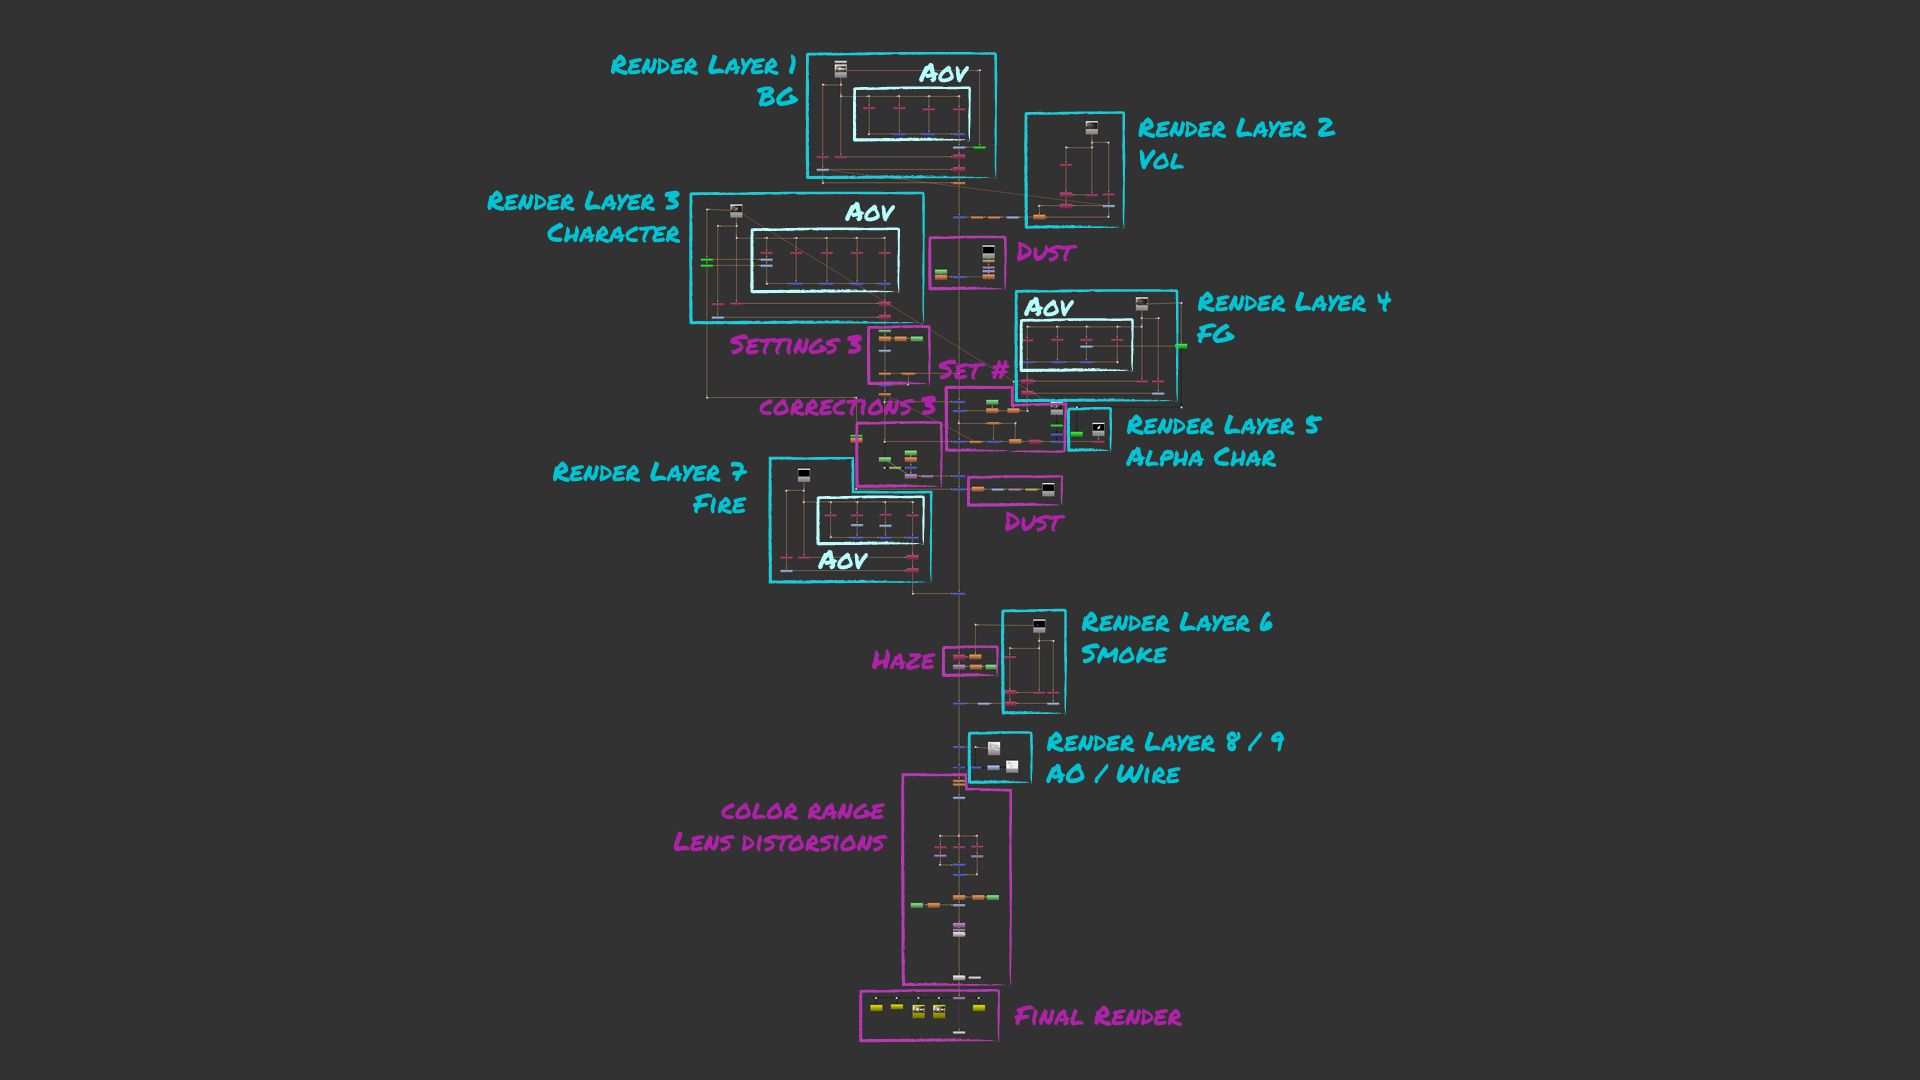
By rendering the final sequence, we would already finalise the production stage. This was done with its aov separately and in nine render layers that would have to be recomposed in post-production to finish making small corrections and give it a better final finish. These render layers were divided into: 1. Background, 2. Volumetric lights, 3. Character, 4. Foreground, 5. Character Alpha (utility layer for pre-composition), 6. Pan smoke, 7. Pan fire, 8. Ambient occlusion, and 9. Wireframe.

For the re-composition of all the content, all the render layers were collected and composed in NukeX with their AOVs separately. This provided us with greater control over the scene. Next, small corrections were made in the render and the final look was adjusted for the colour range, fine-tuning the tones, contrasts, and saturation to achieve the desired aesthetic.
But that’s not all. Elements were added subtly to gain realism; details such as dust floating in the environment, to simulate particles in the air and give more life to the scene. Mist generated by the heat of the pan, to add an atmospheric touch around the meat that adds authenticity. Camera oscillations at specific moments, to emphasise certain moments. And distortions of the camera lens, this includes chromatic aberration, depth and motion blurs, and lens distortion. These subtle effects contribute to the feeling of viewing the scene through a real camera.
Finally, I exported everything in a sequence of Exr files to maintain maximum quality and flexibility. Then, in DaVinci Resolve, I made the final colour adjustments and exported the final sequence in video formats to ensure that the image looks good on any screen.
This project has been a truly enriching experience that has provided me with greater fluency in navigating through different programs and software tools. However, what I value most is having understood the complete structure of the creation process in a production. Throughout this project, I have gained knowledge about various departments and have developed a greater awareness of the different needs that exist within them.
By exploring the intricacies of production, I have learned to appreciate the interconnection between areas such as pre-production, animation, modeling, lighting, composition, VFX, and post-production. Each department plays a fundamental role in the materialisation of an idea, and understanding their functions will allow me to collaborate more effectively in a production with colleagues from different specialties.
Moreover, I have gained perspective on the importance of communication and coordination between teams. From pre-production to final delivery, each step requires precise synchronisation to ensure that the project progresses smoothly. This understanding has made me a more versatile and adaptable professional, capable of addressing challenges from multiple perspectives.
In summary, this project has not only expanded my technical skills but has also fostered my appreciation for interdisciplinary collaboration. I am excited to continue growing and applying this knowledge in future projects.
You can see more of Alvaro’s works on his Rookies profile here.