From Fiction to Reality: In-Depth Guide to Recreating a 3D Scene Inspired by a Fictional Story
Alessandro Rigon, an aspiring 3D artist at ABAVR - Academy of Fine Arts of Verona, shares his workflow reconstructing the set of the church of Jerusalem’s Lot, aiming to refine his skills for a potential career in gaming or VFX.
Meet Alessandro Rigon, an aspiring 3D artist and student at ABAVR - Academy of Fine Arts of Verona. Passionate about the world of 3D art, he is currently focusing on growing his skills and deciding whether to pursue his career in the gaming or VFX industry. In this article, he shares his workflow and techniques that allowed him to reconstruct the set of the church of Jerusalem’s Lot.
About the artist
Hello everyone, my name is Alessandro, and I am a 25-year-old 3D artist. Since I was a child, I have always had many interesting passions, such as music instruments, photography, design, technology troubleshooting, and much more. However, before 2020-2021, I had never thought of becoming a 3D artist. In fact, though I spent most of my time in high school preparing myself to enrol in the faculty of medicine, I decided to enrol in the bachelor’s of New Technologies for Arts at ABAVR - Academy of Fine Arts of Verona. This historical Italian academy, founded in 1764, offers an interesting educational offer, ranging from traditional to digital arts. Currently, I am enrolled in my last year there and have been learning many art fundamentals, from drawing and matte-painting to 3D art and animation for both VFX and video games.
As a token of gratitude, I would like to mention two mentors from my academy for their support, encouragement, and teaching: Luca Orlandi, director of photography specialised in CGI and professor for the “Multimedia Design” class, and Piero Feltrinelli, game producer and professor for the “Screenwriting for games” class.
Also, my heartfelt thanks to Wall Street English International School, specifically to my teachers at the WSE schools of Vicenza and Bassano, for allowing me to take my language proficiency to the next level over the course of the last year.
The project brief
This project represents my final exam for the 8 months-long class of Multimedia Design 2, where I was given the assignment of recreating a complete environment and at least 2 main characters, strongly inspired by Stephen King’s “Night Shift” fictional series of stories.
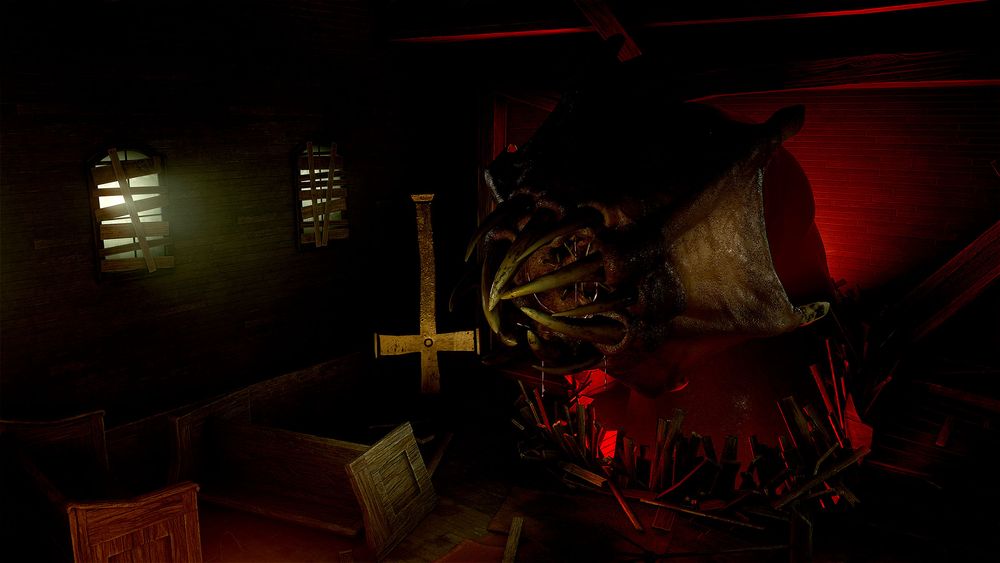
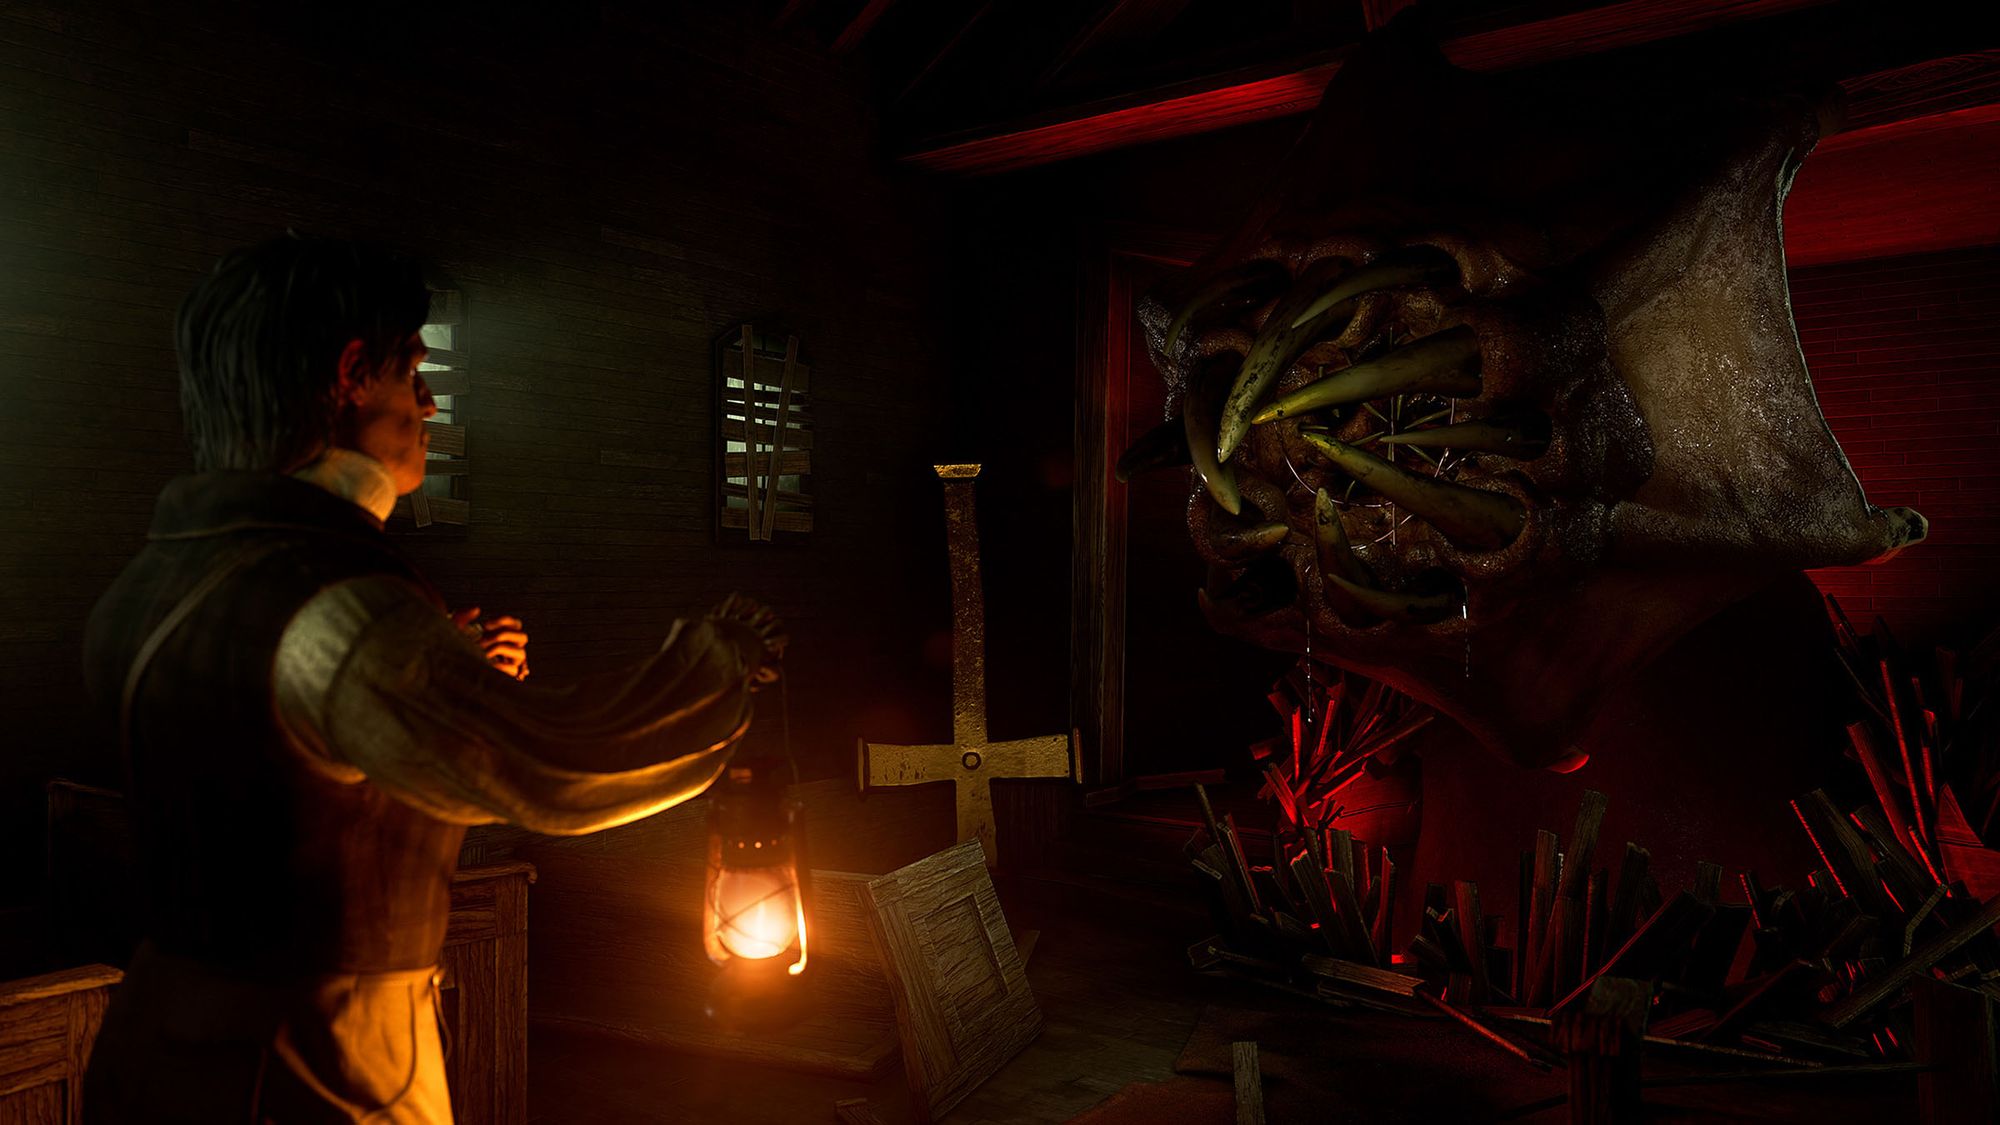
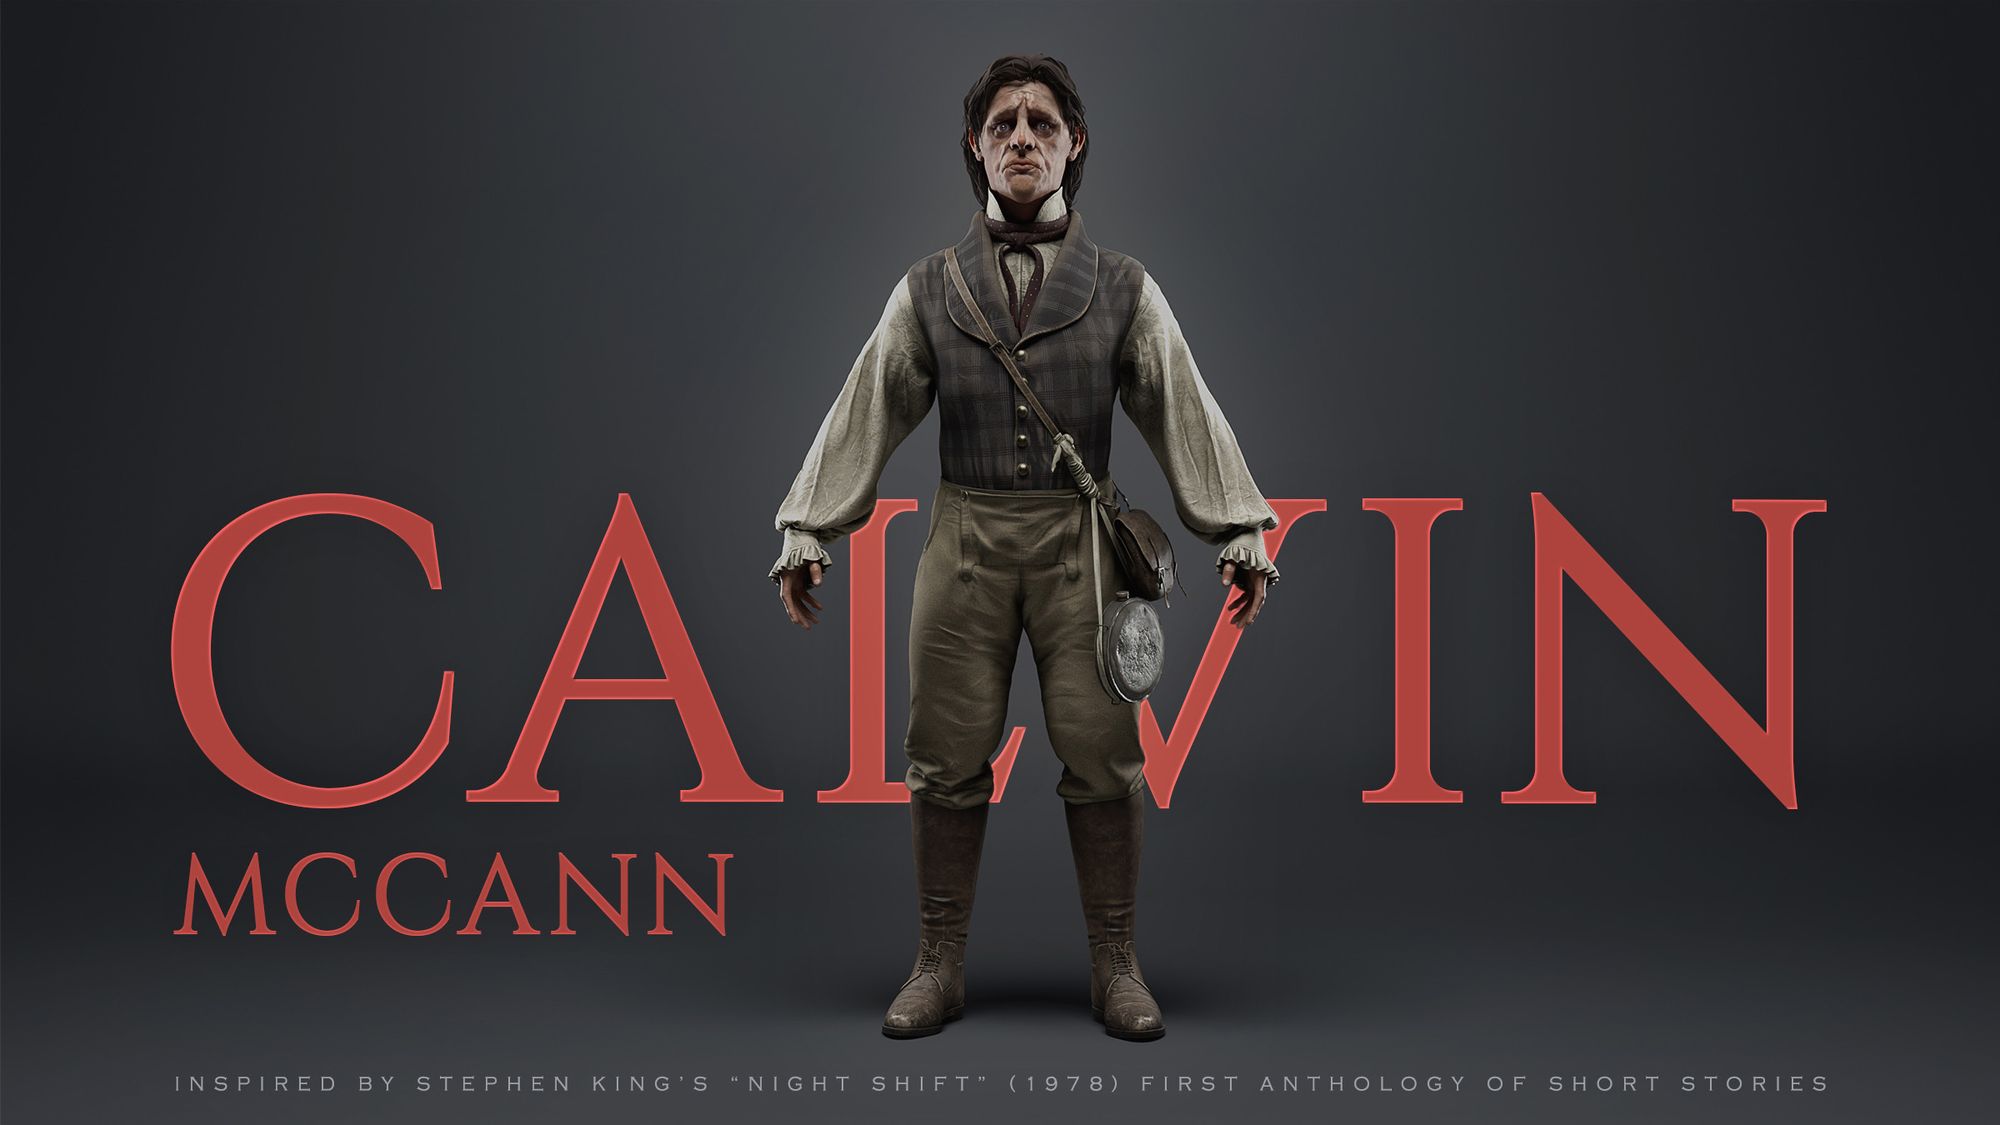
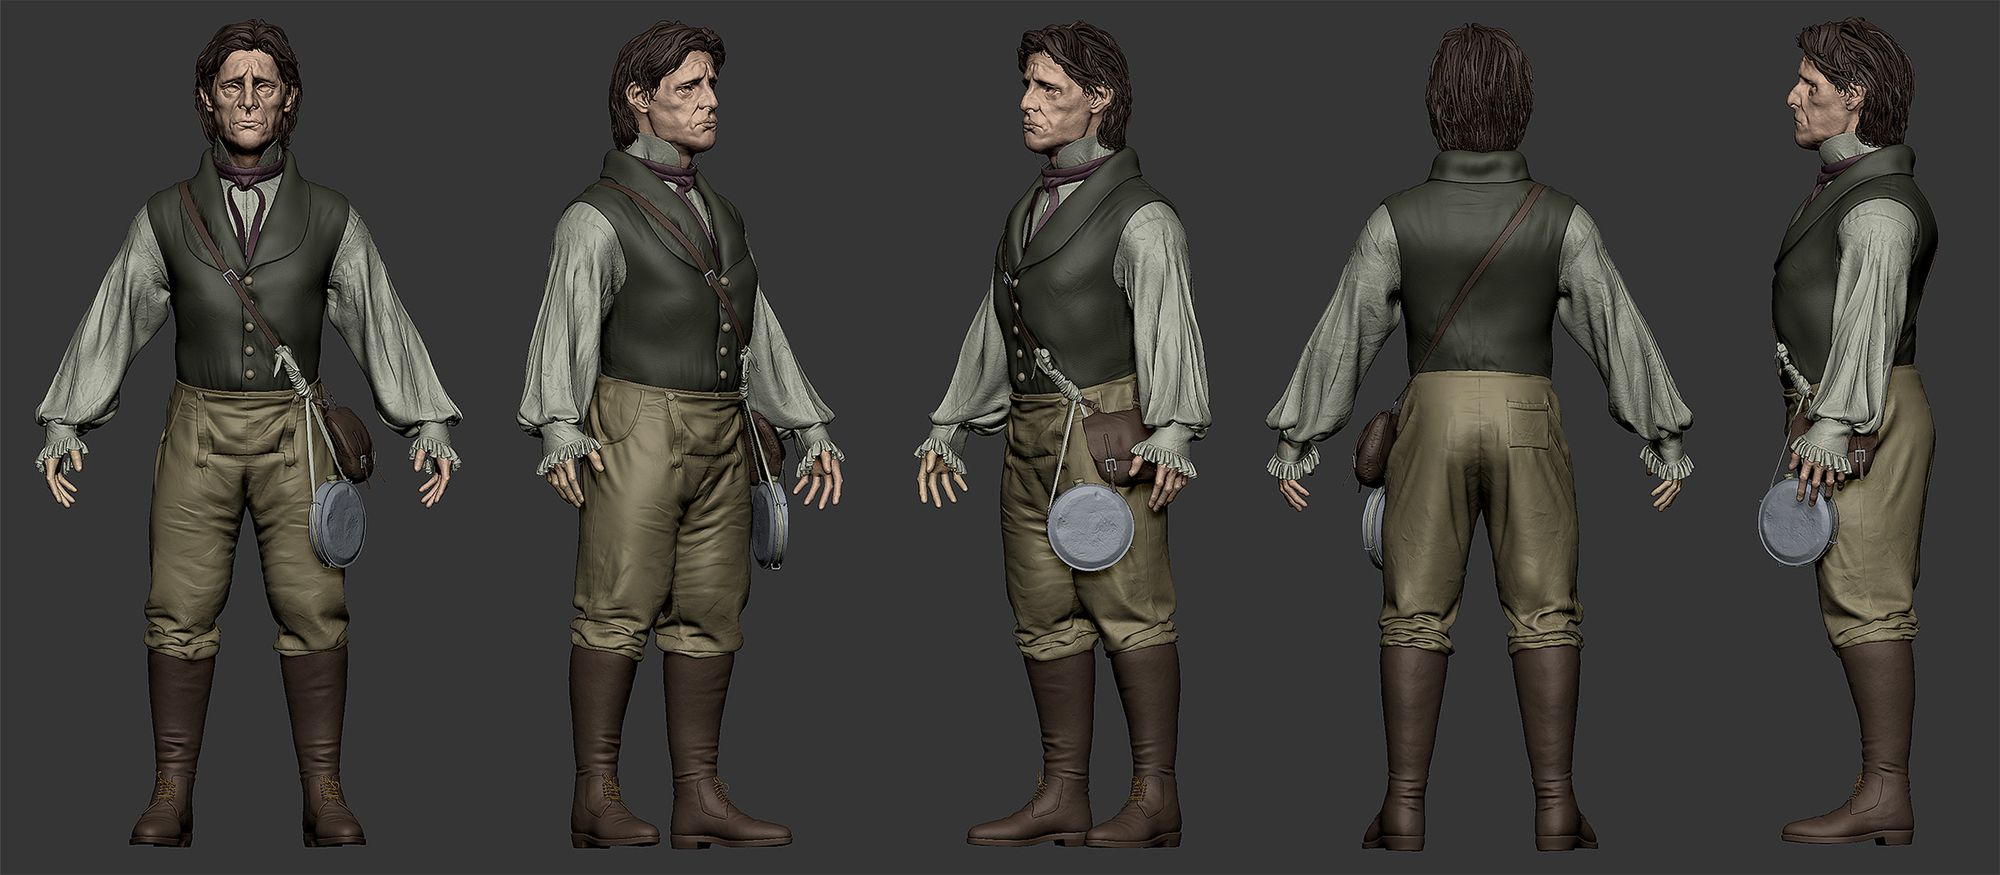
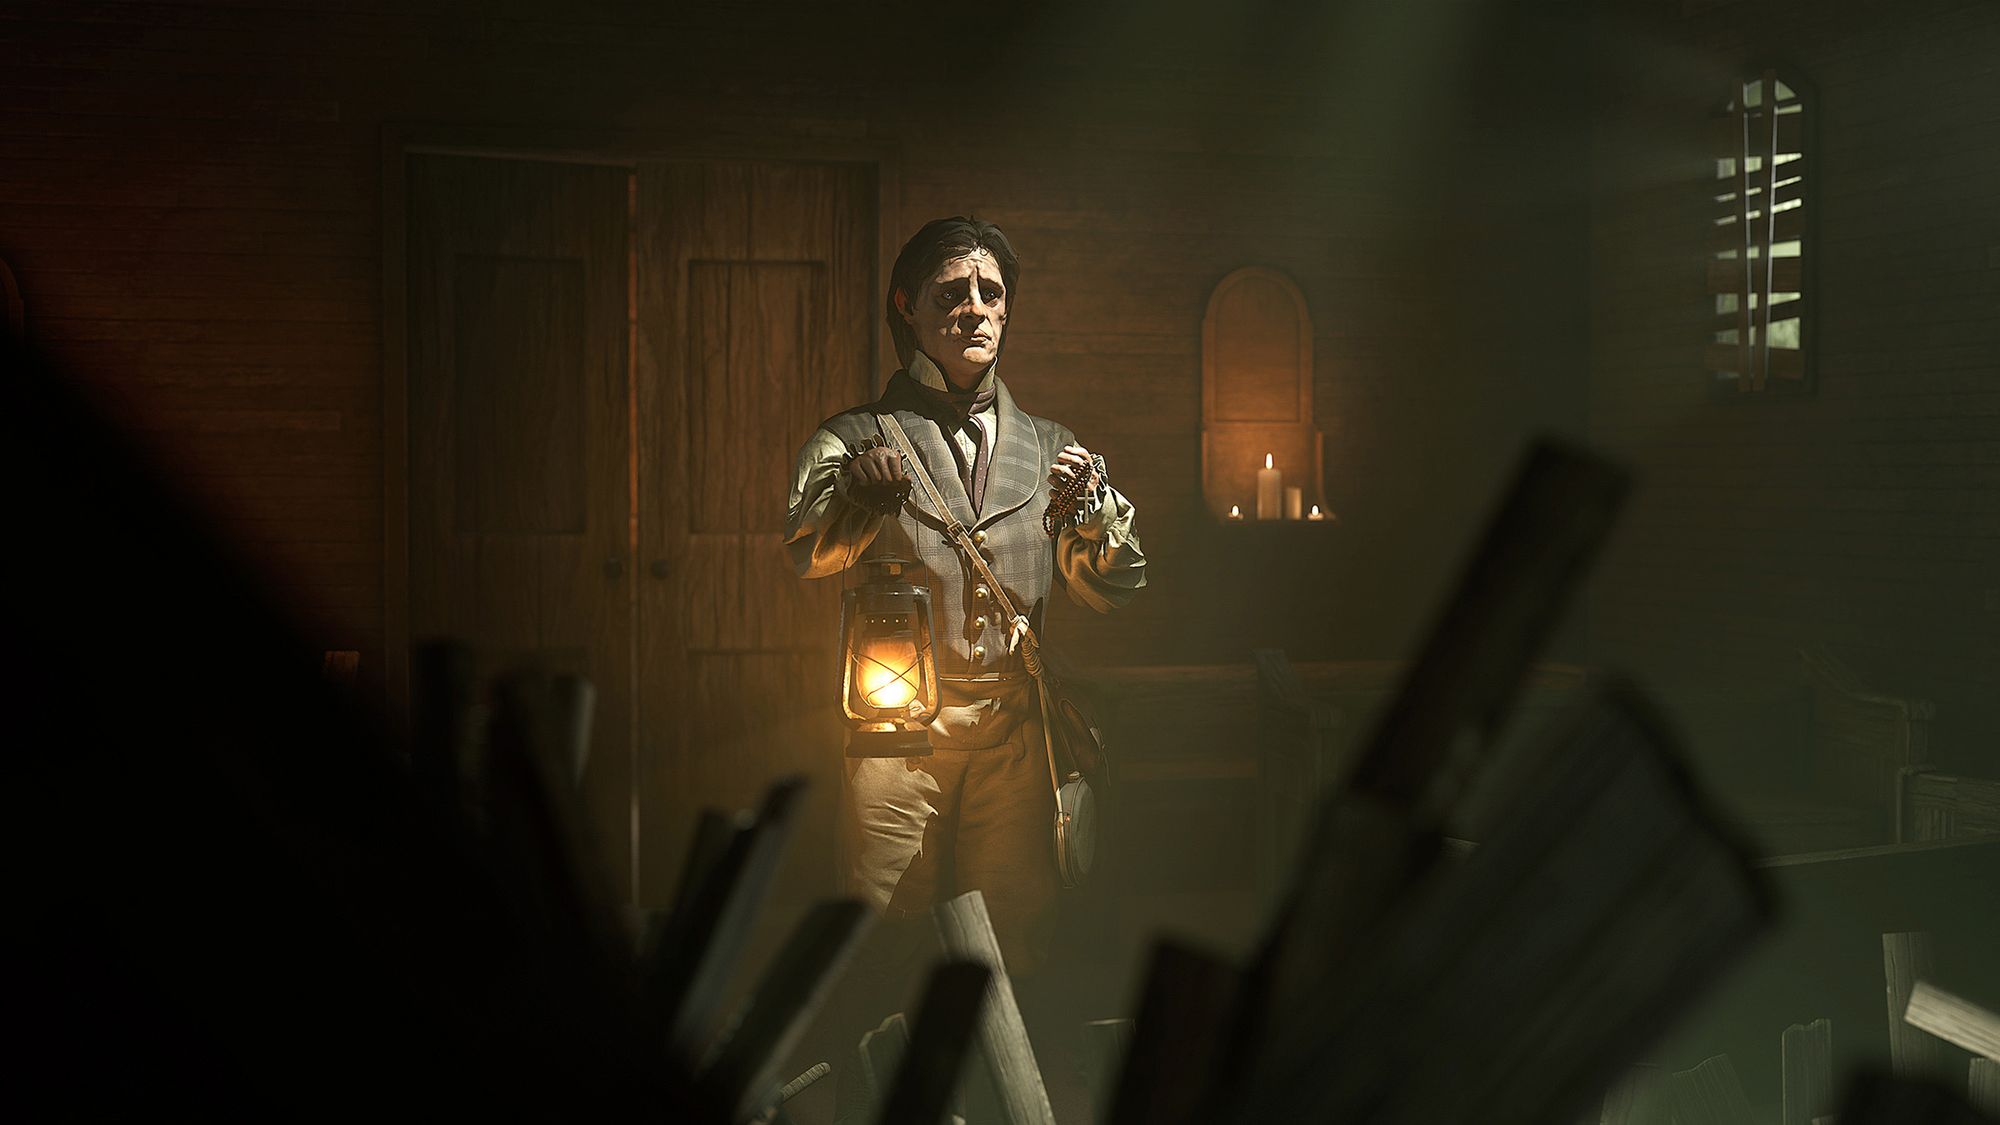
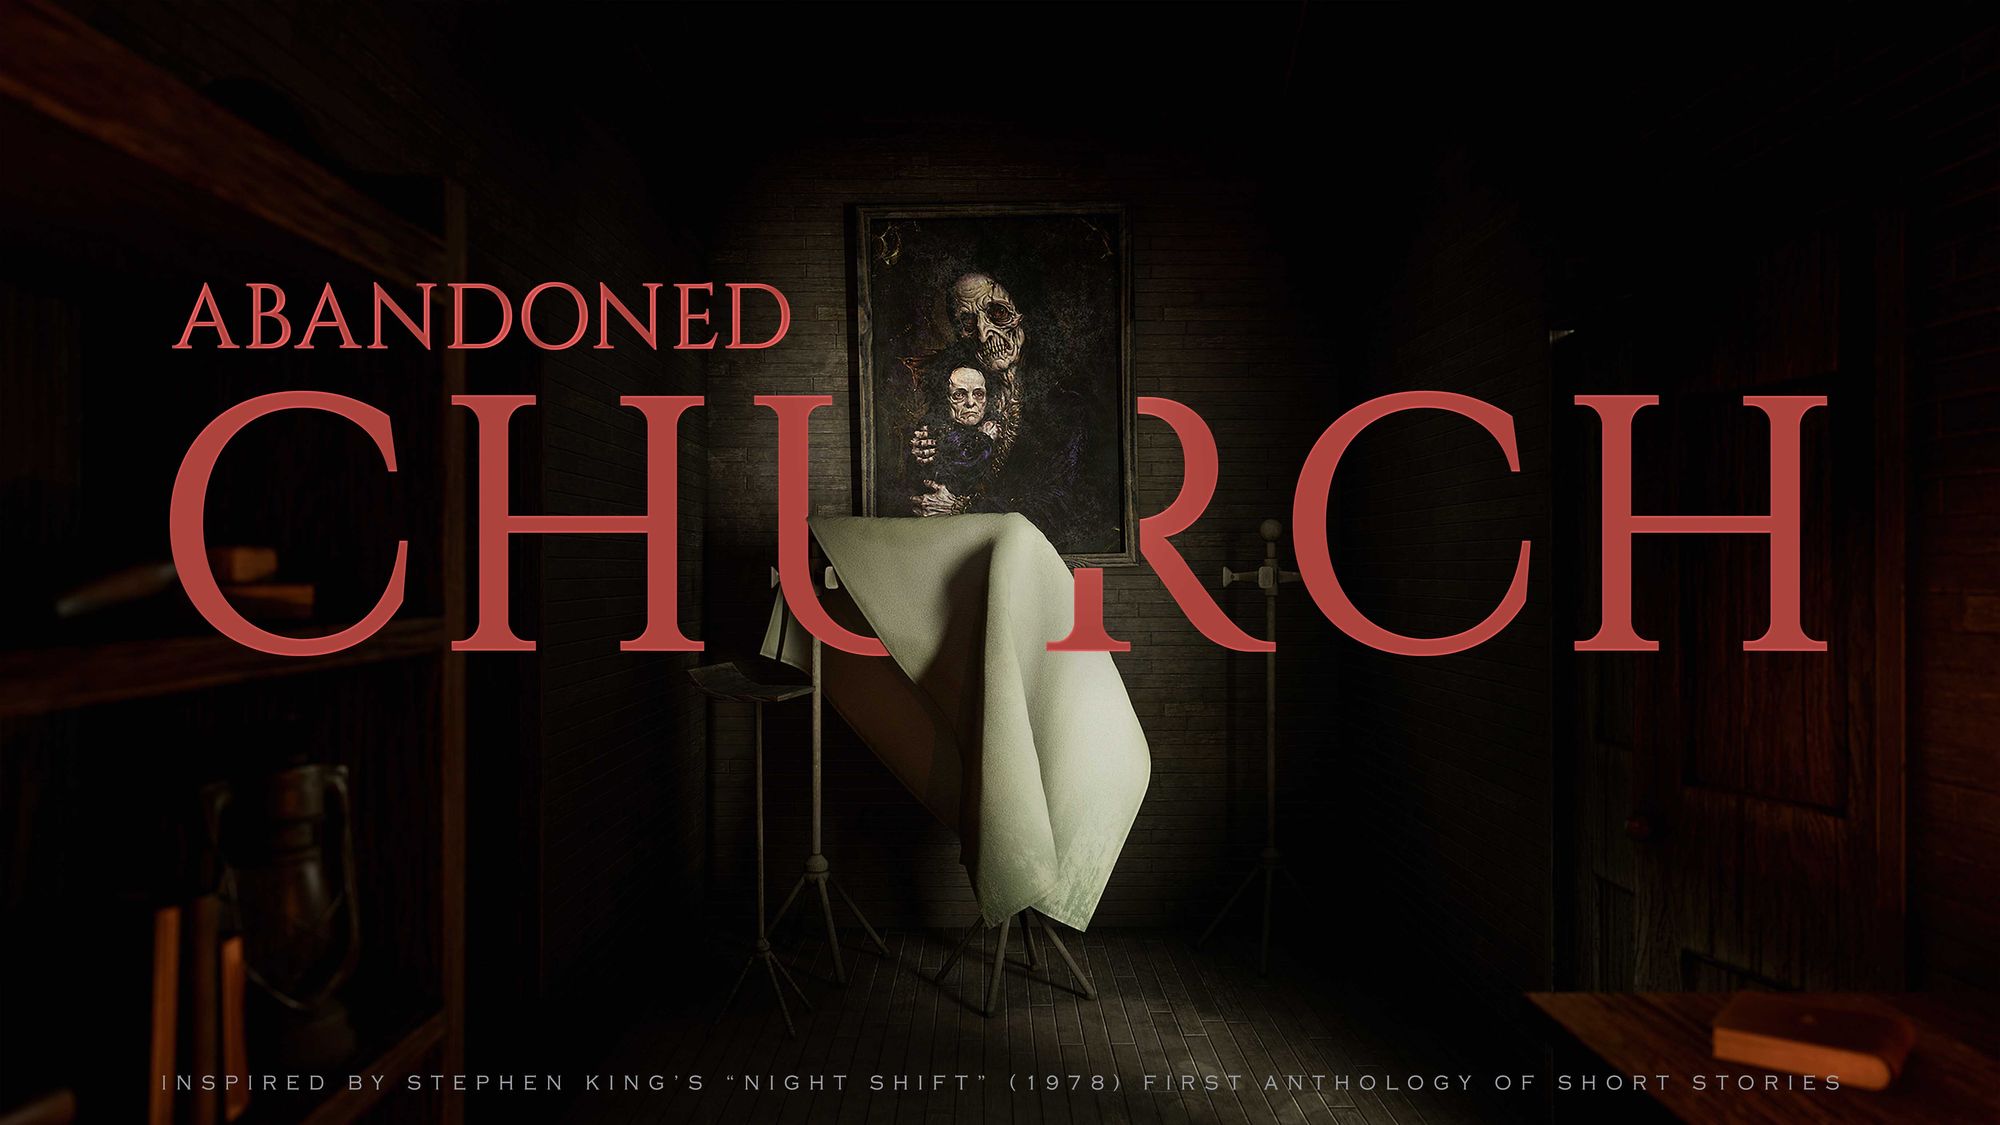
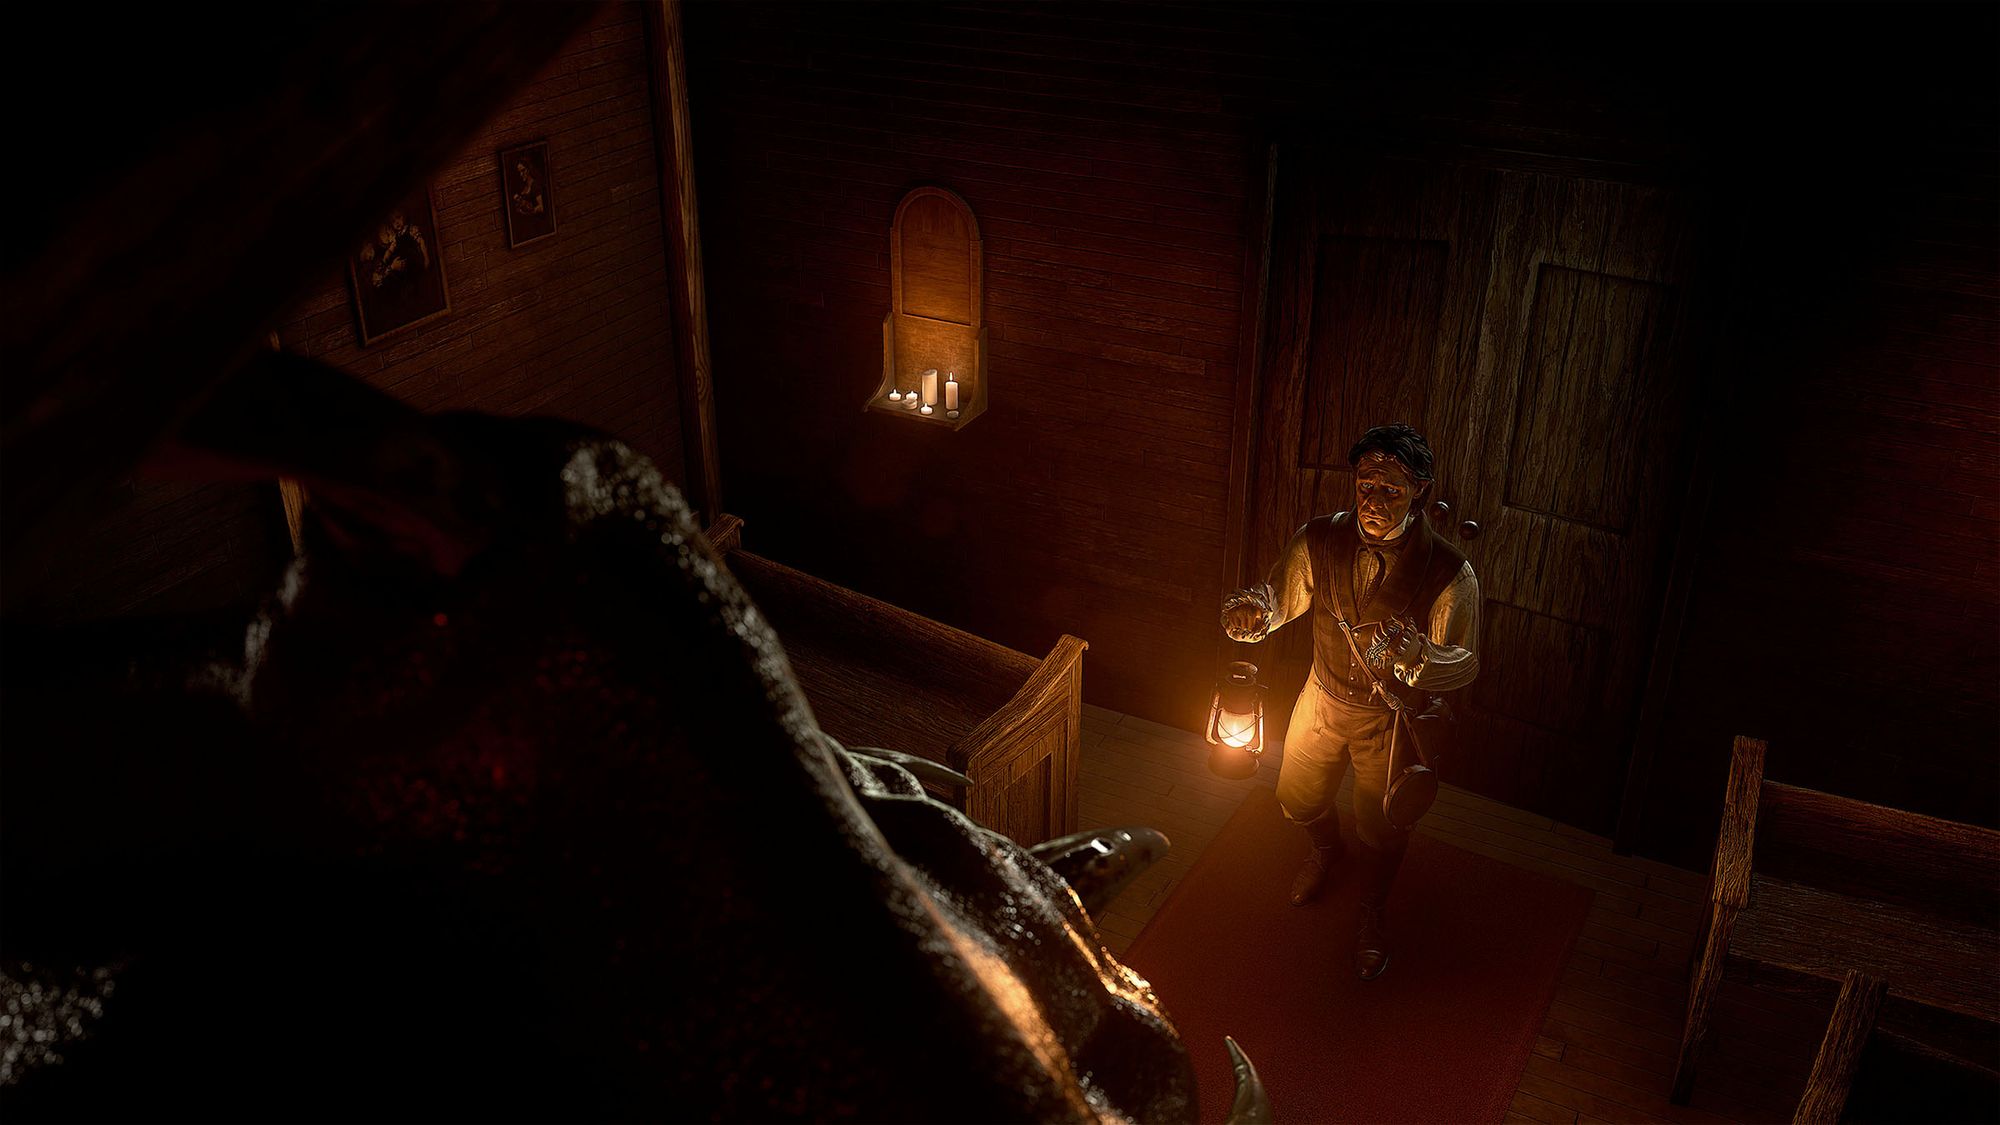
The pivotal scene of the story I reconstructed in 3D.
I chose to depict the character of Calvin McCann and the creature of The Worm in the abandoned church of Jerusalem’s Lot.
💡
Note that it was mandatory to render the final scene in Maya, even though for this project I used some common techniques typical of games. For example, I decided not to use displacement maps at all, forcing myself to get the most out of my normal maps.
Software used
Maya, for inorganic and hard-surface modeling, UVs;
ZBrush, for organic modeling and overall digital sculpting of details;
Marvelous Designer, for the creation of clothing and some extra models like a carpet or a cloth;
Stable Diffusion (Automatic1111 Web-UI), for generating just the three cursed paintings in the church, replicating the poses of the subjects from historical paintings;
The Artistic Direction choice for the whole project was unrestricted, so I had the opportunity to go for either a stylised or realistic AD. People close to me know how much I love realism, so I definitely went for that. Since I had to base my final work on a written fictional story, I had no visual references, so I started extrapolating as much information as I could from the text to get the most out of the story.
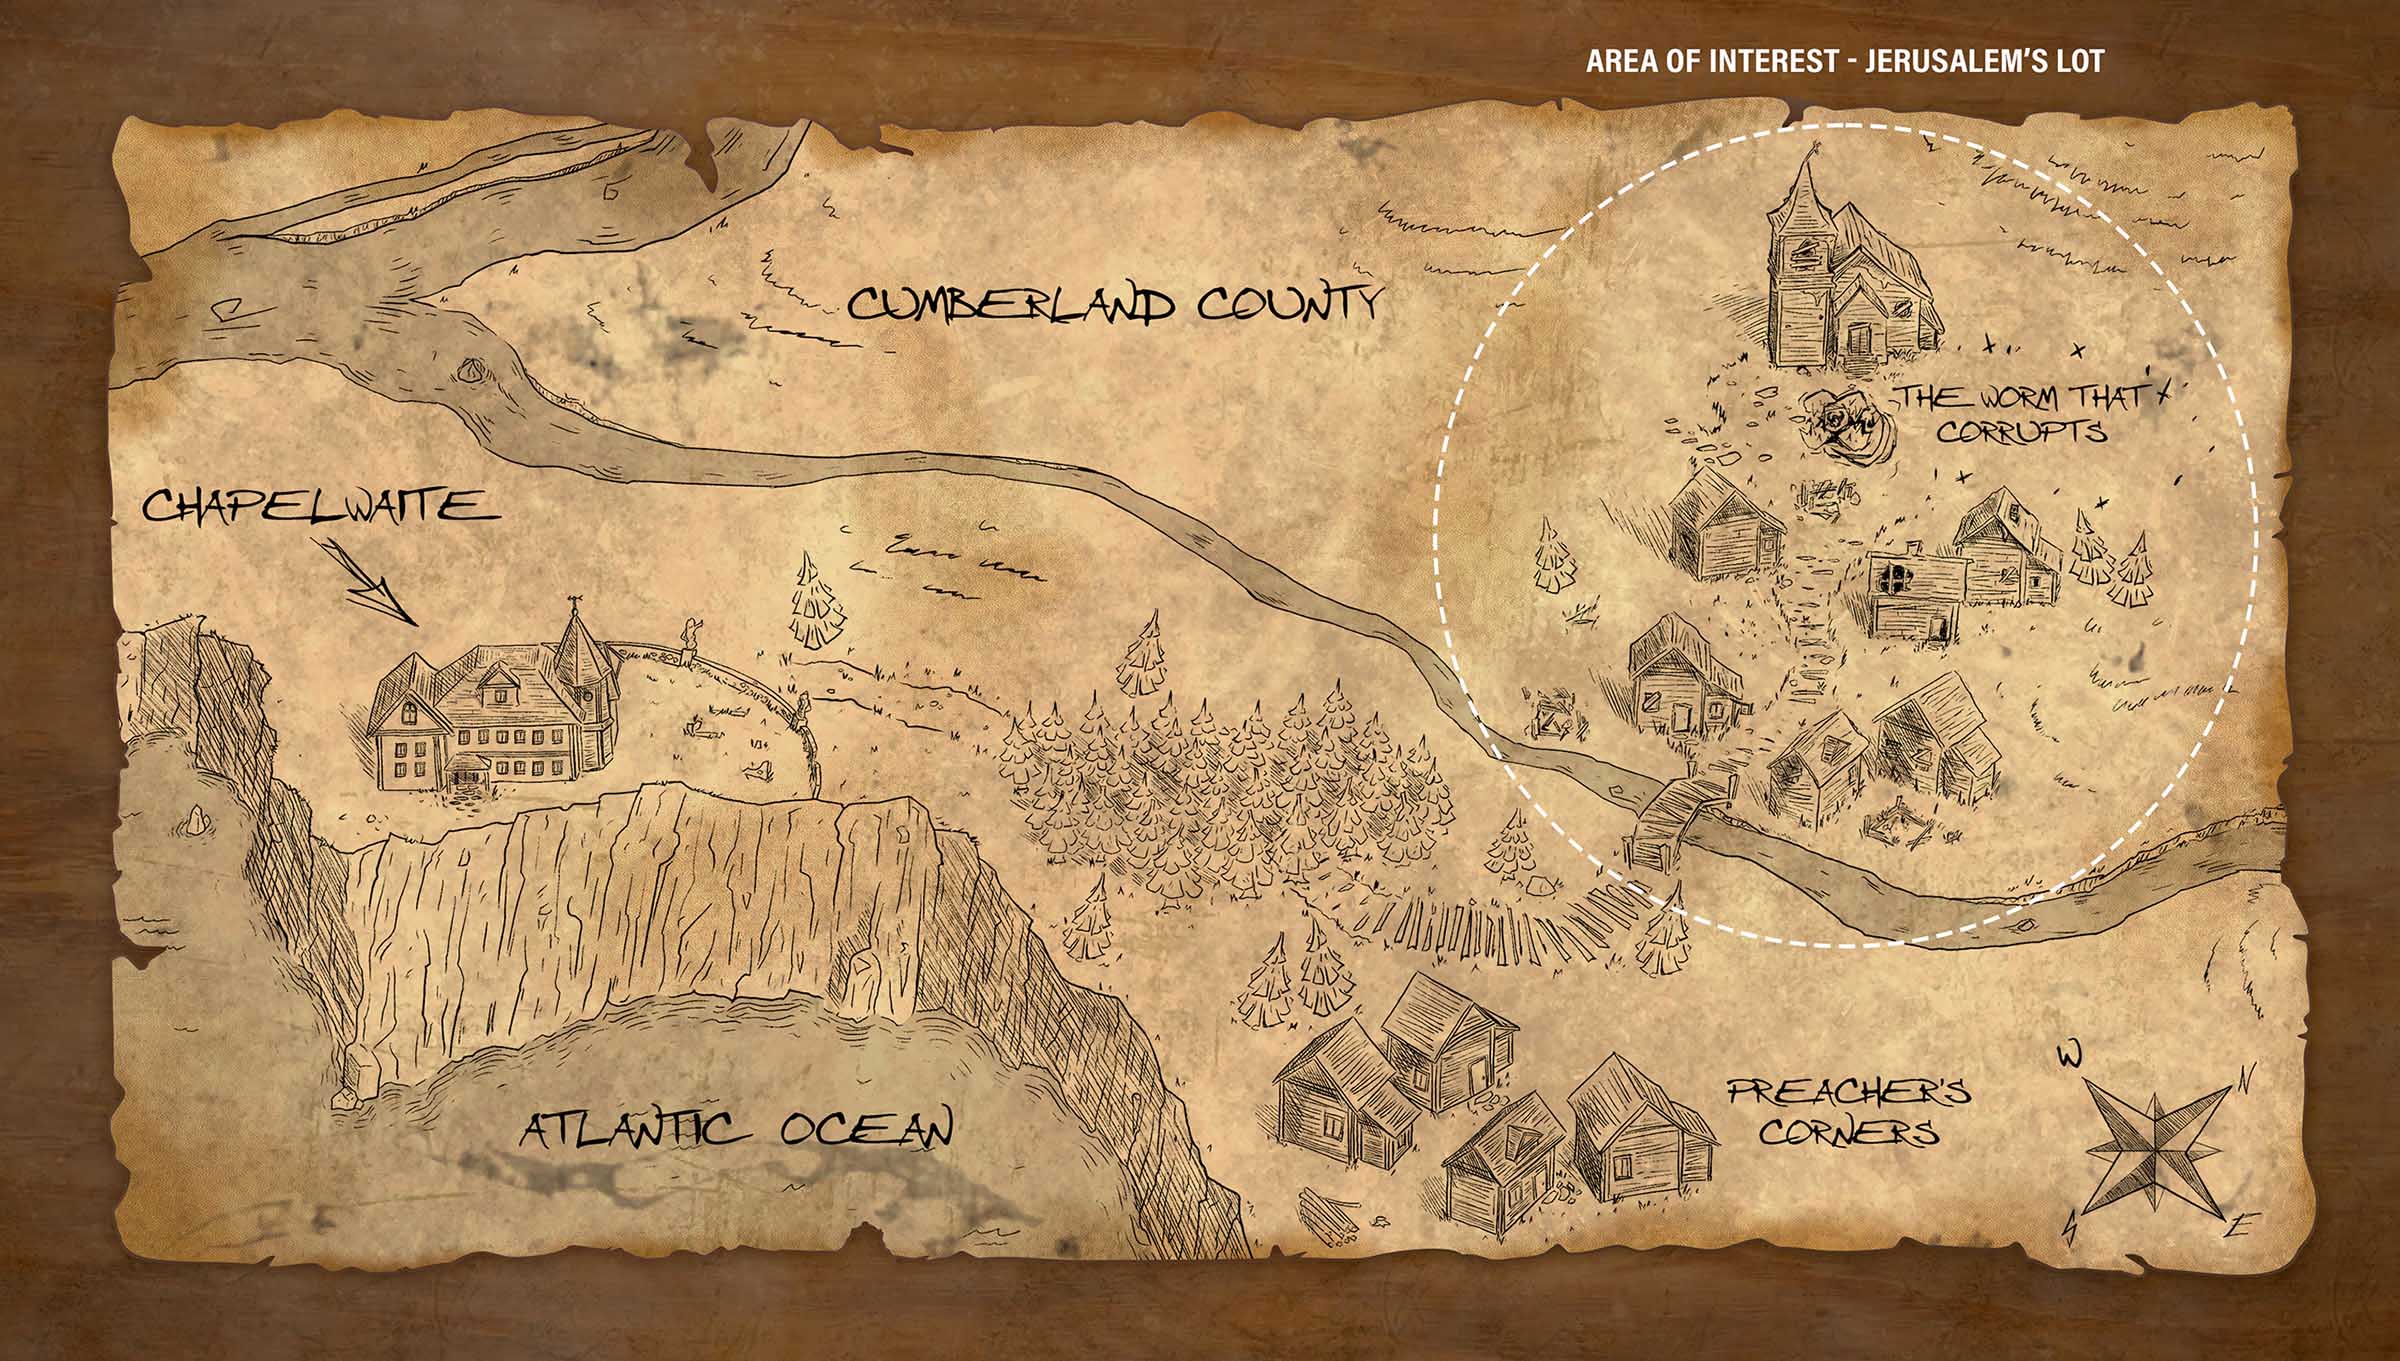
An approximate map I sketched to clear my ideas about the location I wanted to model.
Again, I had no visual references but a lot of textual information, so I proceeded to gather images and put them together to have a complete picture of the project.
References
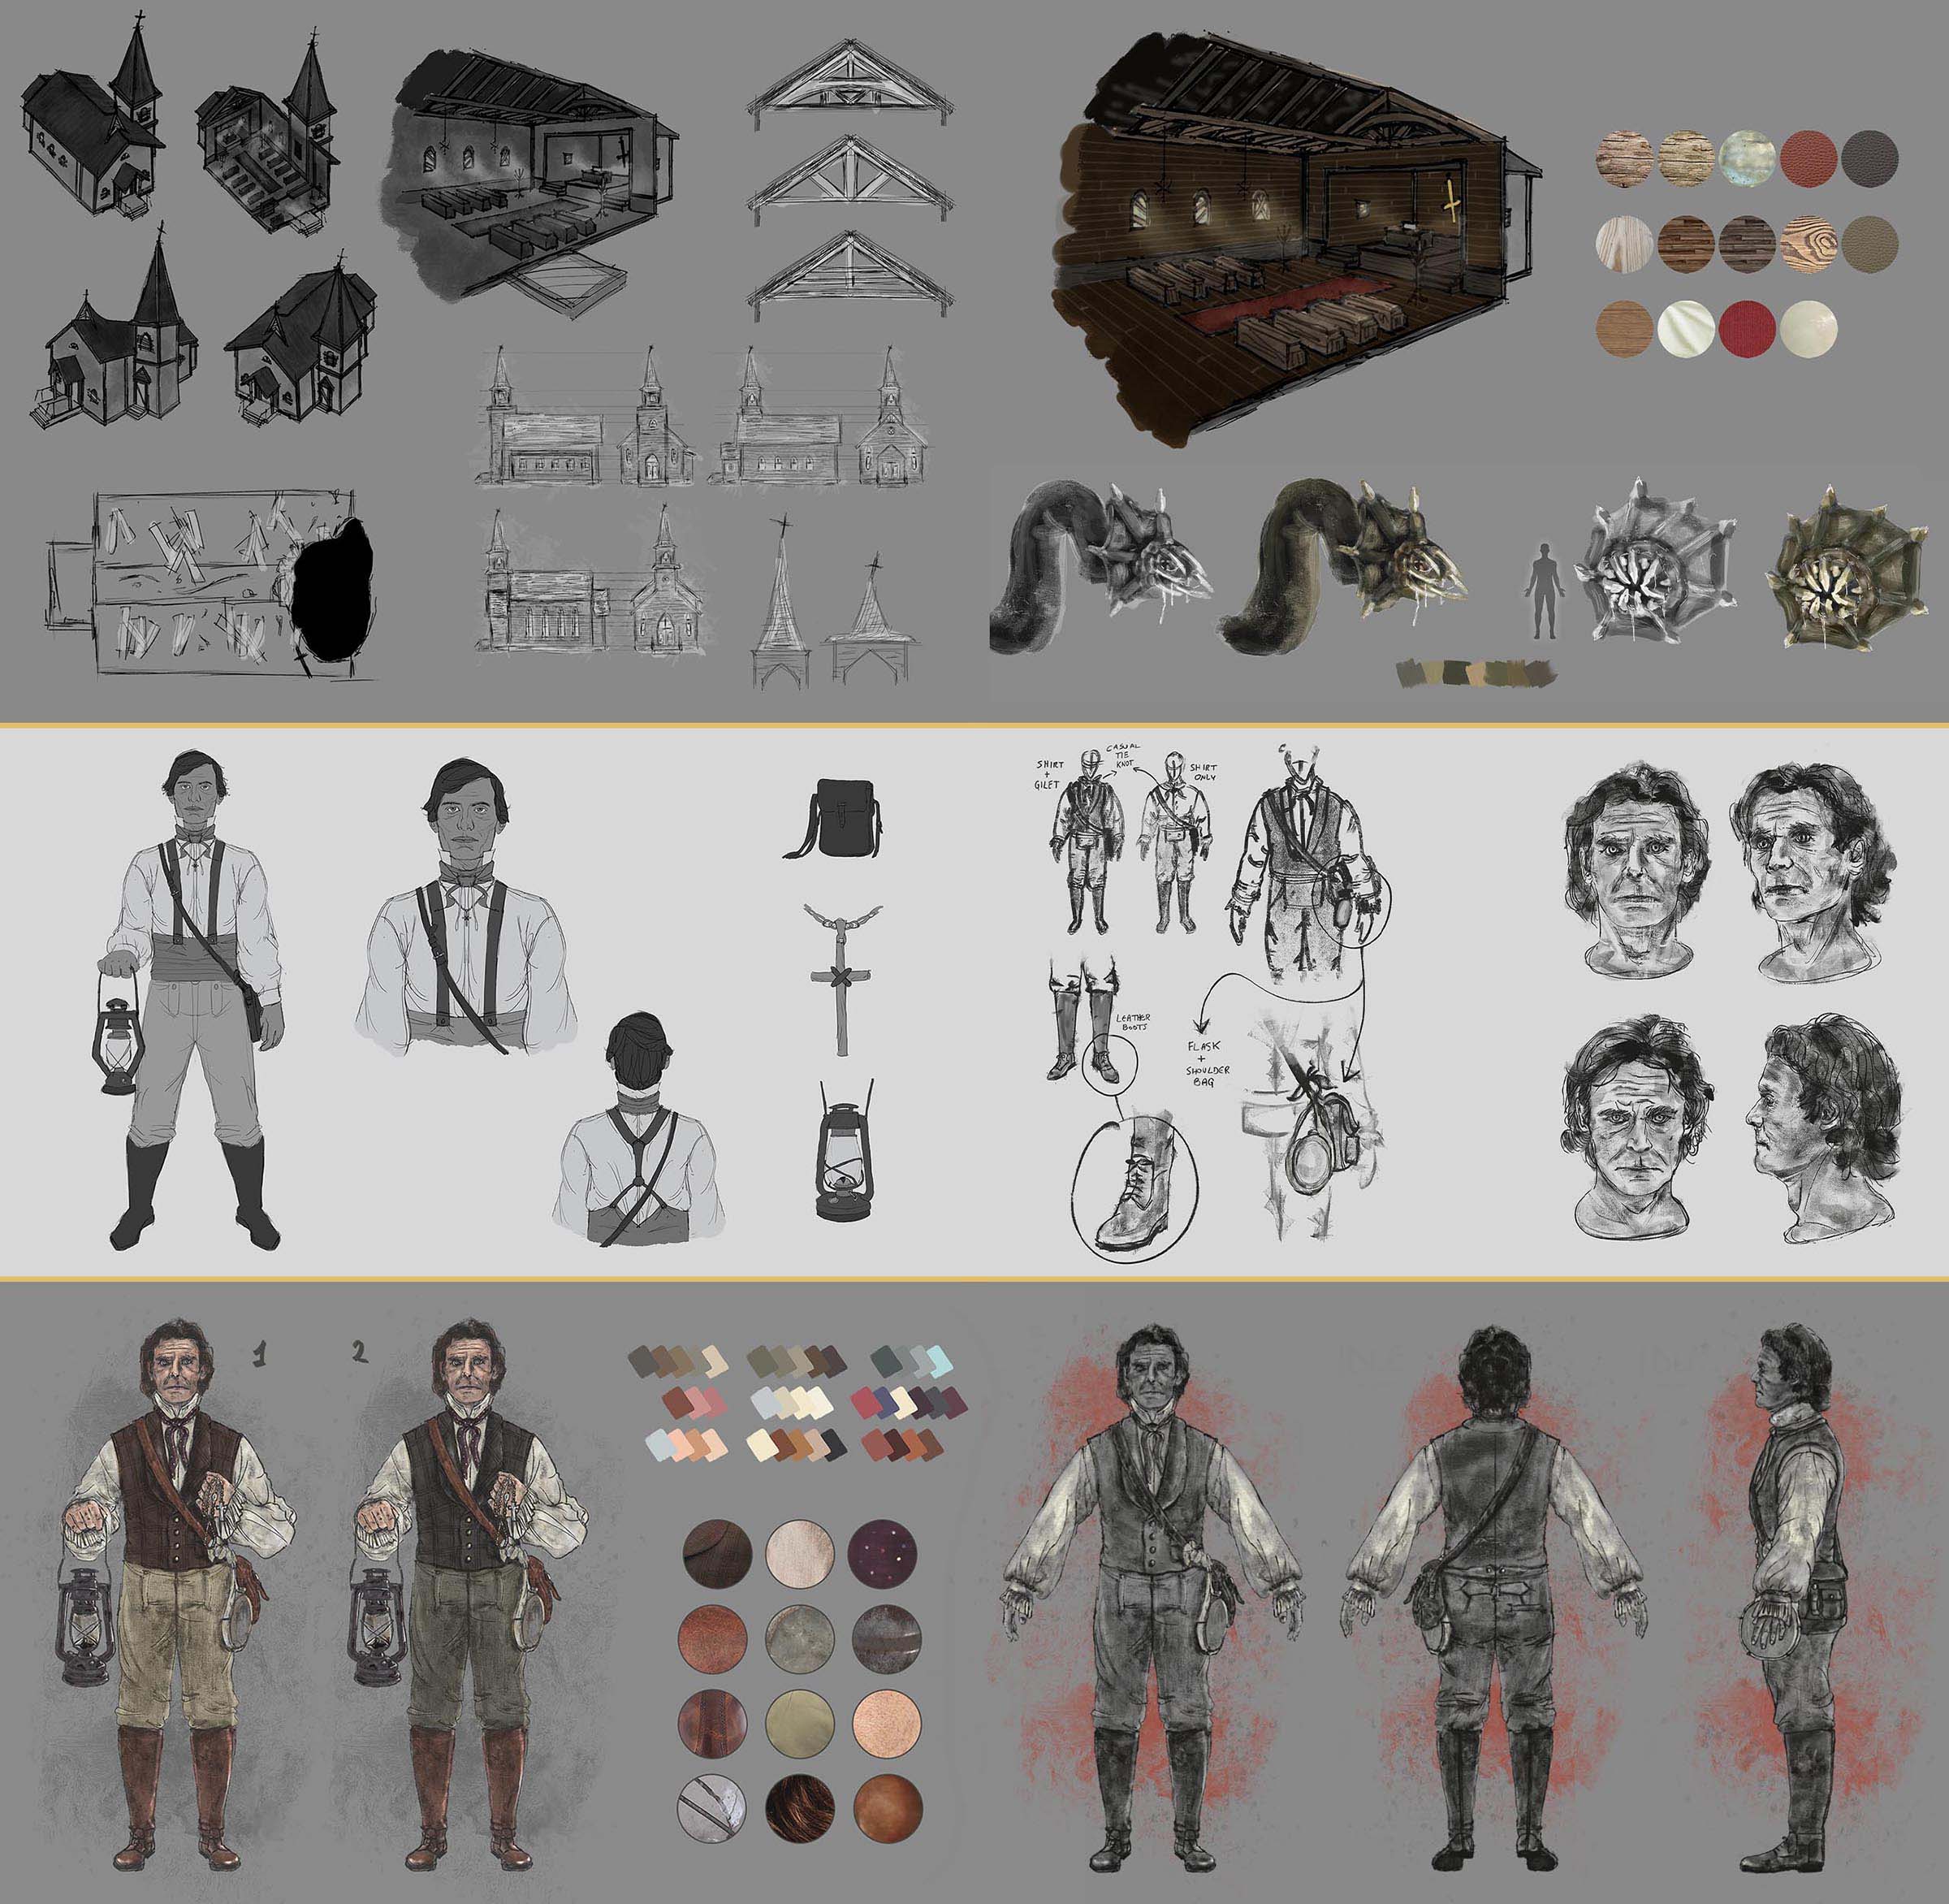
As for the final step of this phase, starting from the collected material, I drew some sketches of both the environment and the characters, also establishing the colour palette and material caps for each.
Sketches
Table of contents
Making of Calvin: The religious manservant
Clothing creation
Modeling and sculpting the head
Modeling the accessories
Refining and texturing the character
Rendering the character
Making of The Worm: The ancient creature
Modeling and sculpting the creature
Texturing the creature
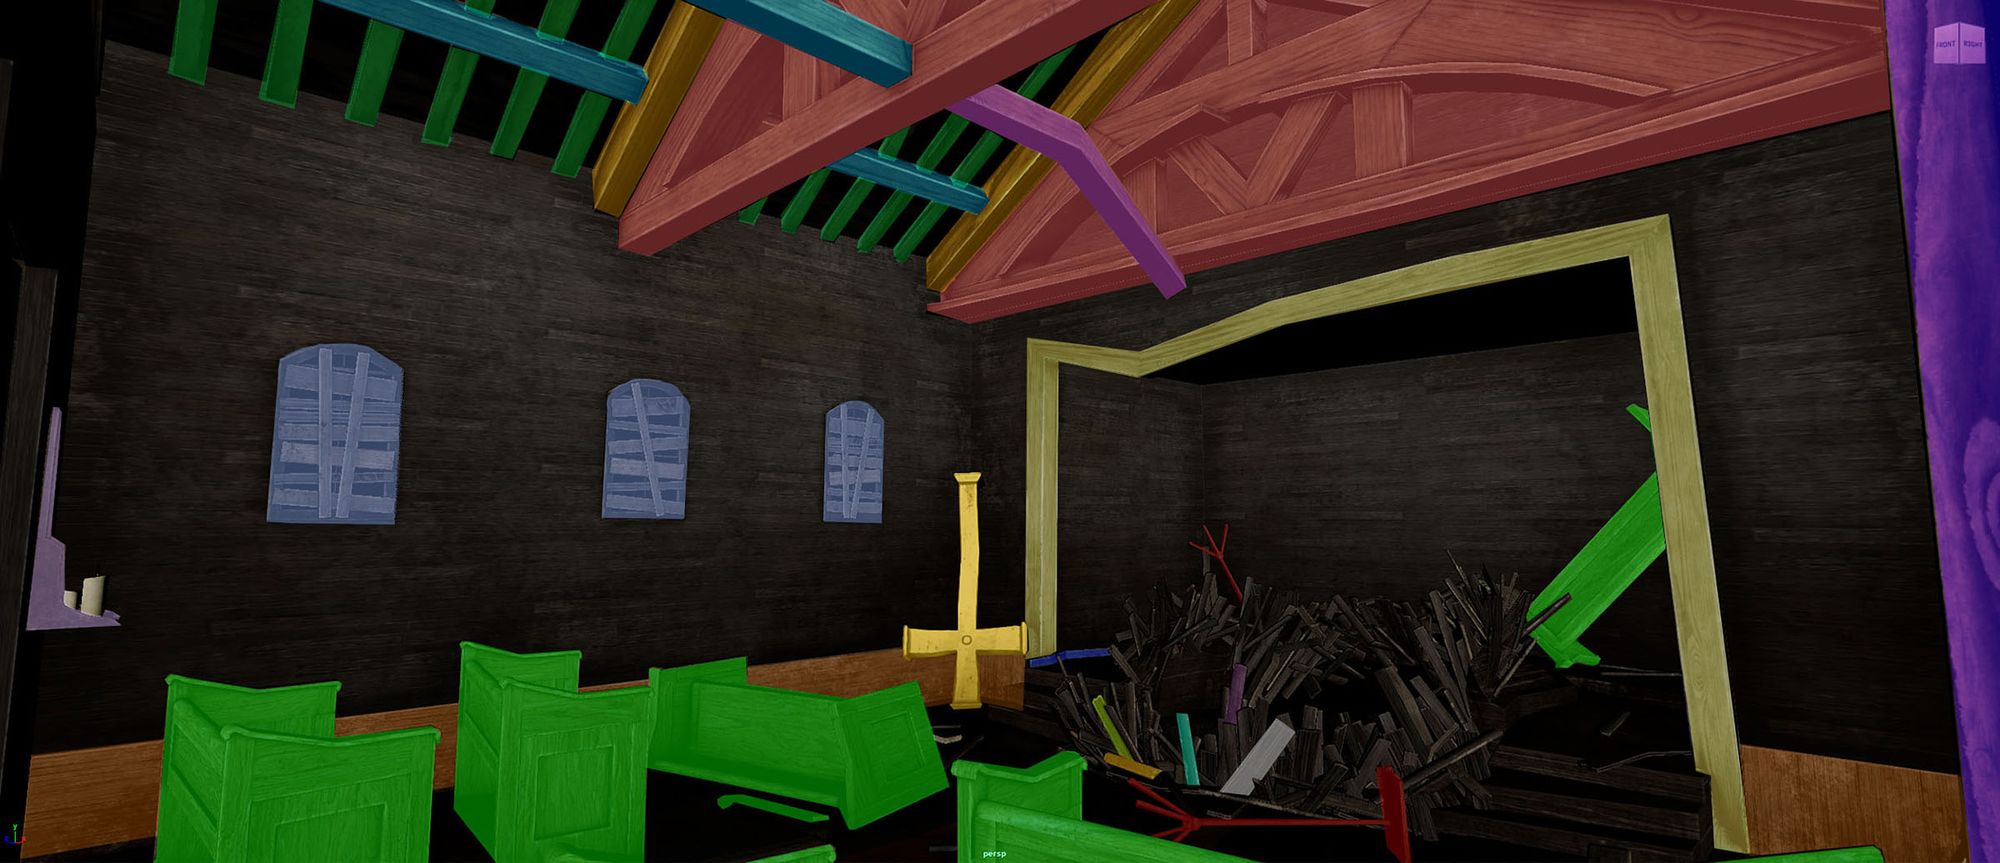
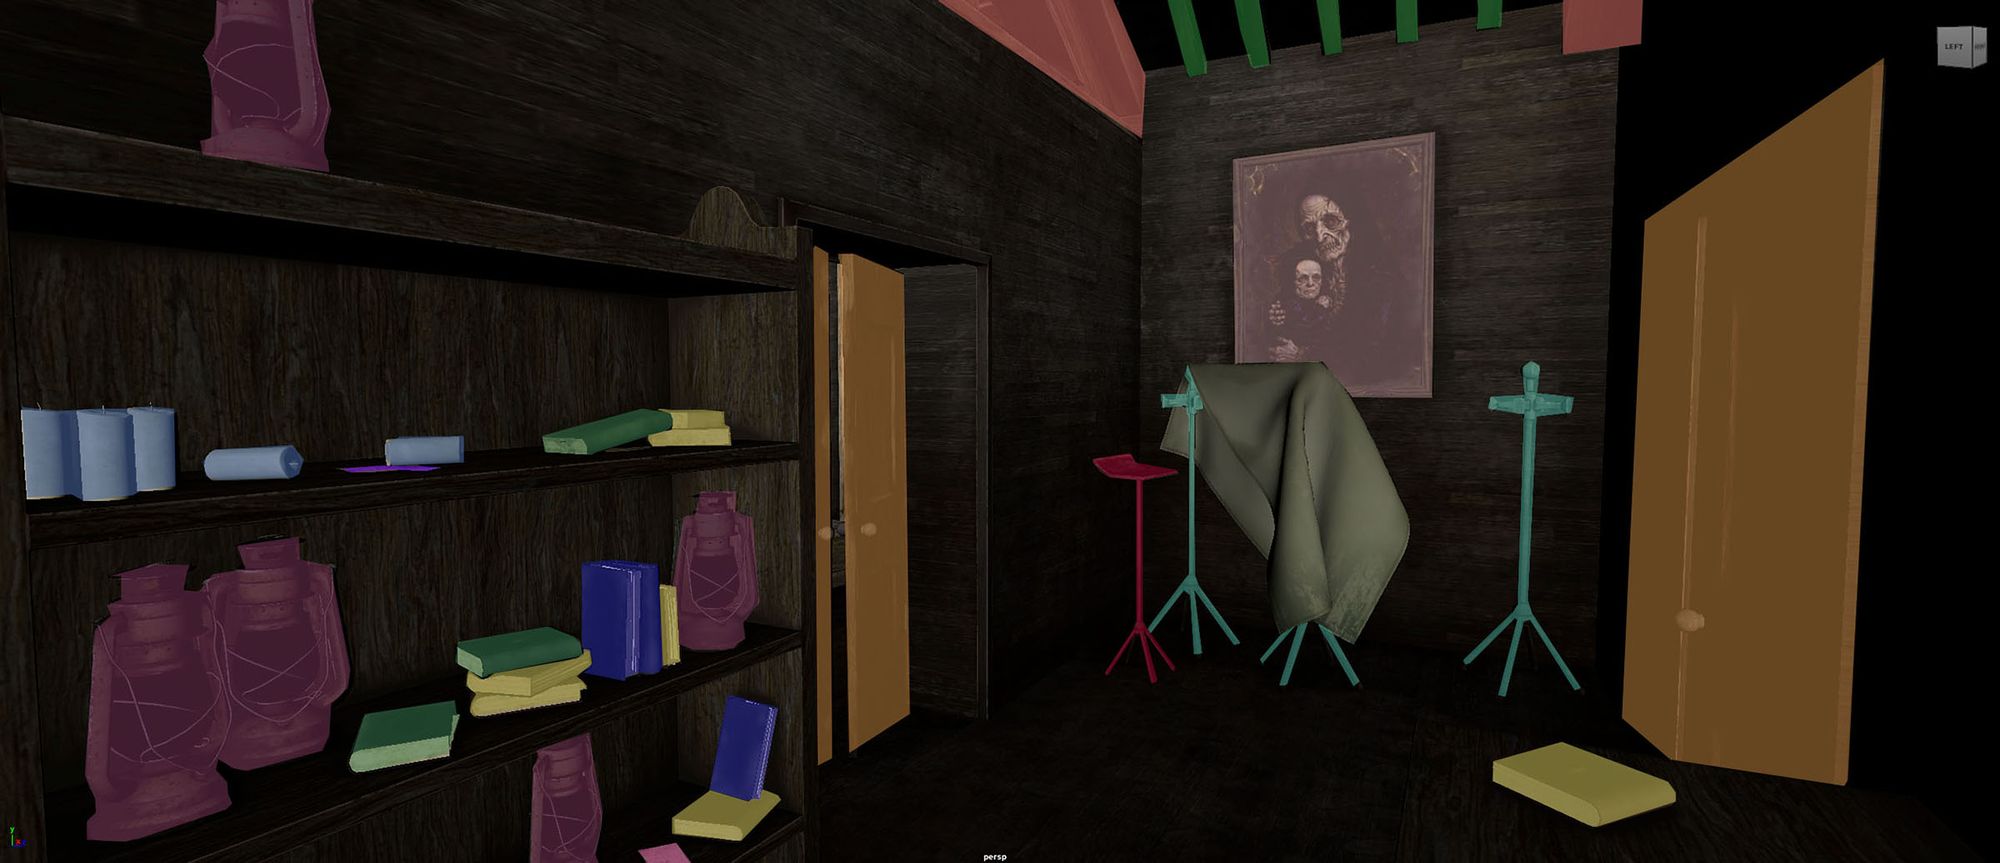
Making of the abandoned church: Jerusalem’s Lot
Implementing AI into the workflow
Modeling props
Modularity of the environment
Texturing props
Rendering the final scene
Conclusion
Making of Calvin McCann
The religious manservant
Clothing creation
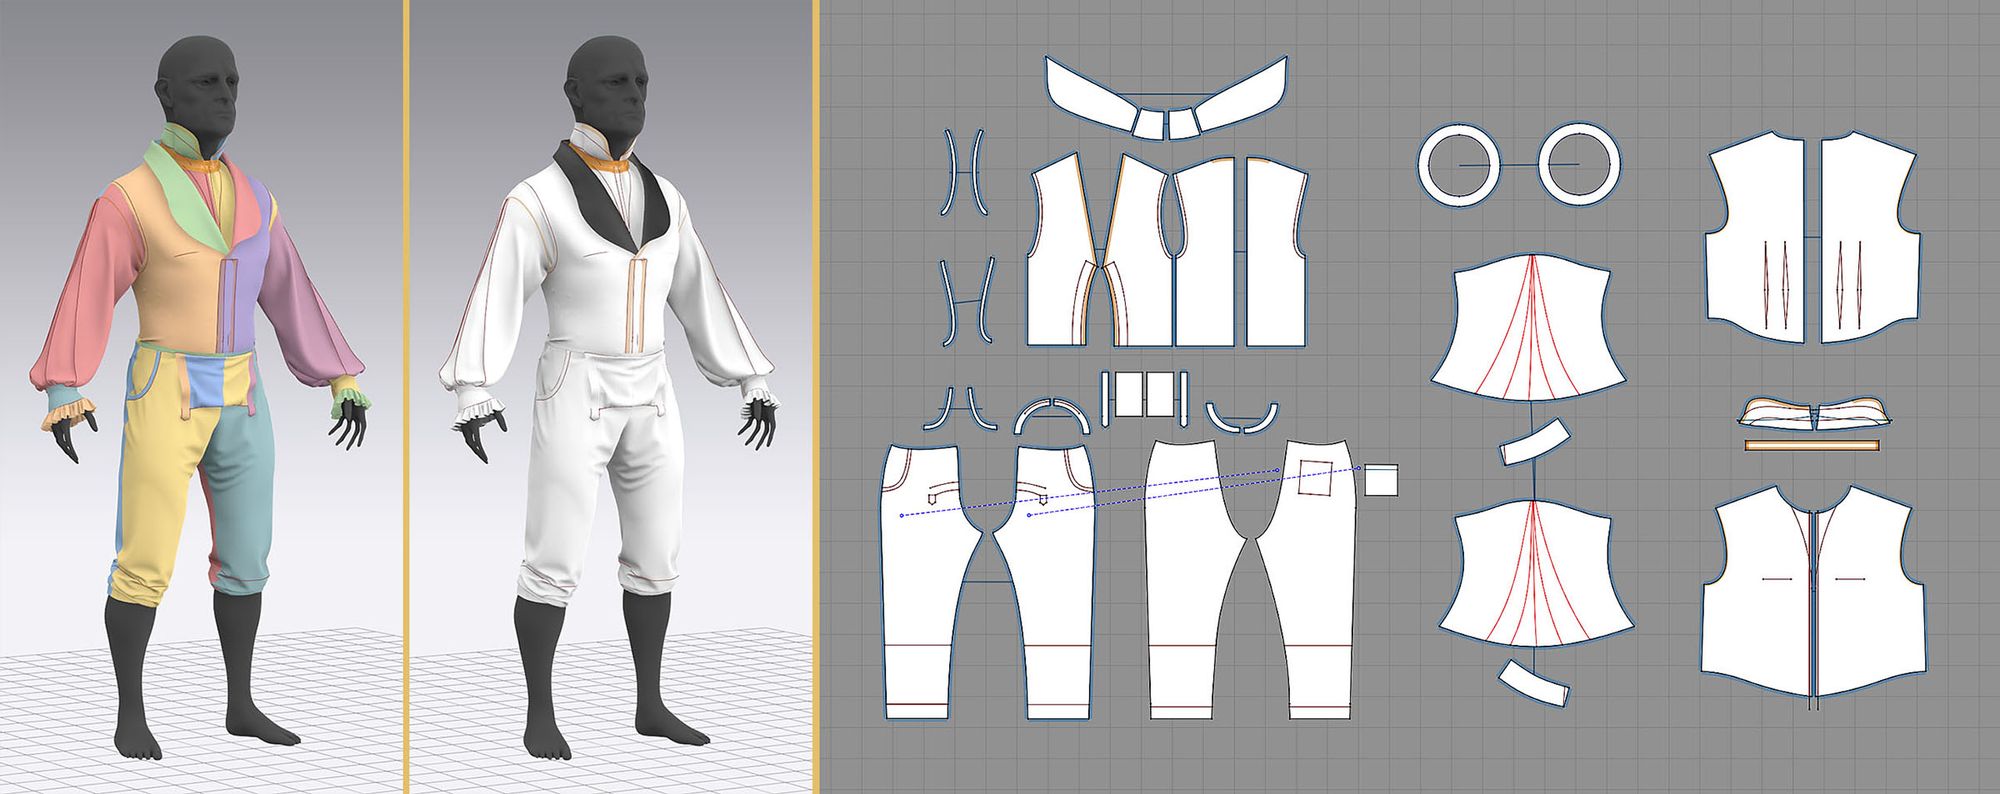
Marvelous Designer is one of my favourite software; I have so much fun every time I am required to create and simulate different types of clothes. Here I needed to create the gilet, the shirt, and the pants of Calvin. About the buttons, the flask, the bag, the boots, and the foulard, I wanted to model them in Maya and then bring them in ZBrush later.
In Marvelous I created the patterns mainly using the Polygon tool, without tracing them: I personally think a garment should be created based on the proportions of your character, so copying and simply tracing the patterns of something you find on the internet won’t work out well. In addition to the Polygon tool, also the Rectangle and Ellipse tools are very useful in some situations to start with.
Simulated clothes and 2D patterns
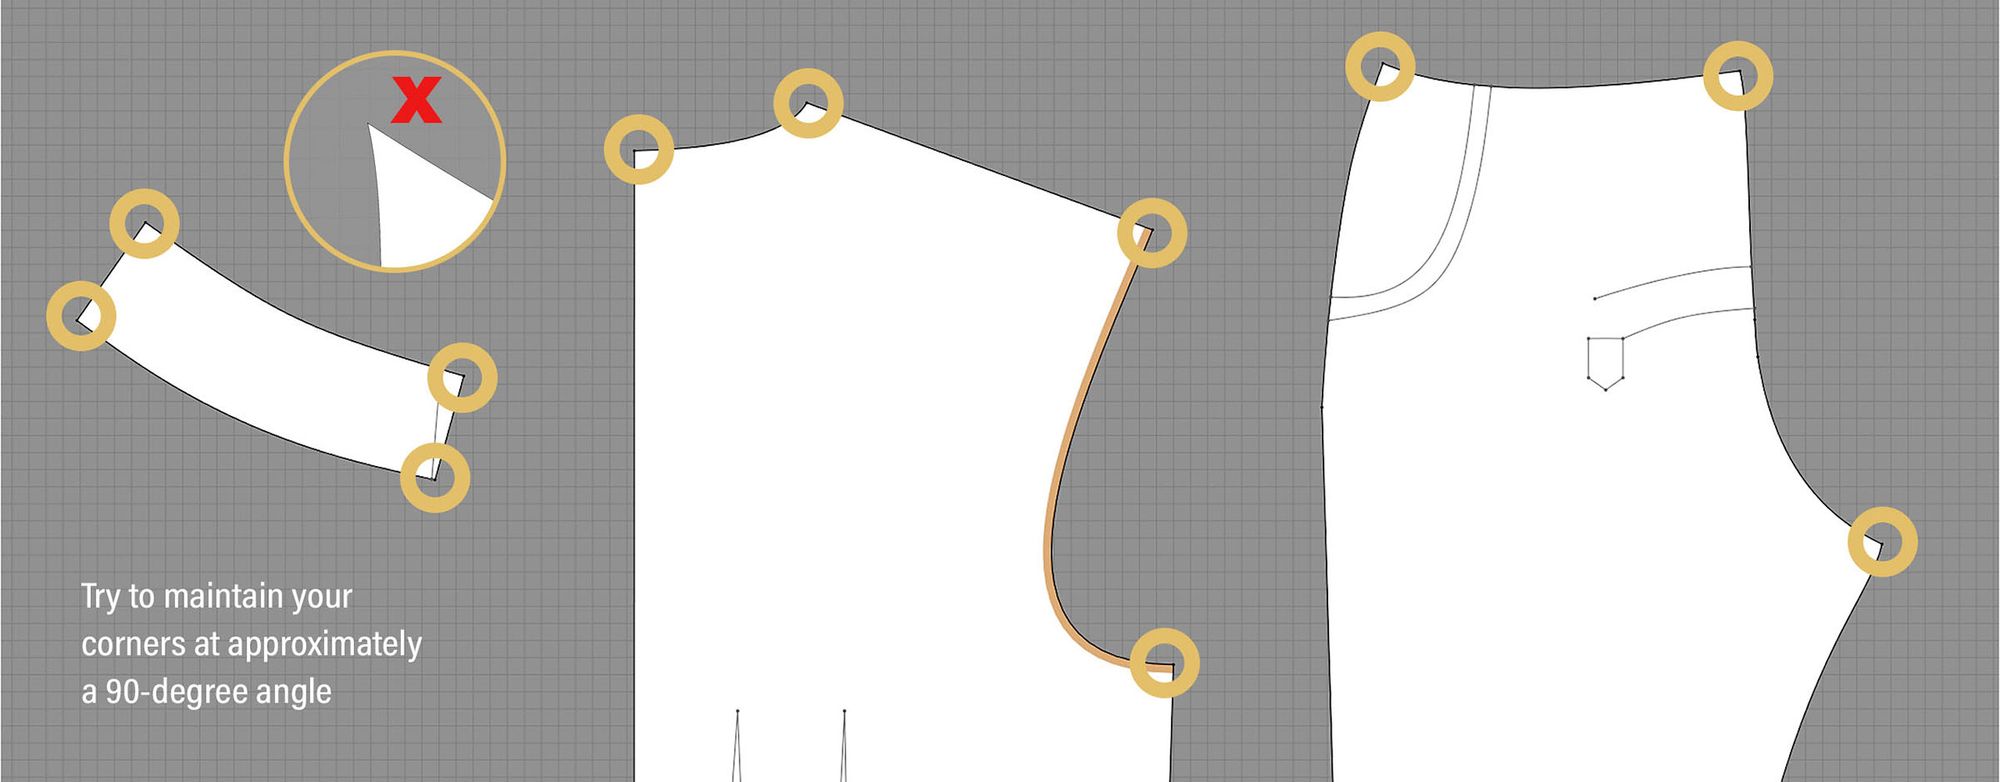
The most important advice I can give someone when facing patternmaking is to ensure the corners of your patterns maintain a 90-degree angle; this way, you avoid undesired pinching and flaring. This also means your garments will fit your avatar way better.
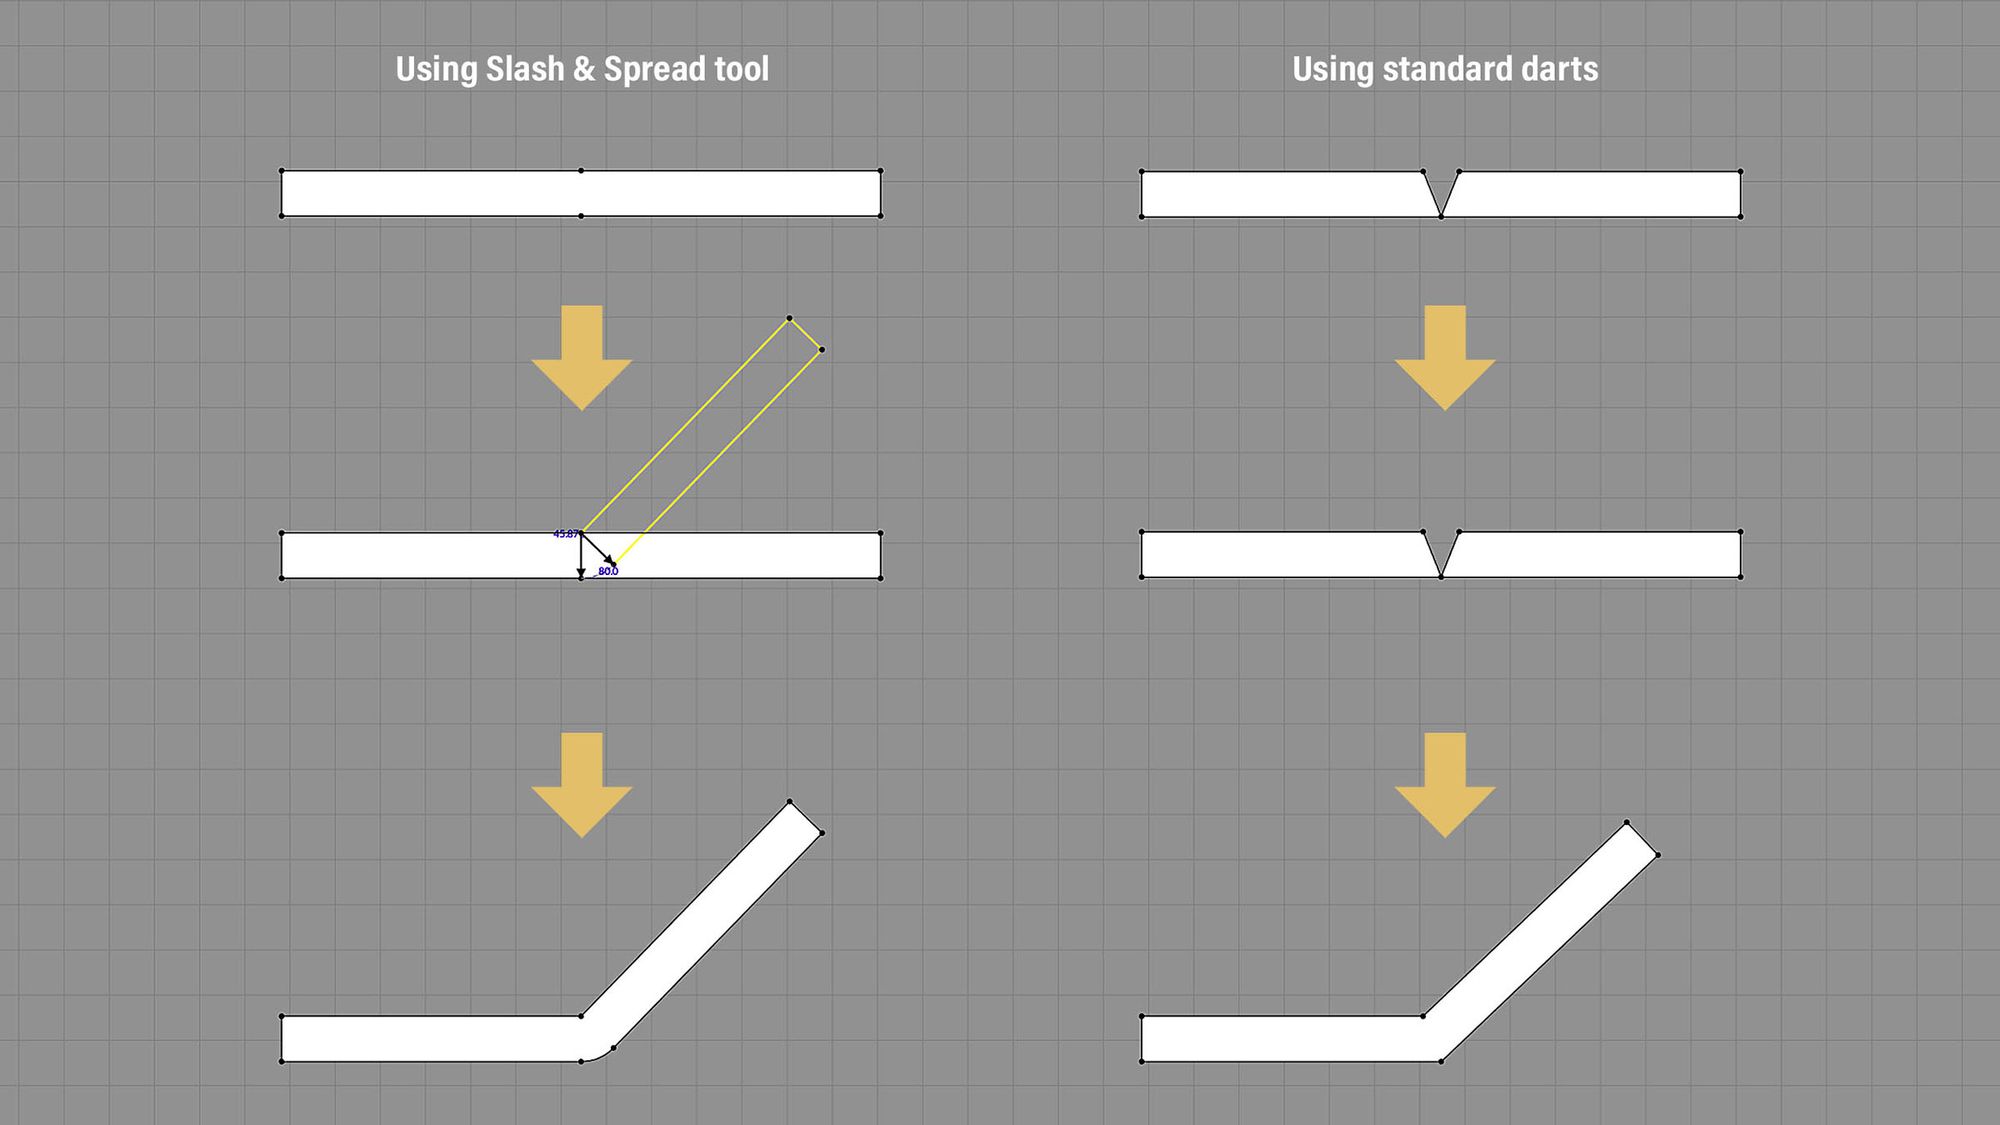
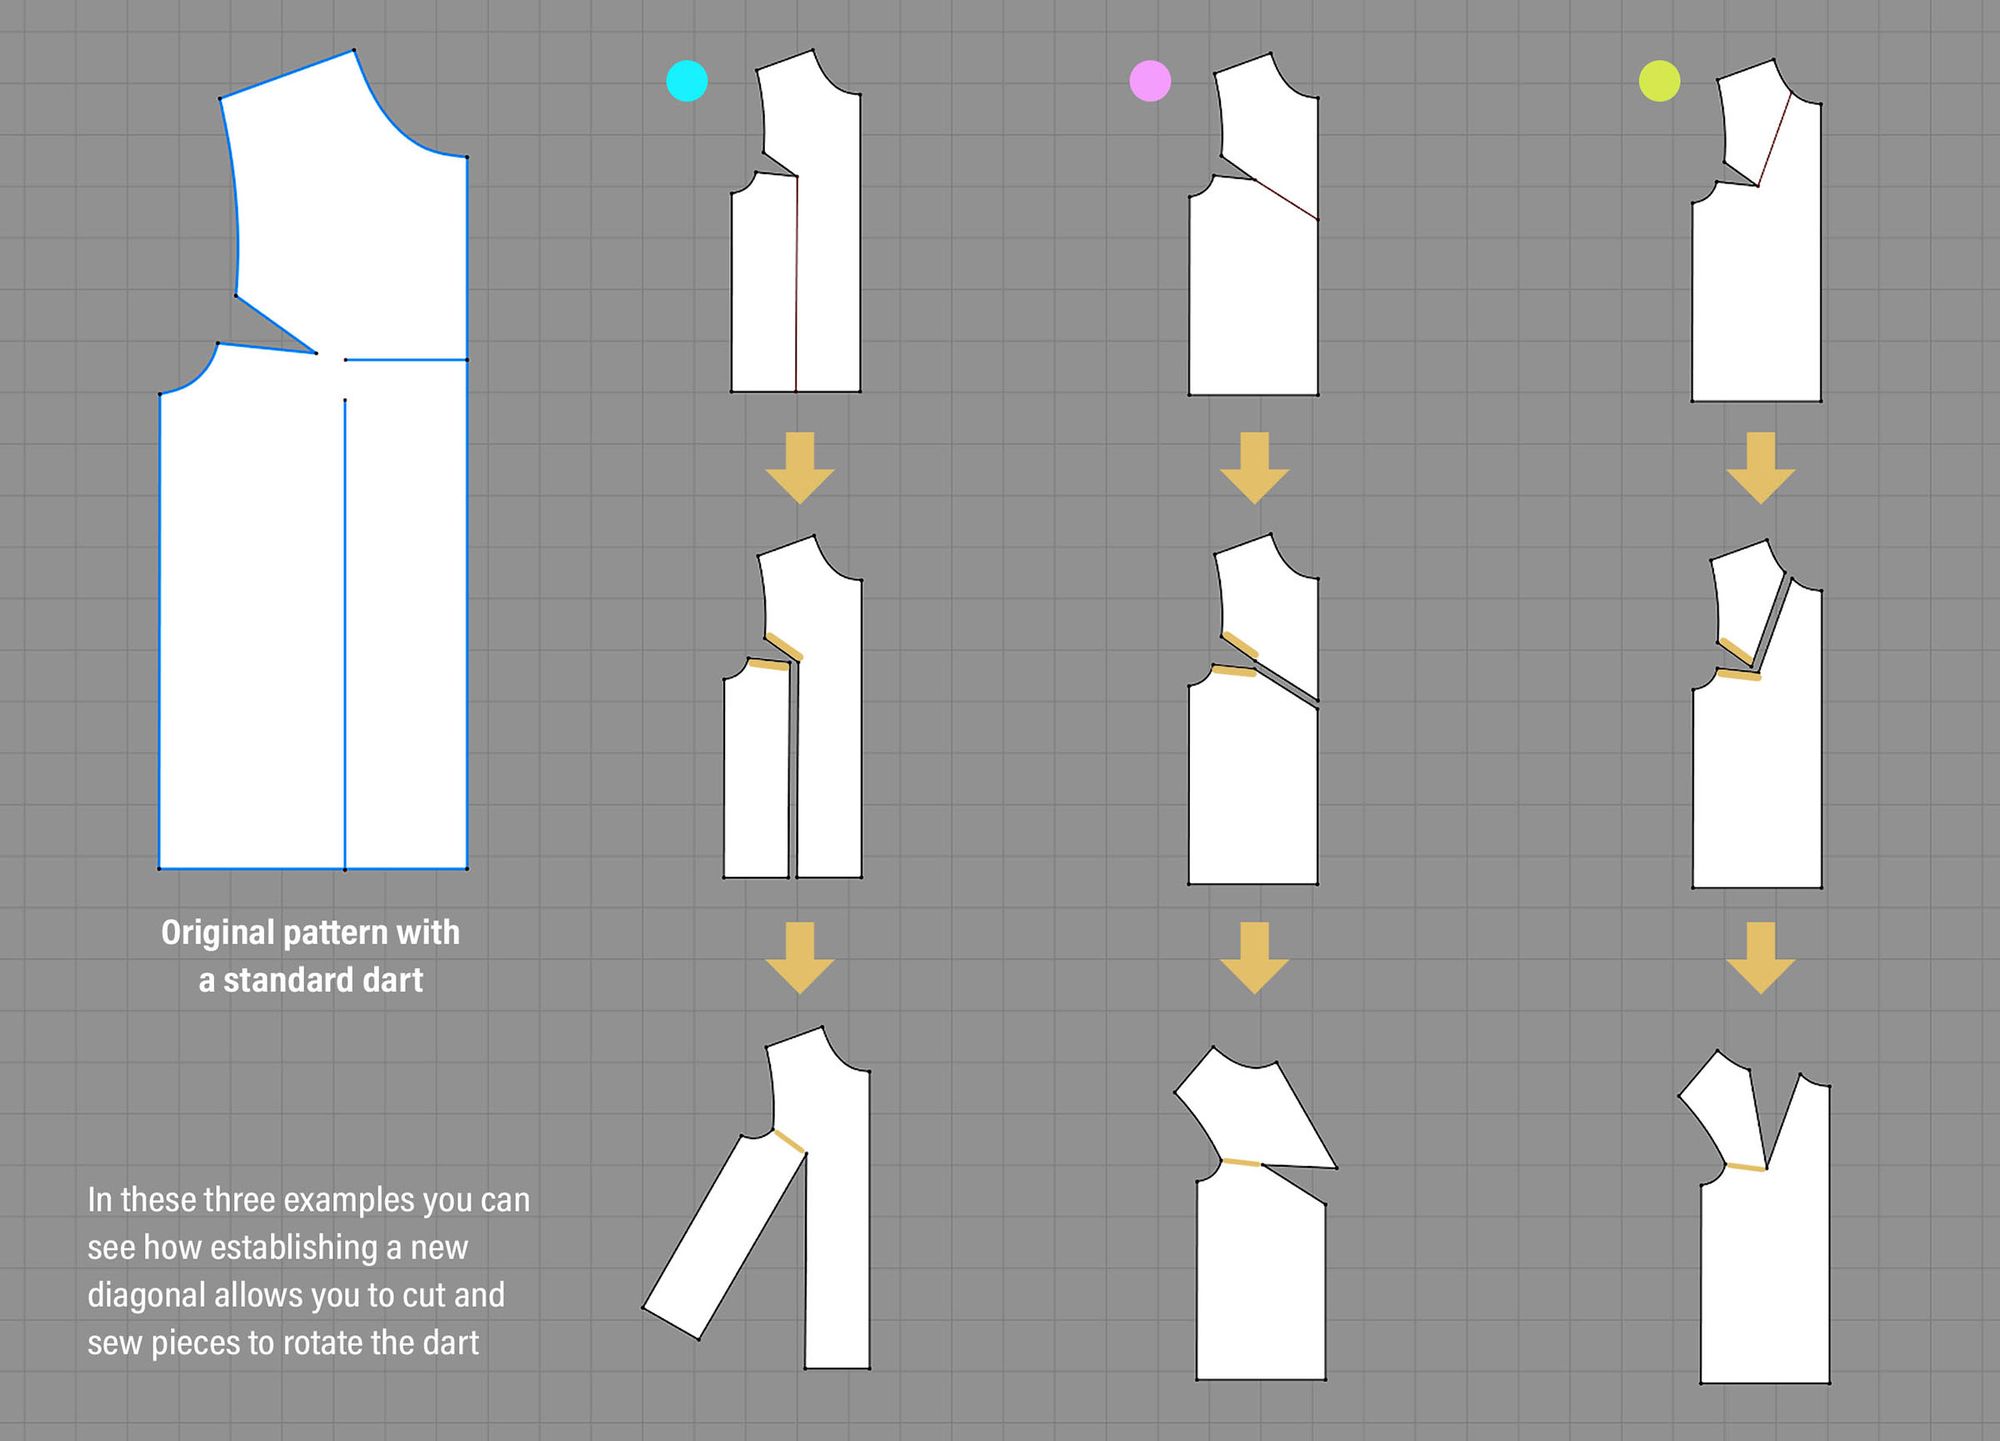
Another very useful feature in Marvelous is the Slash & Spread tool that allows you to shorten or lengthen a piece of clothing but taking advantage of curvature. If you are used to removing excess fabric using darts, you can use proper curvature to do the same thing!
You can achieve the same result of using a dart by taking advantage of curvature (Slash & Spread tool)
Also remember that darts can be rotated around your pattern based on your needs, and this can be useful knowledge if you need to interpret a pattern someone else made. To do so, draw an internal line from the tip of the dart to whatever point you prefer on the opposite border. Then cut along that diagonal line you just created and merge the sides of the original darts.
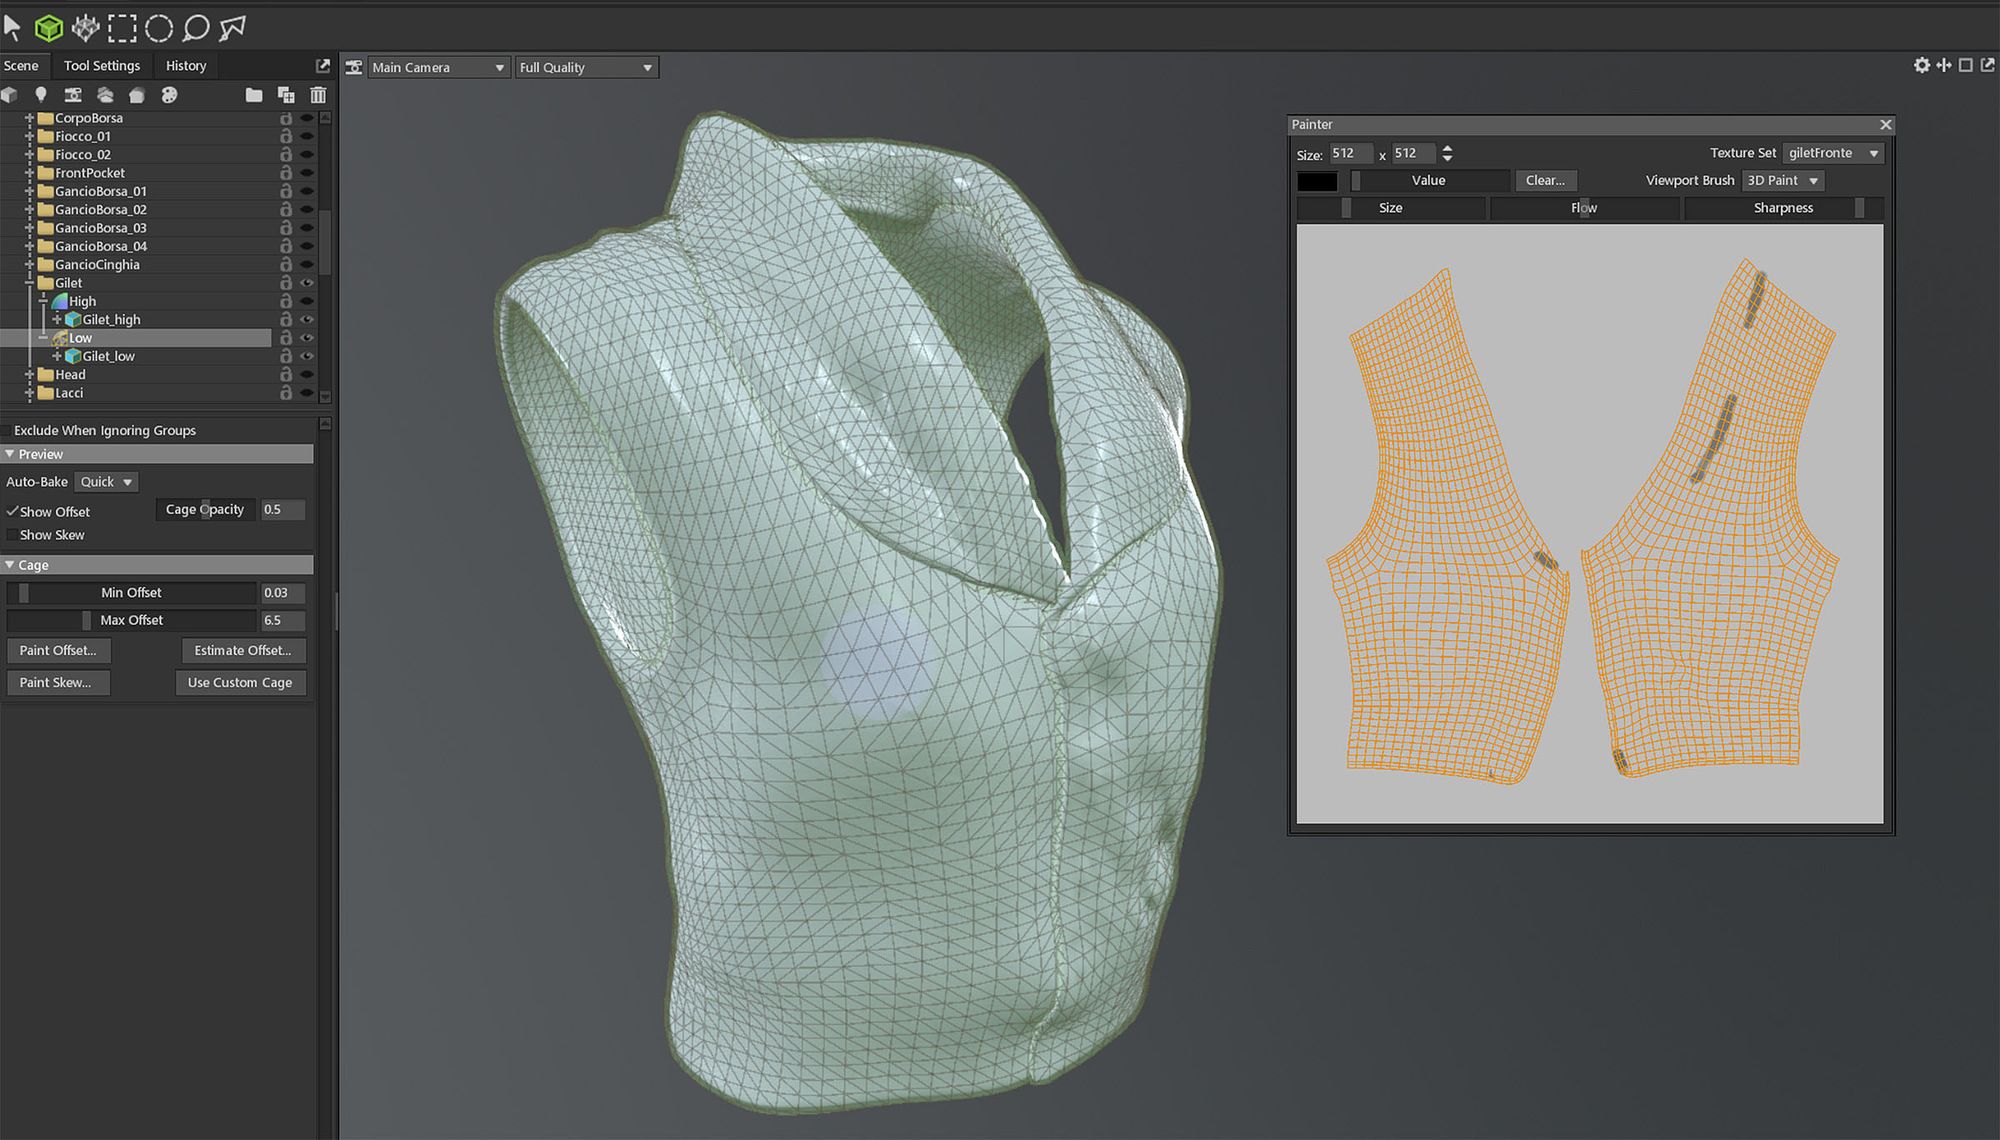
Now it is time to move on and have a look at the most tedious part of this clothing-creation pipeline: retopology and mesh cleaning. I always do retopology by hand, but I find the retopology tools in Maya being quite buggy, so I usually do it in TopoGun. As for the cleaning part, I do it in Maya.
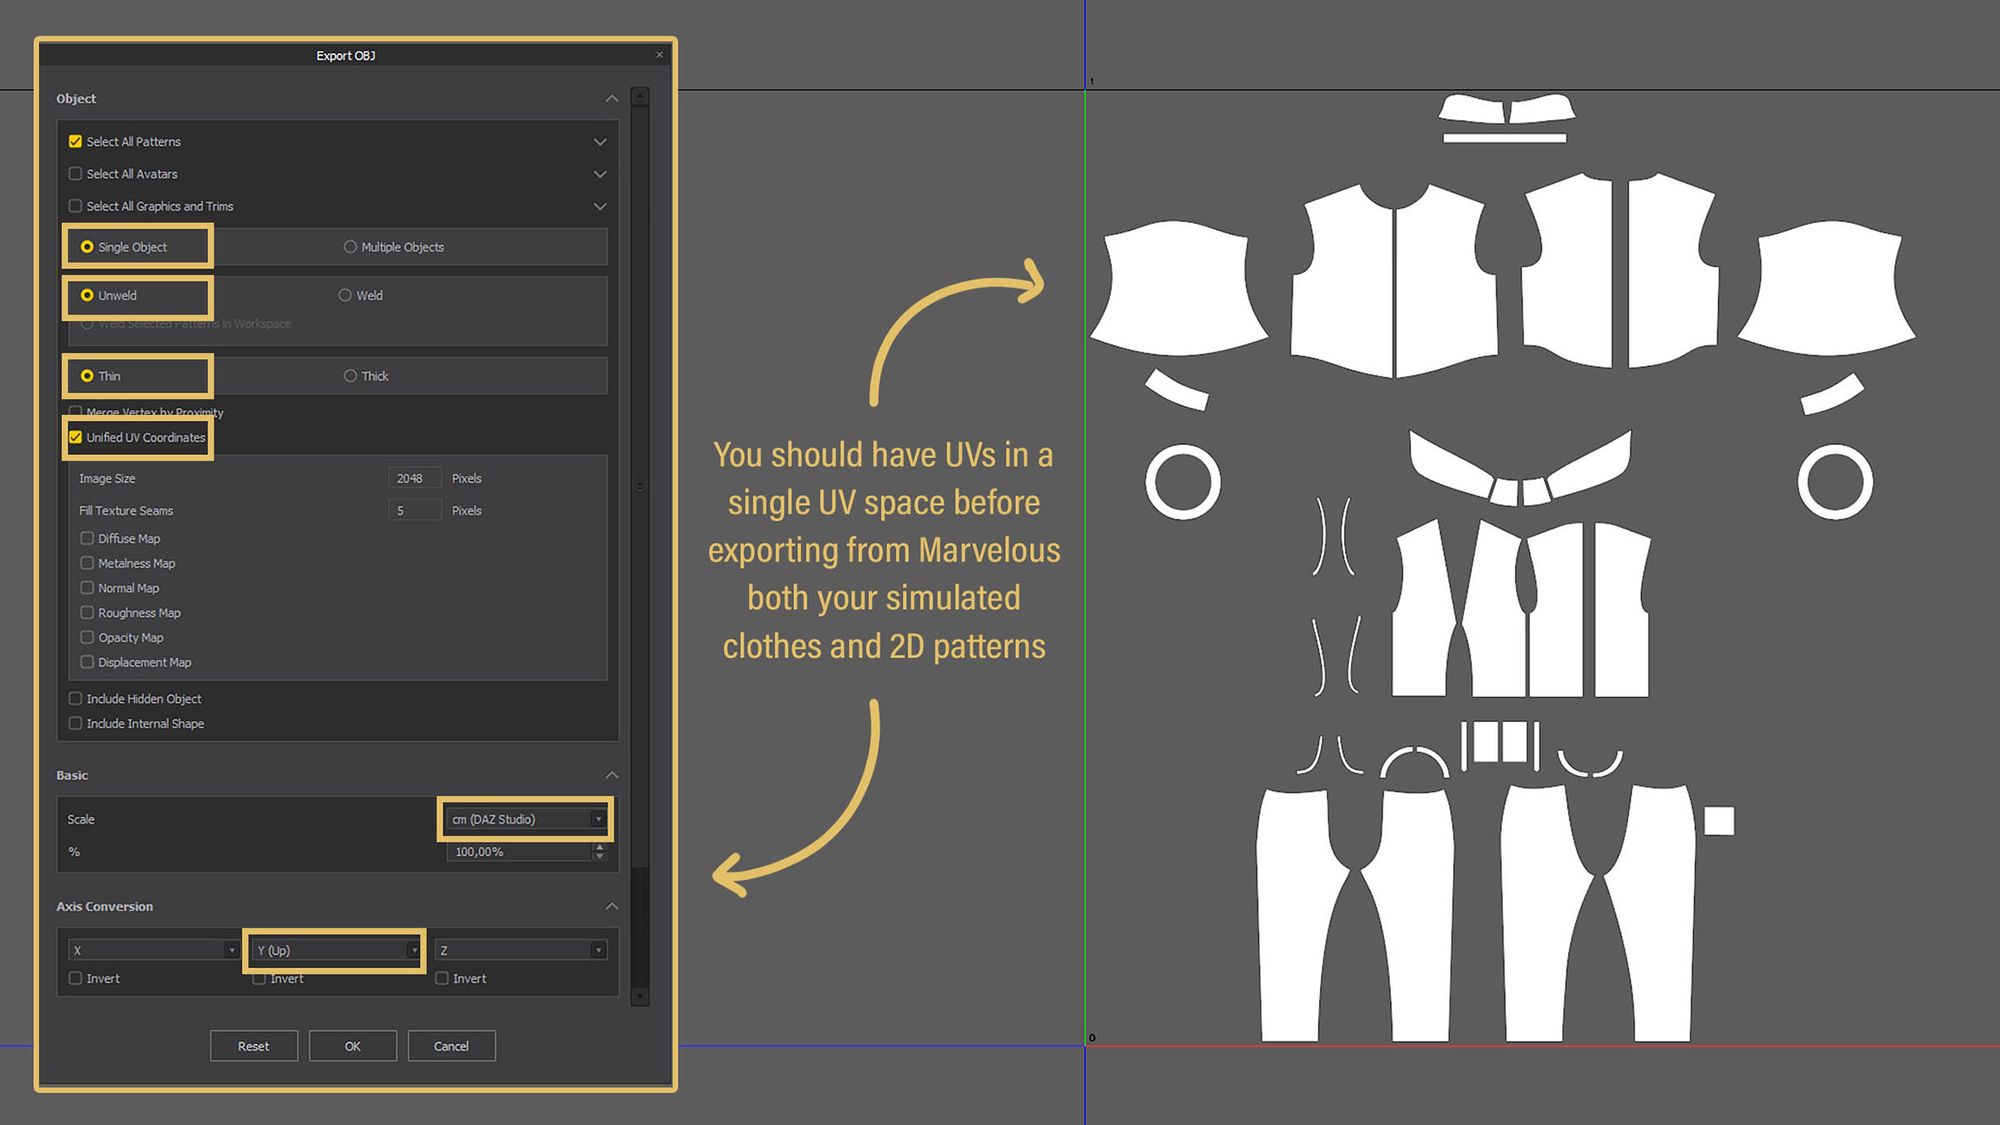
So when my outfit is finished, I usually export both the 2D patterns and my simulated clothing with a good particle distance, no thickness, unweld vertices, and, very important, with UVs.
💡
Before exporting from Marvelous, I always make sure my clothes have UVs rearranged in a single UV space. This is crucial for the later stage of mesh cleaning.
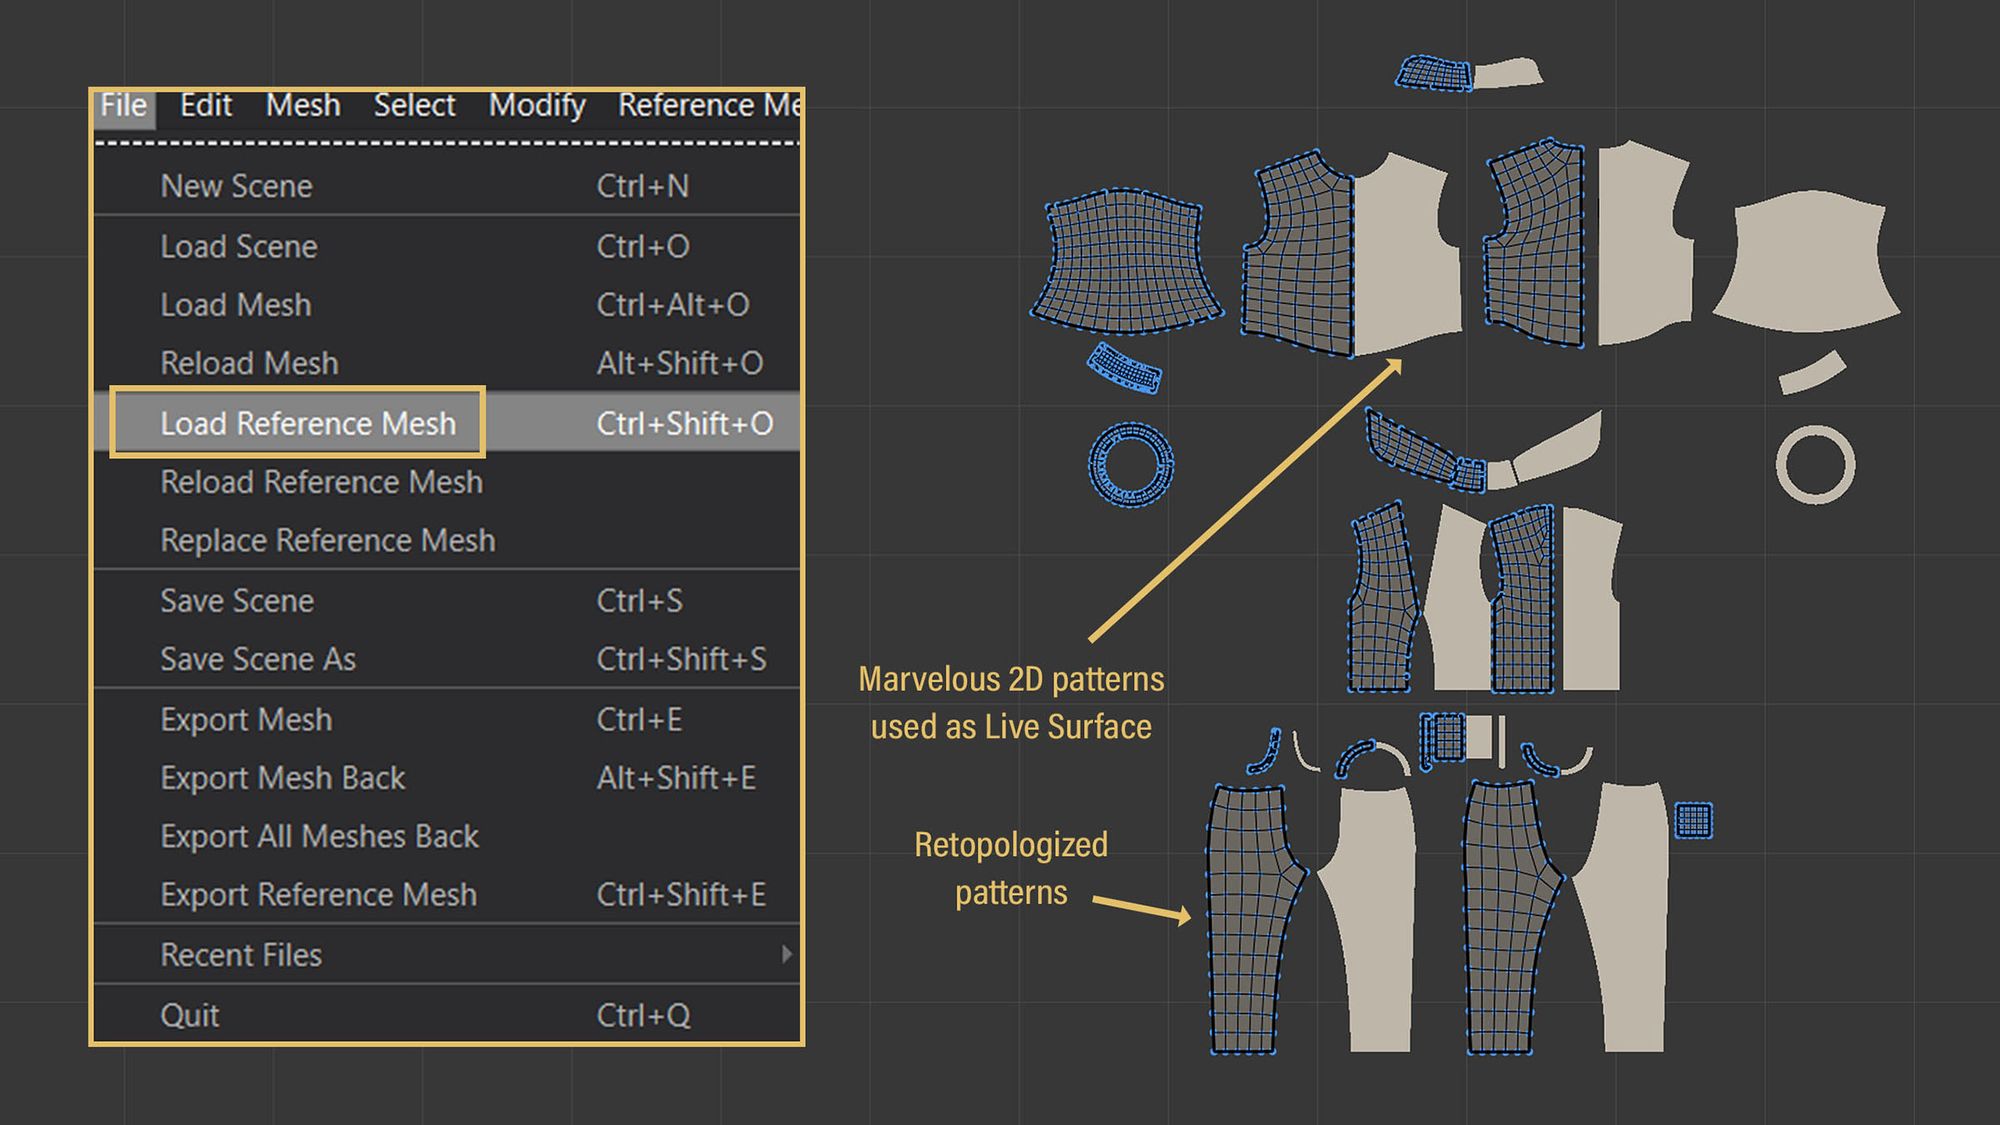
For the next step, I import my 2D patterns in TopoGun as a Reference Mesh, so they become a Live Surface like in Maya. Then I proceed retopologising only one half of the patterns because they are symmetrical and I can mirror them later in Maya. Finally, I export the retopologised 2D patterns.
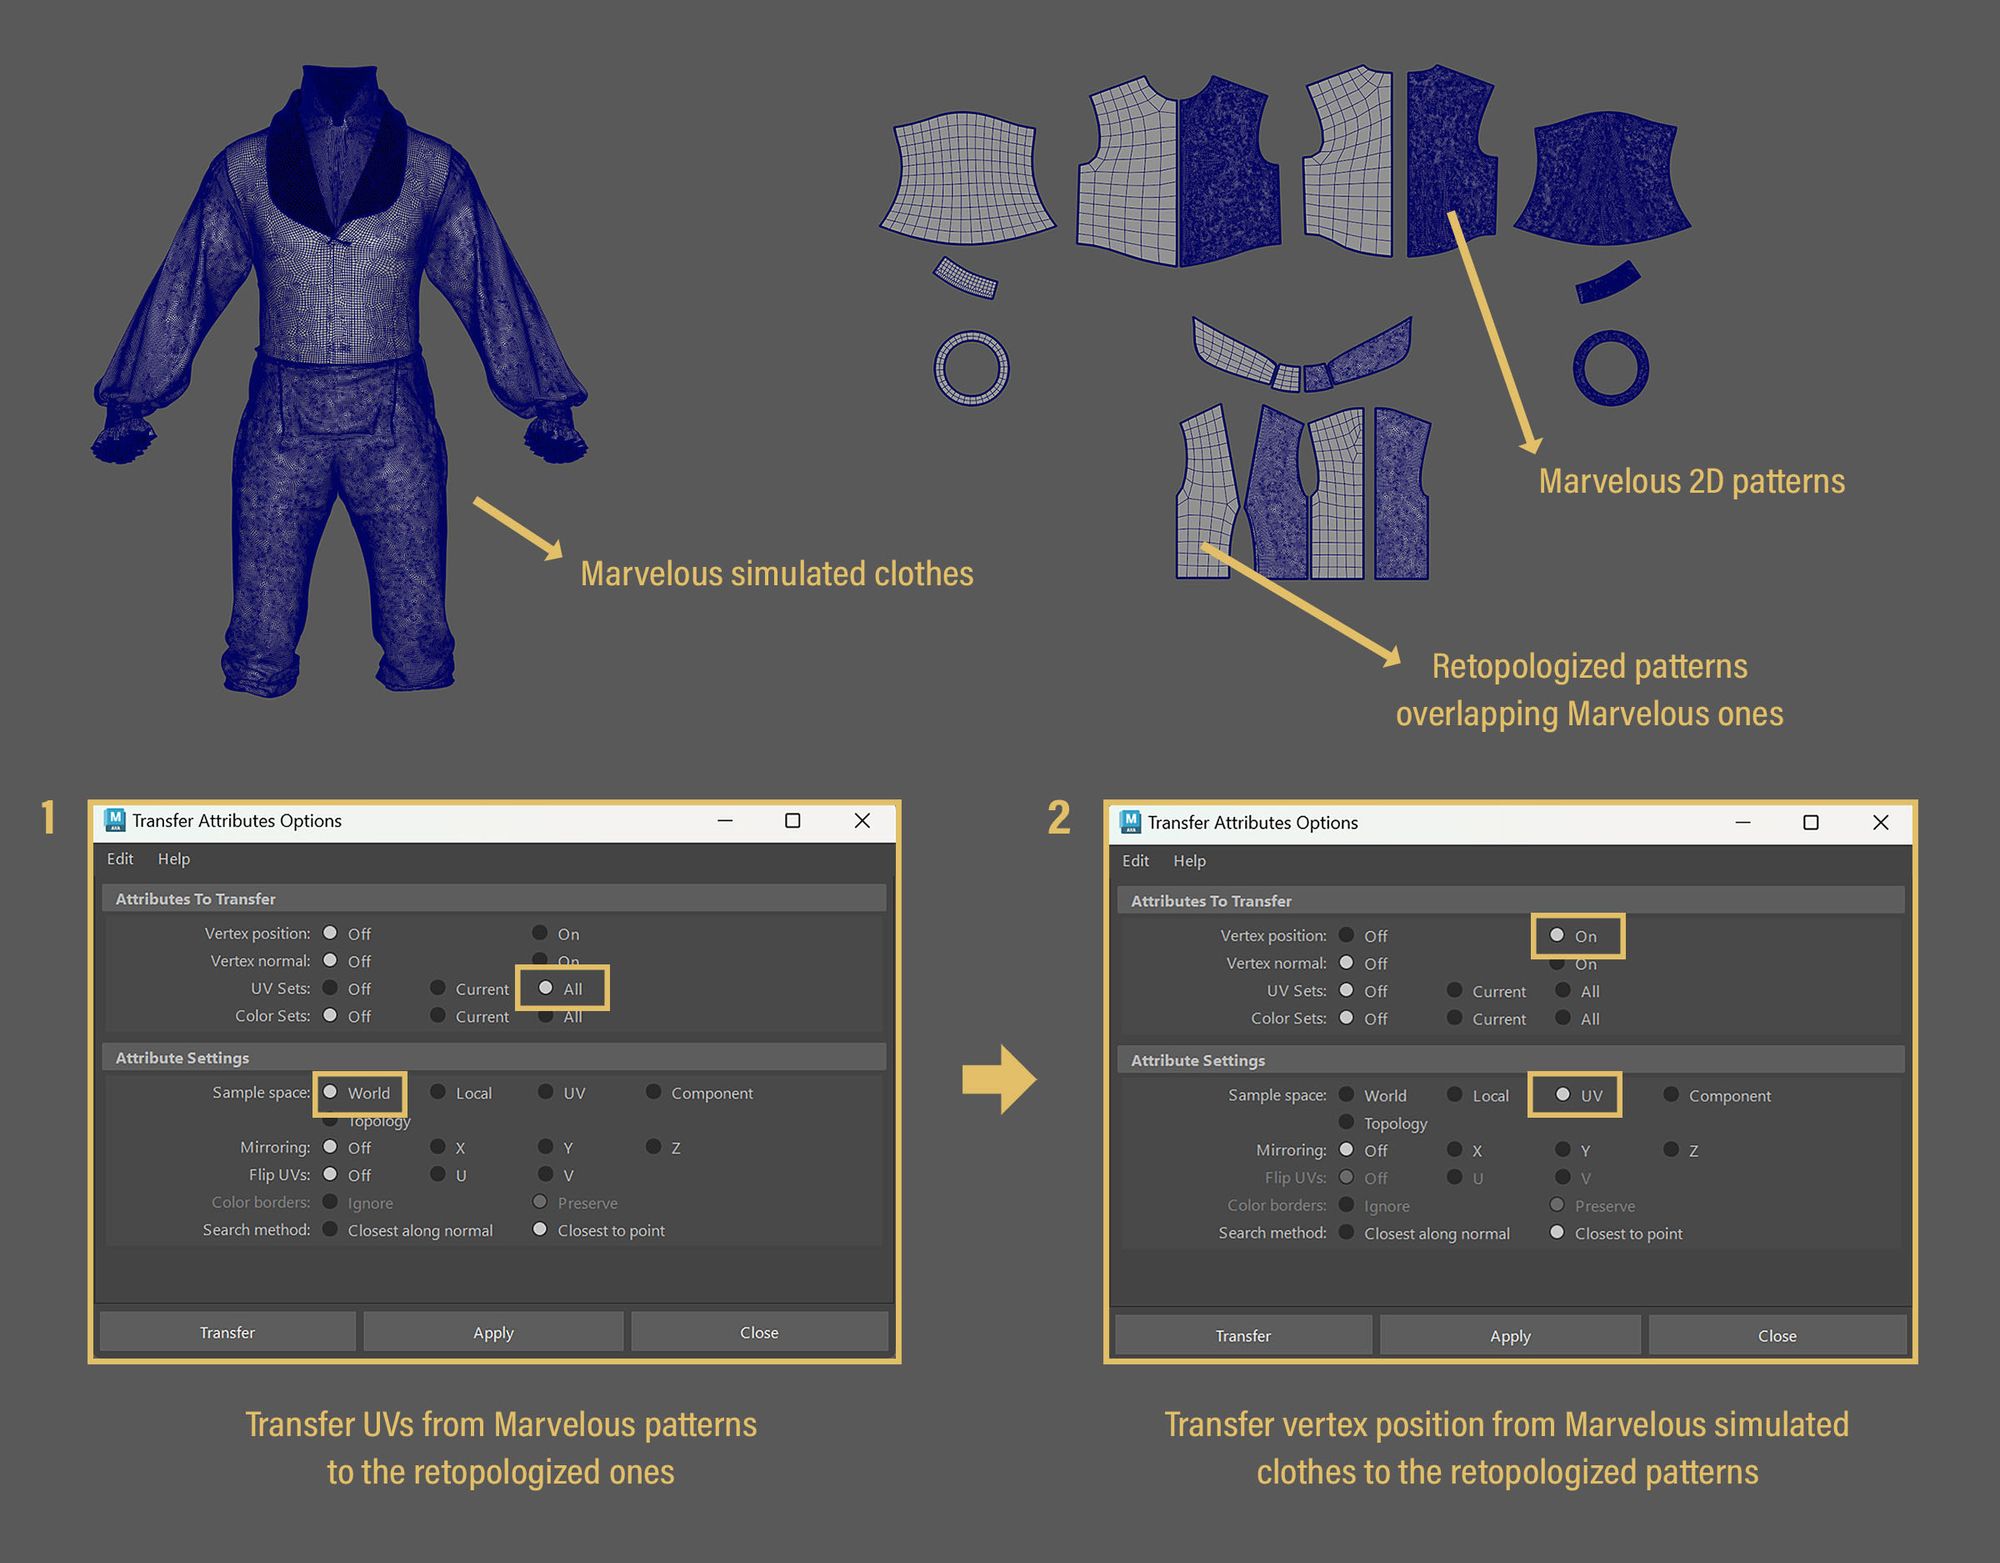
As for the final step, I import my simulated clothes and 2D patterns, both exported from Marvelous, and also the new retopologised 2D patterns. Since we used the Marvelous 2D patterns as a Live Surface, the new retopologized ones will perfectly overlap them in Maya. This allows me to transfer UVs from the Marvelous 2D patterns to the retopologized ones, taking advantage of World space - this is why I previously said making sure you have UVs on your Marvelous clothes, when exporting, is crucial.
Leveraging on the same UVs again, I also transfer vertex position from the simulated clothes to the retopologised patterns. This way, I obtain the same simulated clothes but with proper topology.
💡
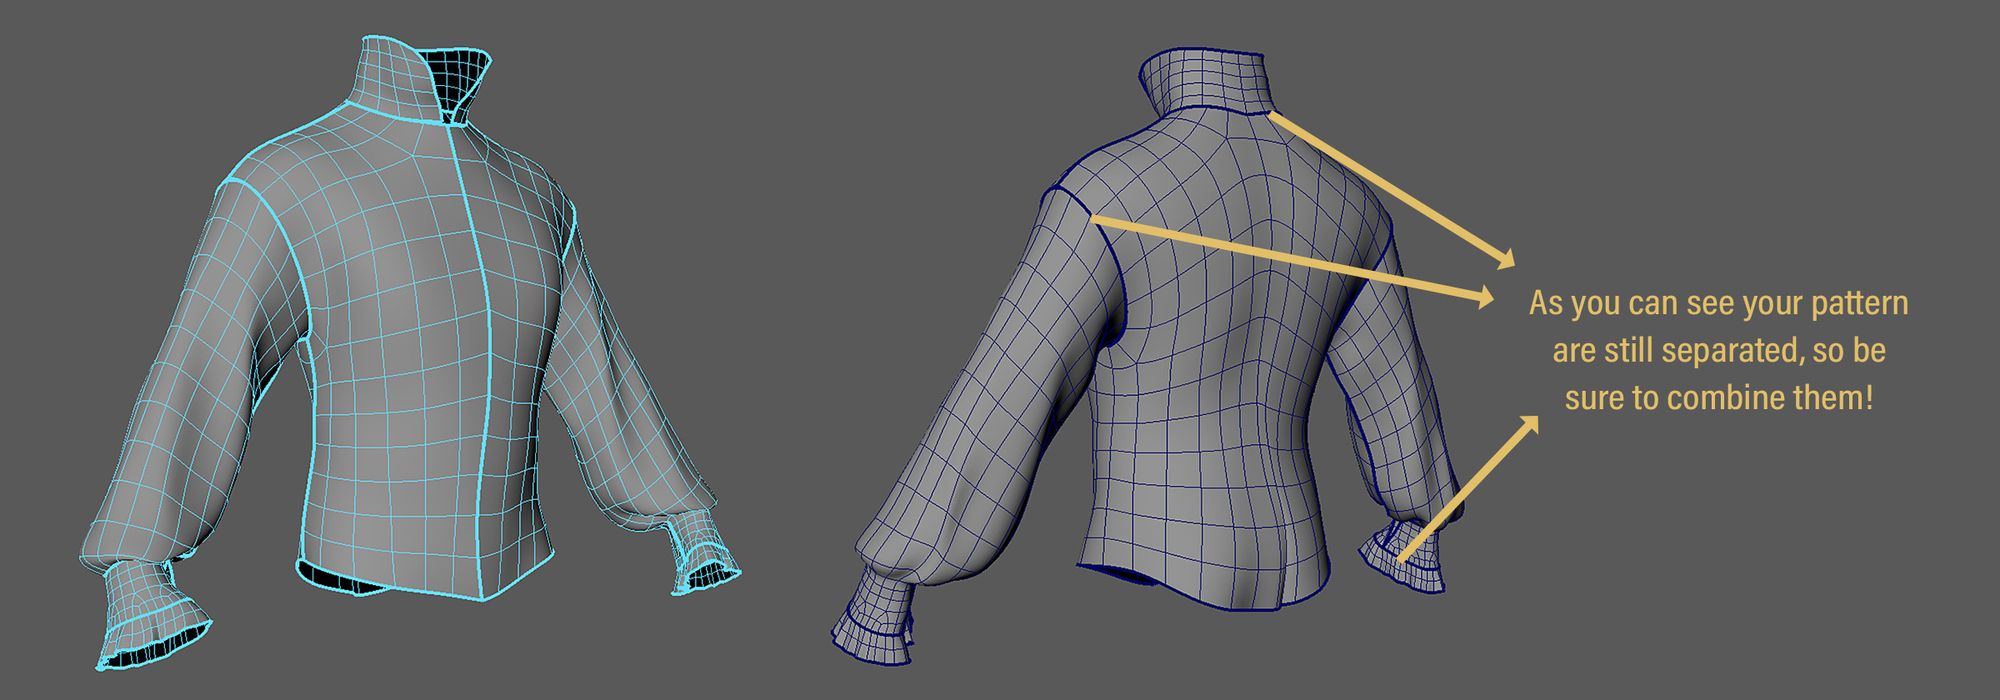
At this point, remember to combine the pieces of clothing and merge the vertices based on your needs!
Combine the pieces and merge the vertices.
Modeling and sculpting the head
Given both my sketches and references of precise male models, I aimed for facial and body traits that were something in-between. In the end, I had one goal: the character of Calvin had to be seen as religious, insecure, and worried about the situation he would have found himself in. So my main efforts went into thinking about his facial expression.
To sculpt the head in ZBrush, I started from a sphere and using Dynamesh, I adjusted the primary shapes until the silhouette was good enough for my personal tastes. Then I moved on duplicating the head and ZRemeshing it, taking advantage of the ZRemesher guides I quickly placed to create a sort of acceptable topology for sculpting with subdivisions. Finally, I projected the details from the duplicated head to the ZRemeshed one. That allowed me to continue sculpting secondary and eventually tertiary details too.
Use of ZRemesher and guides to get a uniform quad topology, allowing you to subdivide and add detail to your high-poly.
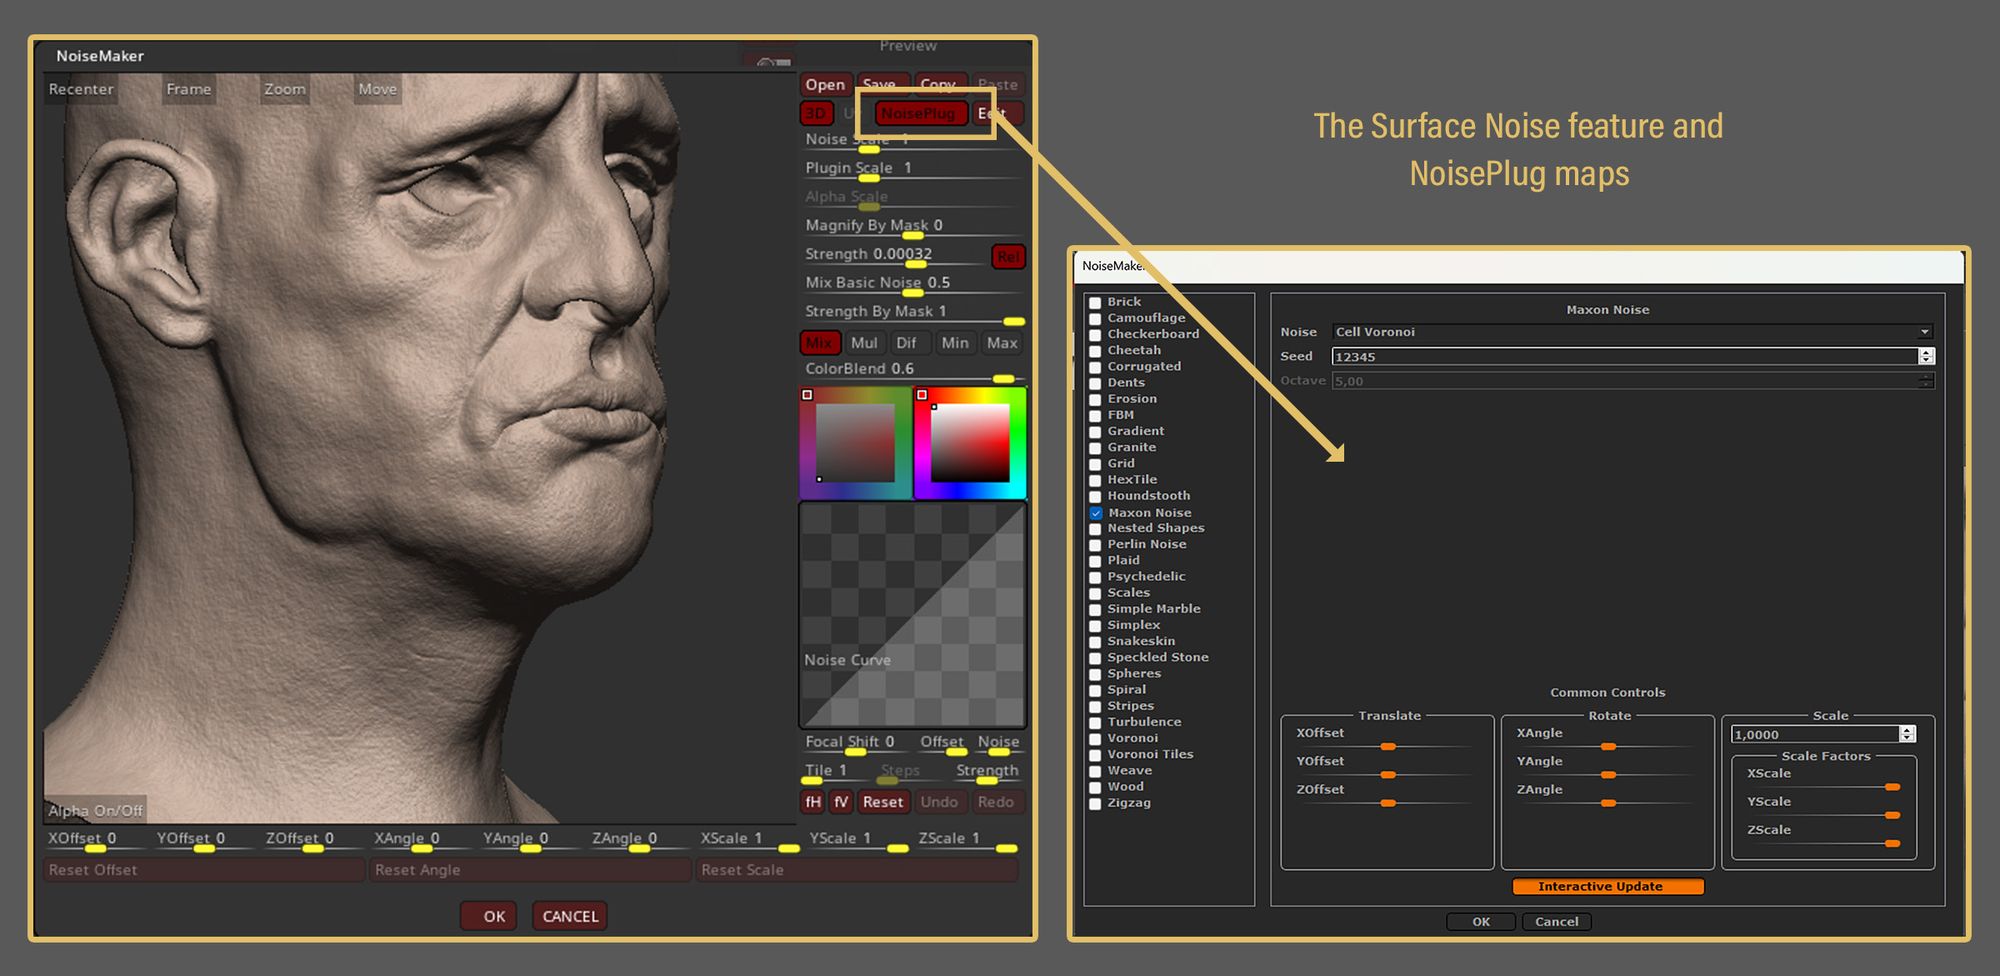
At the time I made Calvin, I still didn’t get in the habit of using TextureXYZ displacement maps, for example, so I used the Surface Noise feature with different NoisePlug maps, then to refine everything manually. Storing different Morph Targets and using the Morph brush helped me during this phase by allowing me to work faster restoring unwanted areas.
In closing, while for your high-poly character model you can use ZRemesher to quickly achieve a quad uniform topology and subdivide it to add detail, for your low-poly mesh you always need to retopologize it properly.
💡
ZRemesher is well known for creating spirals loops, and making the UV stage a nightmare, besides not creating a good topology for animation purposes.
Modeling the accessories
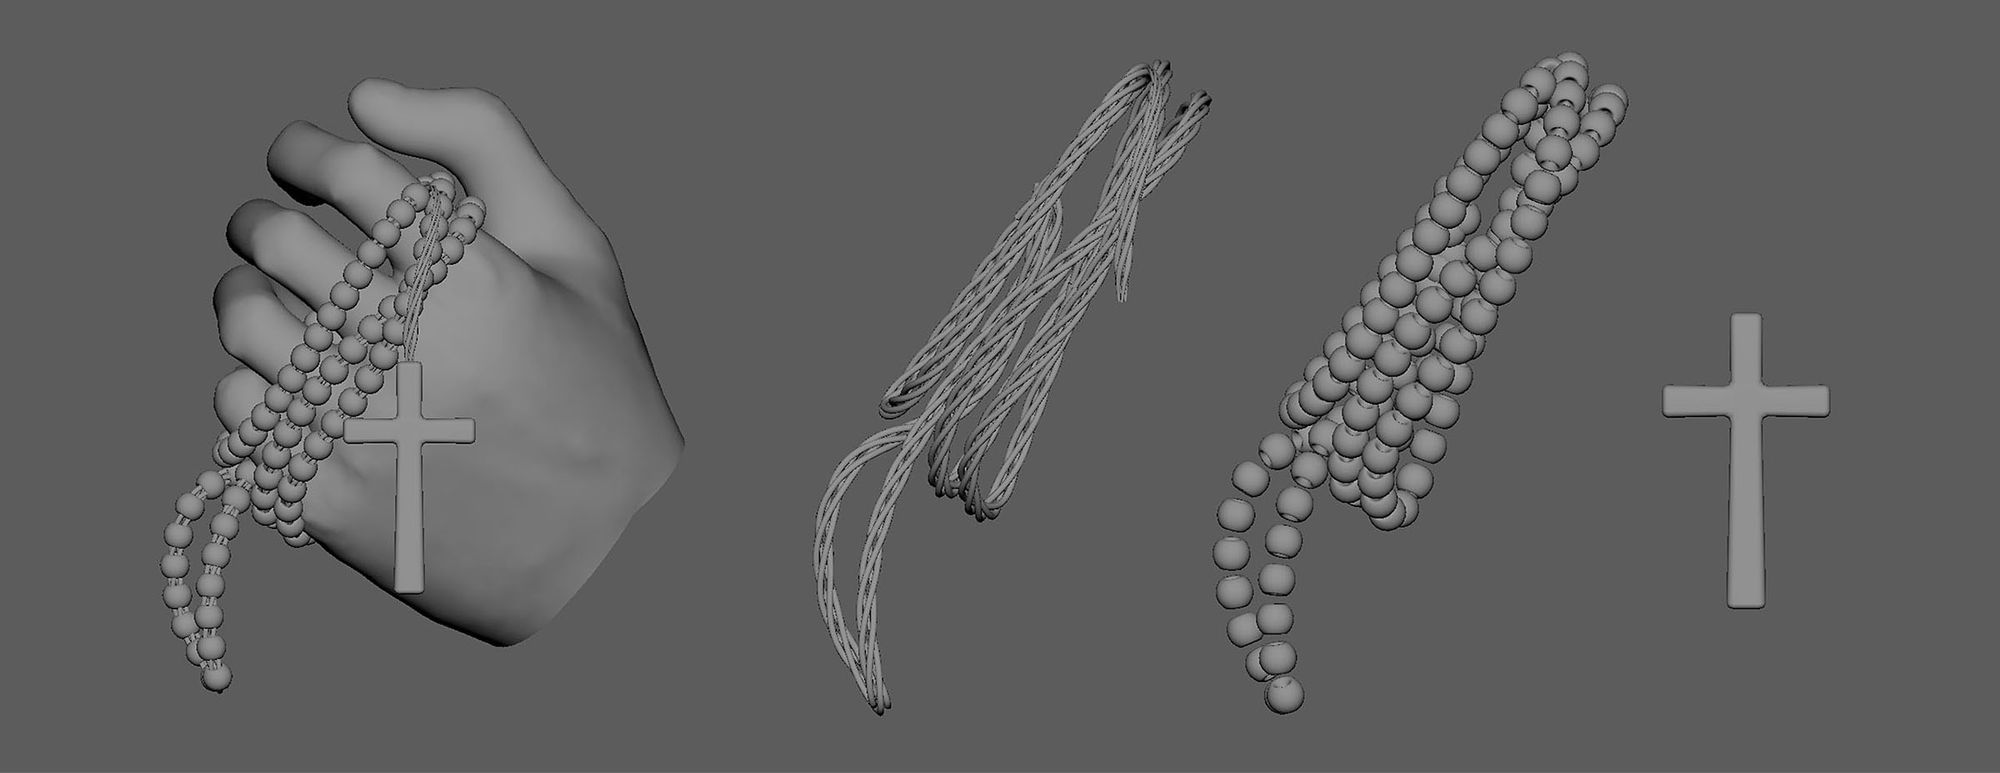
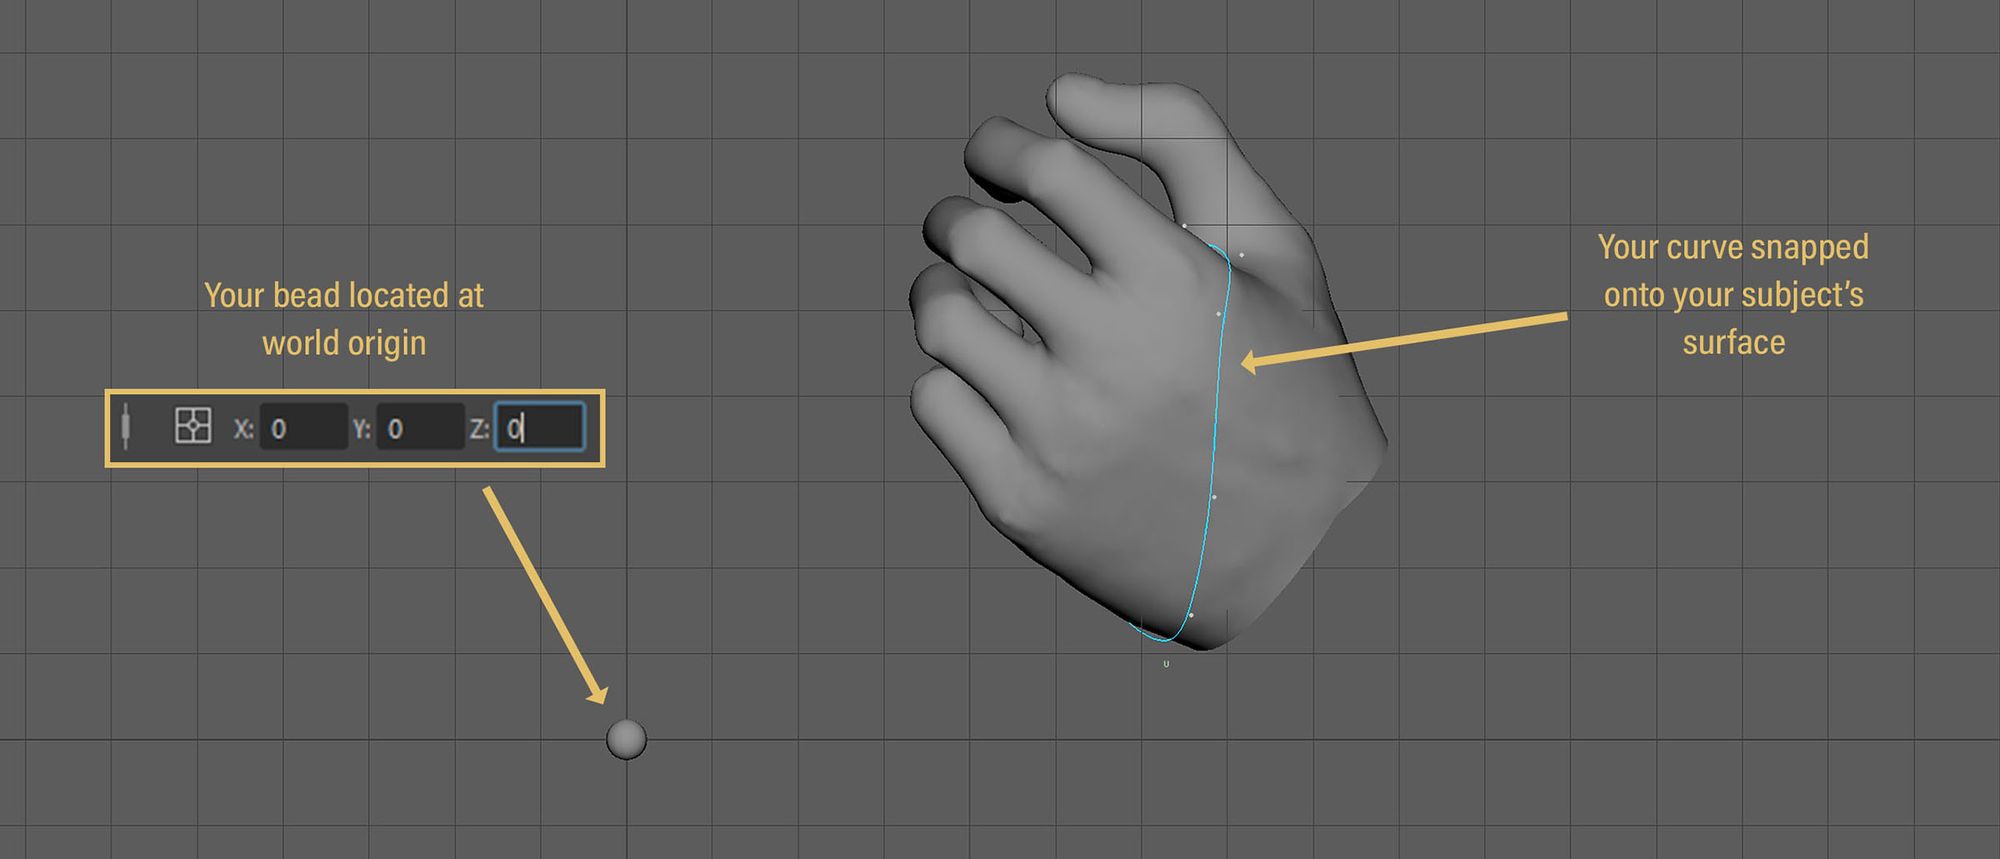
As I previously mentioned, for this character, I decided to model apart the flask, the bag, the boots, and the foulard instead of simulating them in Marvelous. Since those are modeled using common techniques, in this paragraph, I will cover the modeling phases of the rosary that Calvin holds in his left hand in the final scene. I am going to show you the techniques I used to create it procedurally. This is the perfect scenario where the MASH feature in Maya comes in handy because it had to wrap around Calvin’s left hand and it had to be a string of wooden beads.
To generate a procedural string of beads using MASH in your scene, first, you should have just one bead and the subject you want to wrap the chain around. Make sure the single bead is located at world origin (0,0,0), has no history, and frozen transforms. Then select your subject, make it a Live Surface, and draw a curve around it using the EP Curve Tool. You can see the curve snaps to the Live Surface, and you should be in the following situation:
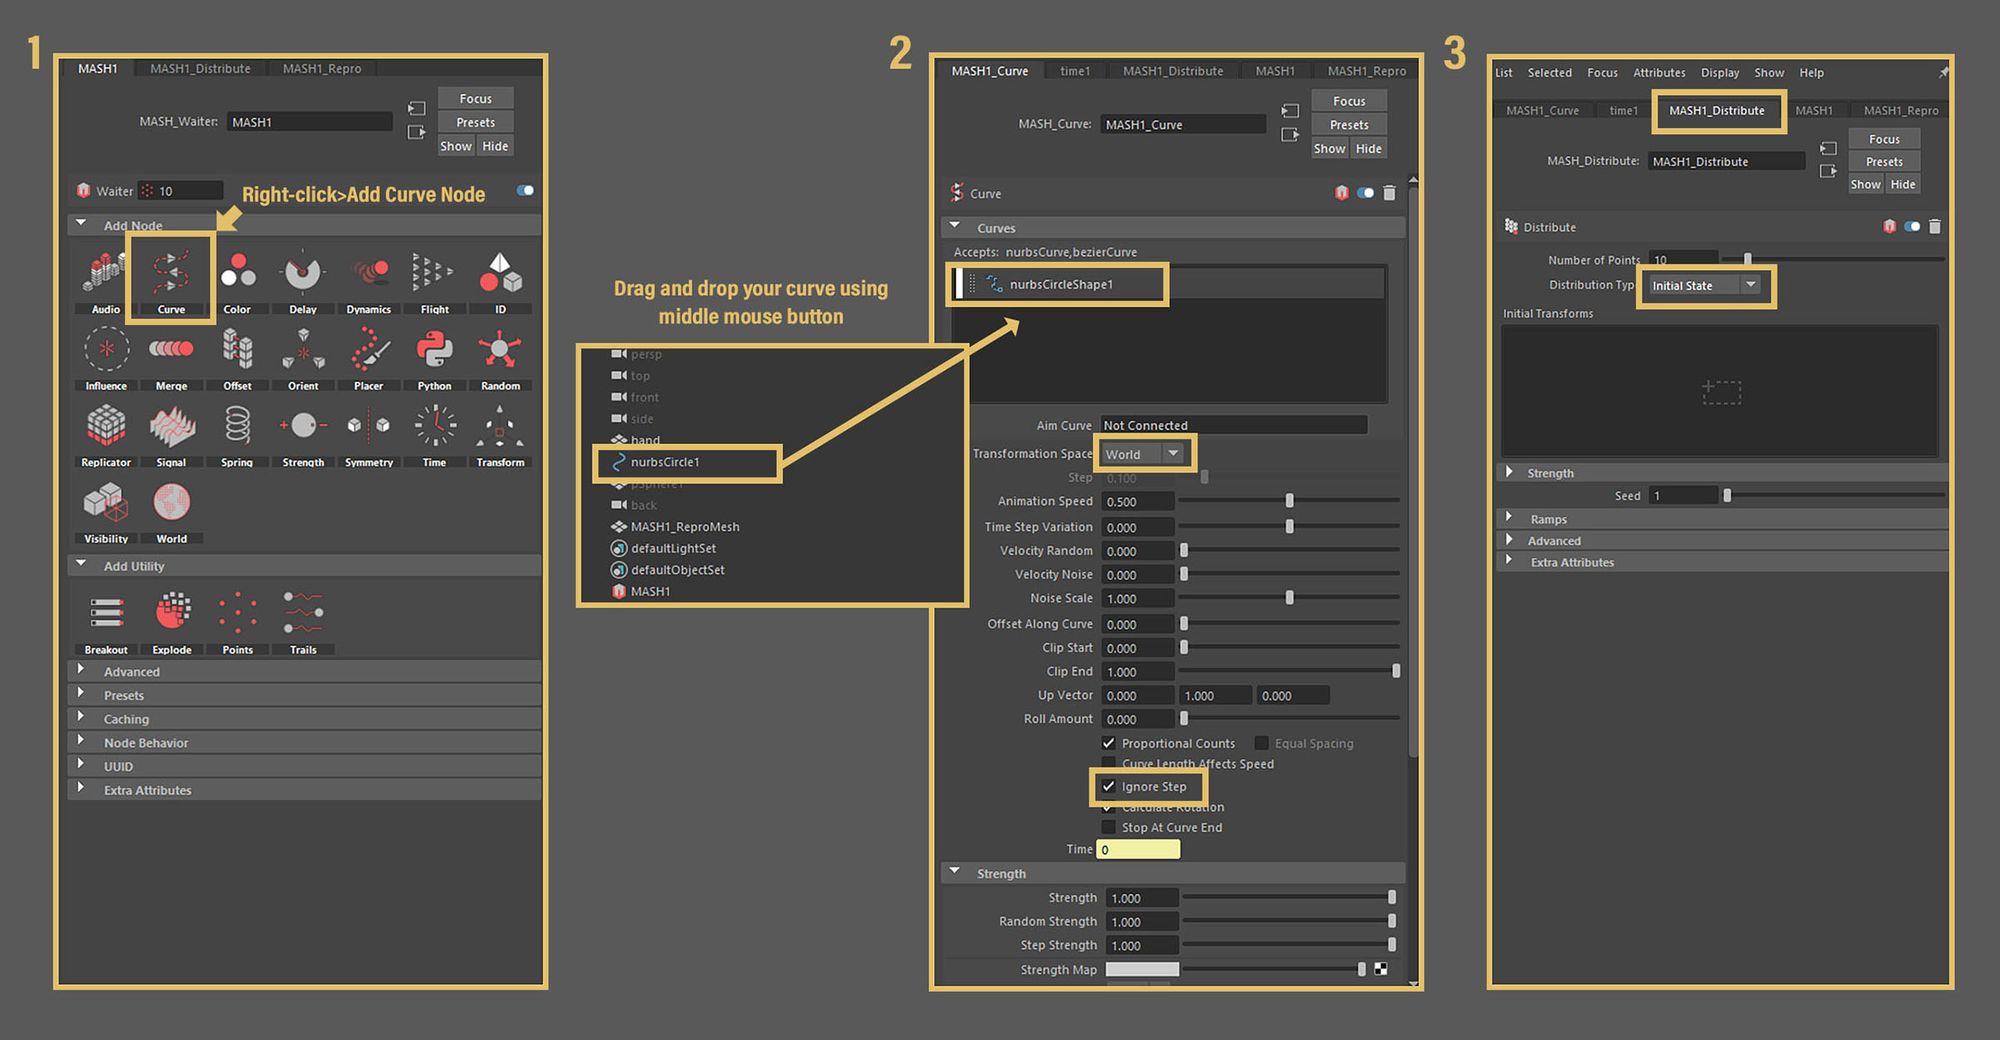
Select the bead, go to the MASH tab, and click the first icon from the left. Your bead should become hidden. Now in the Attribute Editor, you should see a lot of new icons. Click onto the Curve icon > Add Curve Node and in the new tab that opens, by holding the middle mouse button, drag and drop your curve from the outliner into the Input Curves dark-gray box. Then check the Ignore Step box slightly below. Still in the Attribute Editor, change tab and go into the MASH Distribution one: from the drop-down menu change the Distribution Type from Linear to Initial State. Everything is set, and you should finally be able to see your string of beads taking shape.
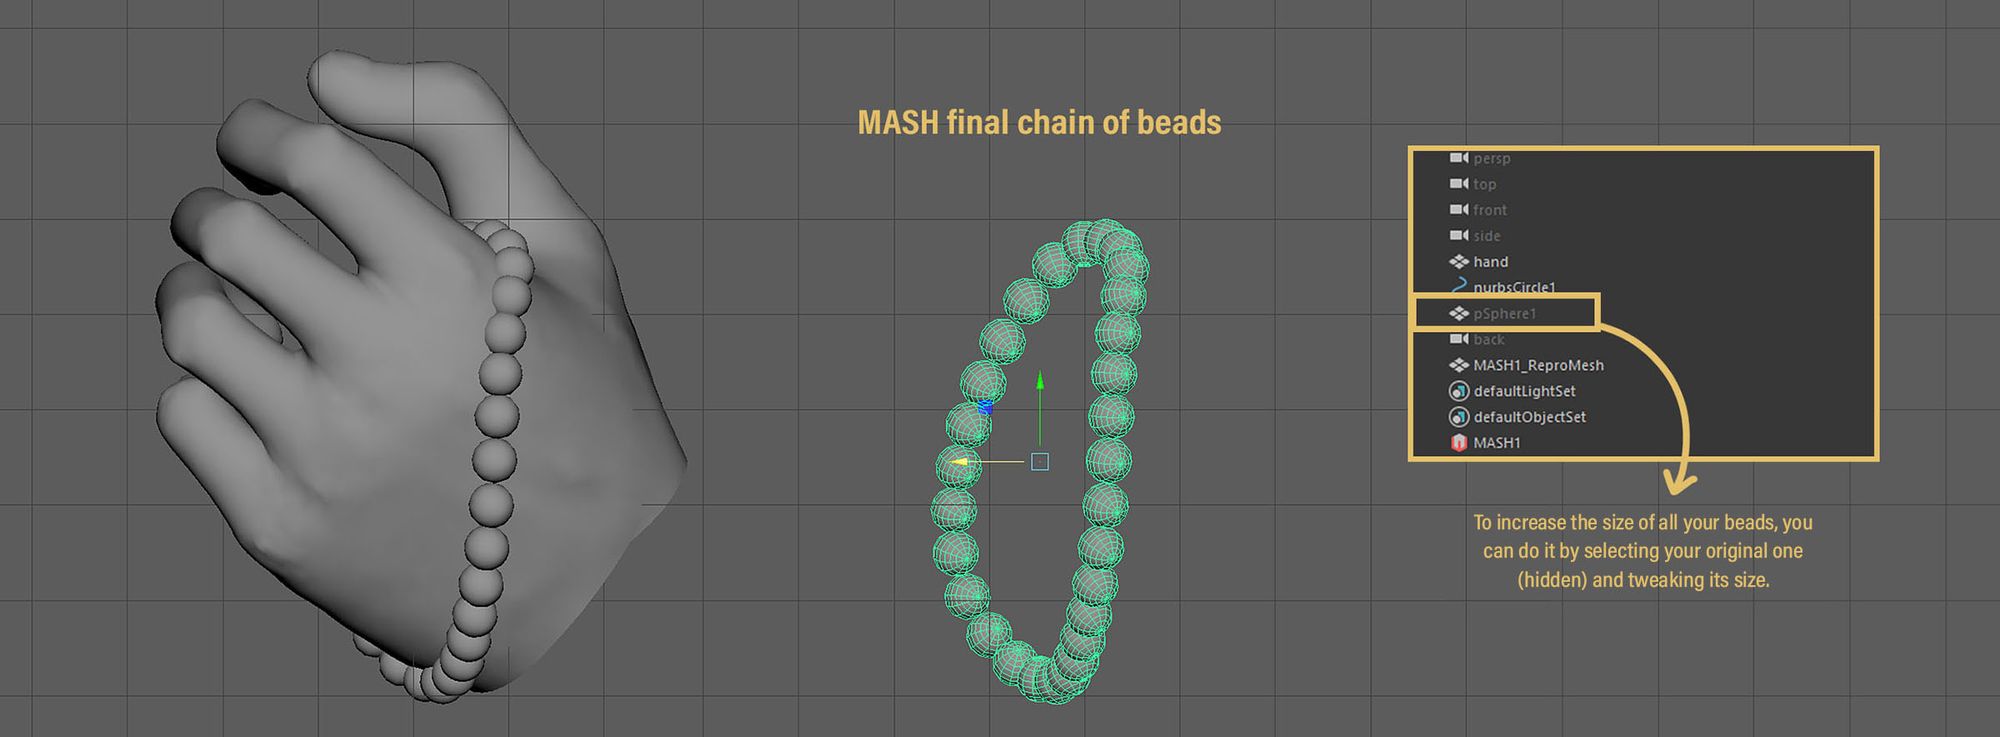
You can create variations in your chain by adjusting the settings directly from the same tab where you initially dragged and dropped the curve. Also, to increase or decrease the number of your beads, you can change it in the second tab, the MASH Distribution one, using the Number of Points slider. Finally, you can change the size of all your beads by changing it on the original mesh at world origin: make the original bead visible again from the outliner and tweak its size as you prefer. When you are done, select the MASH mesh and delete the history.
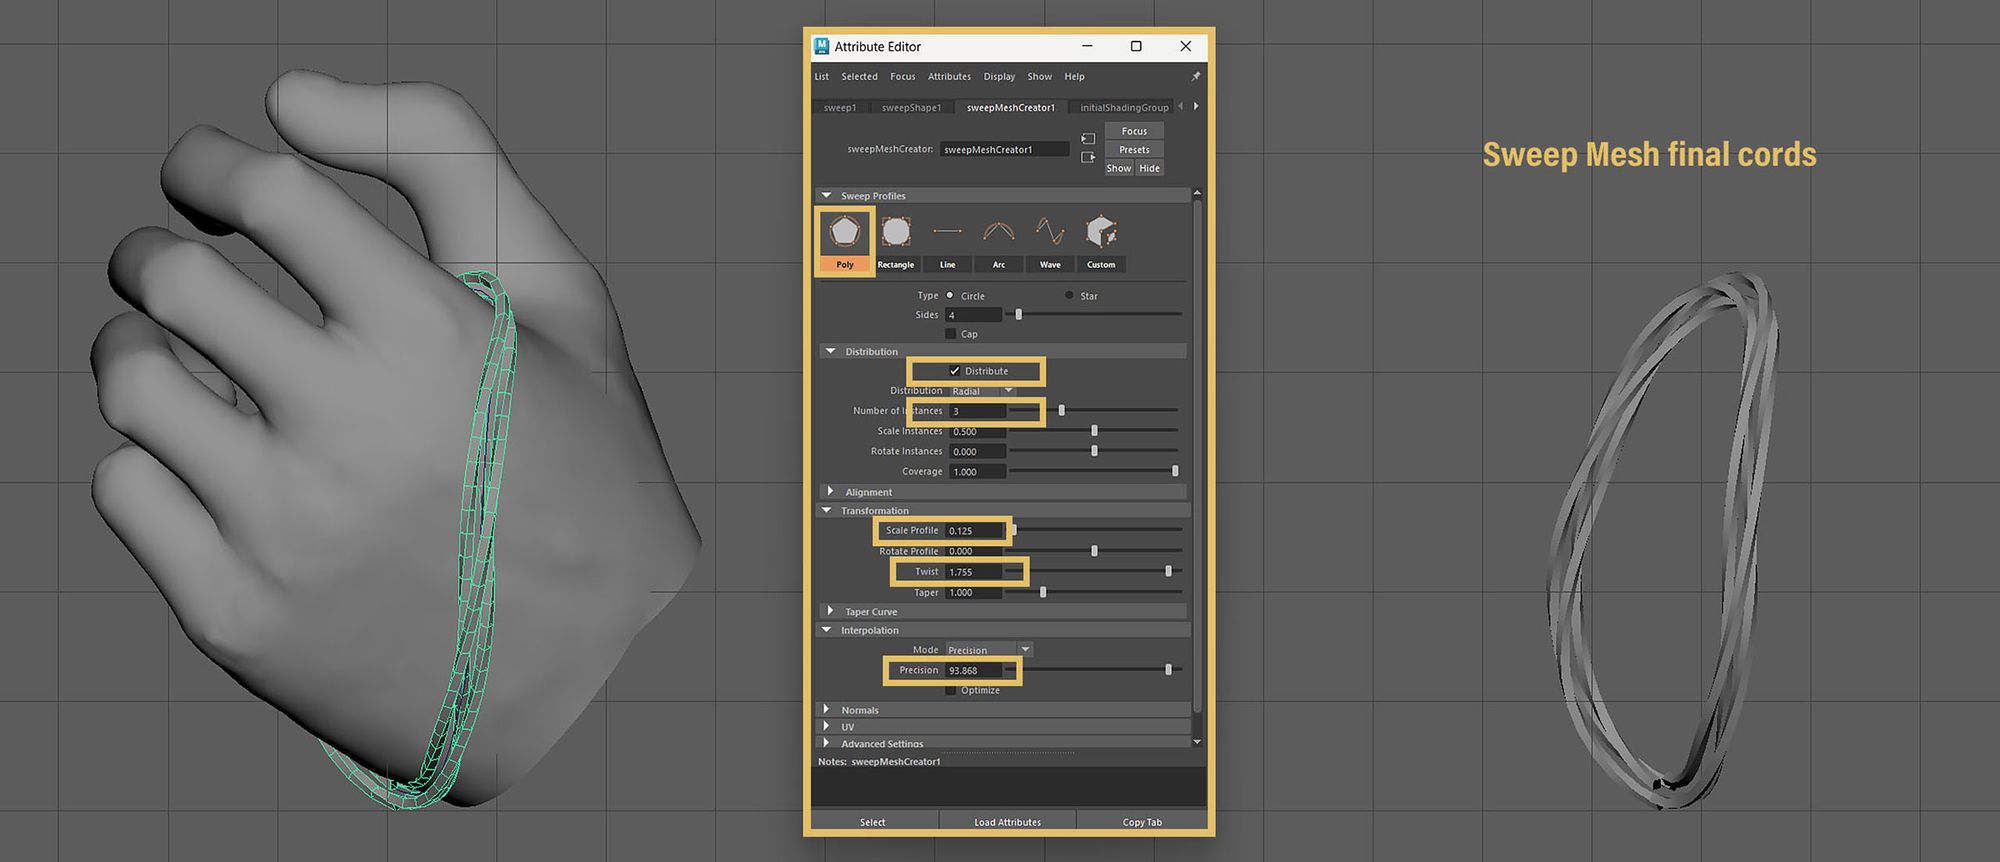
Let’s see how to create the braided cords running through the wooden beads. You only need the curve you used before for the MASH feature. Select the curve and in the top bar of Maya click on Edit > Sweep Mesh. This will open a new tab in the Attribute Editor where you can tweak all the parameters, but before you do so, go in its Interpolation section and set the Precision slider to be higher than 88.0, so your mesh has the minimum amount of subdivisions to follow the shape of your curve. Then you can adjust everything else, for example enabling Distribution to have multiple cords instead of just a single one, also tweaking the Scale Profile to determine the size of the cords and finally using the Twist slider to get your final braided cords. Once you are done, again, delete the history of the mesh.
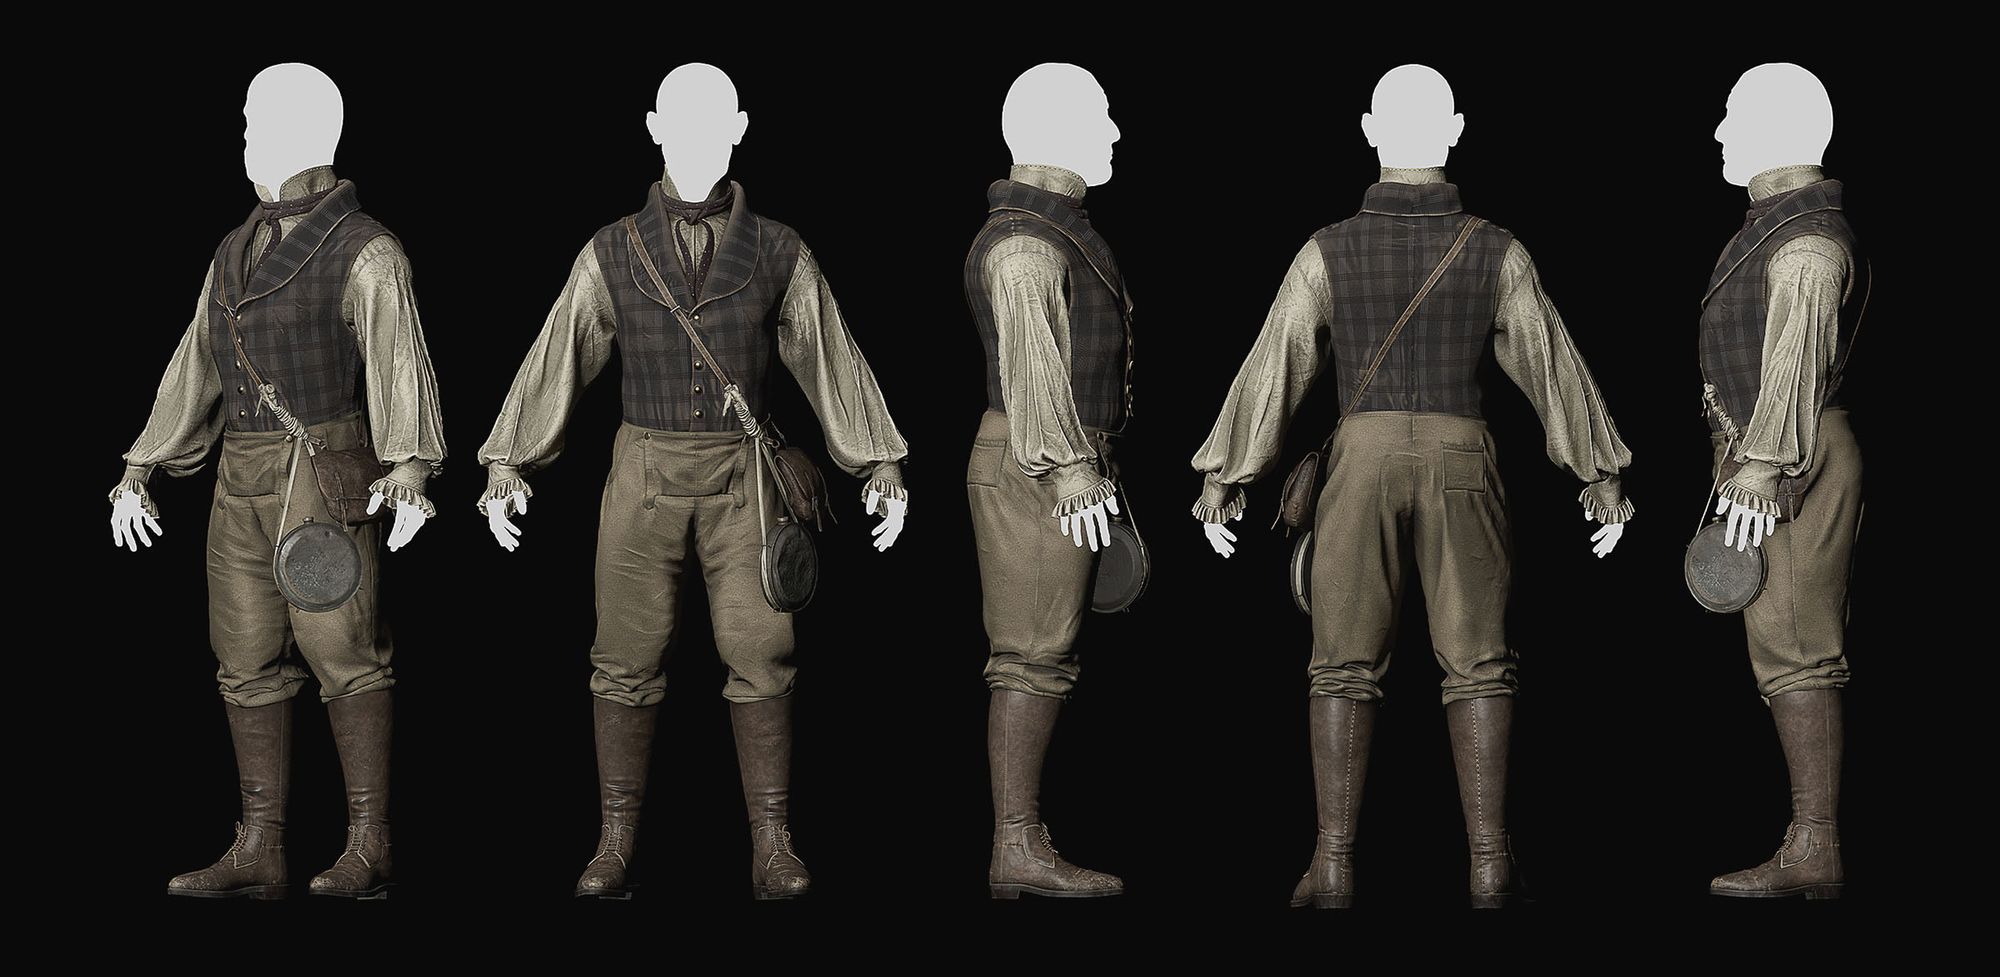
Refining and texturing the character
Before moving to the texturing phase, I imported and refined the clothes in ZBrush. I combined both the use of alphas and manual sculpting, and eventually I added seams that would have been baked down later, onto my low-poly mesh. Polygroups helped me a lot to manage different subtools and hide specific portions of the meshes while sculpting.
ZBrush turnaround with polypaint
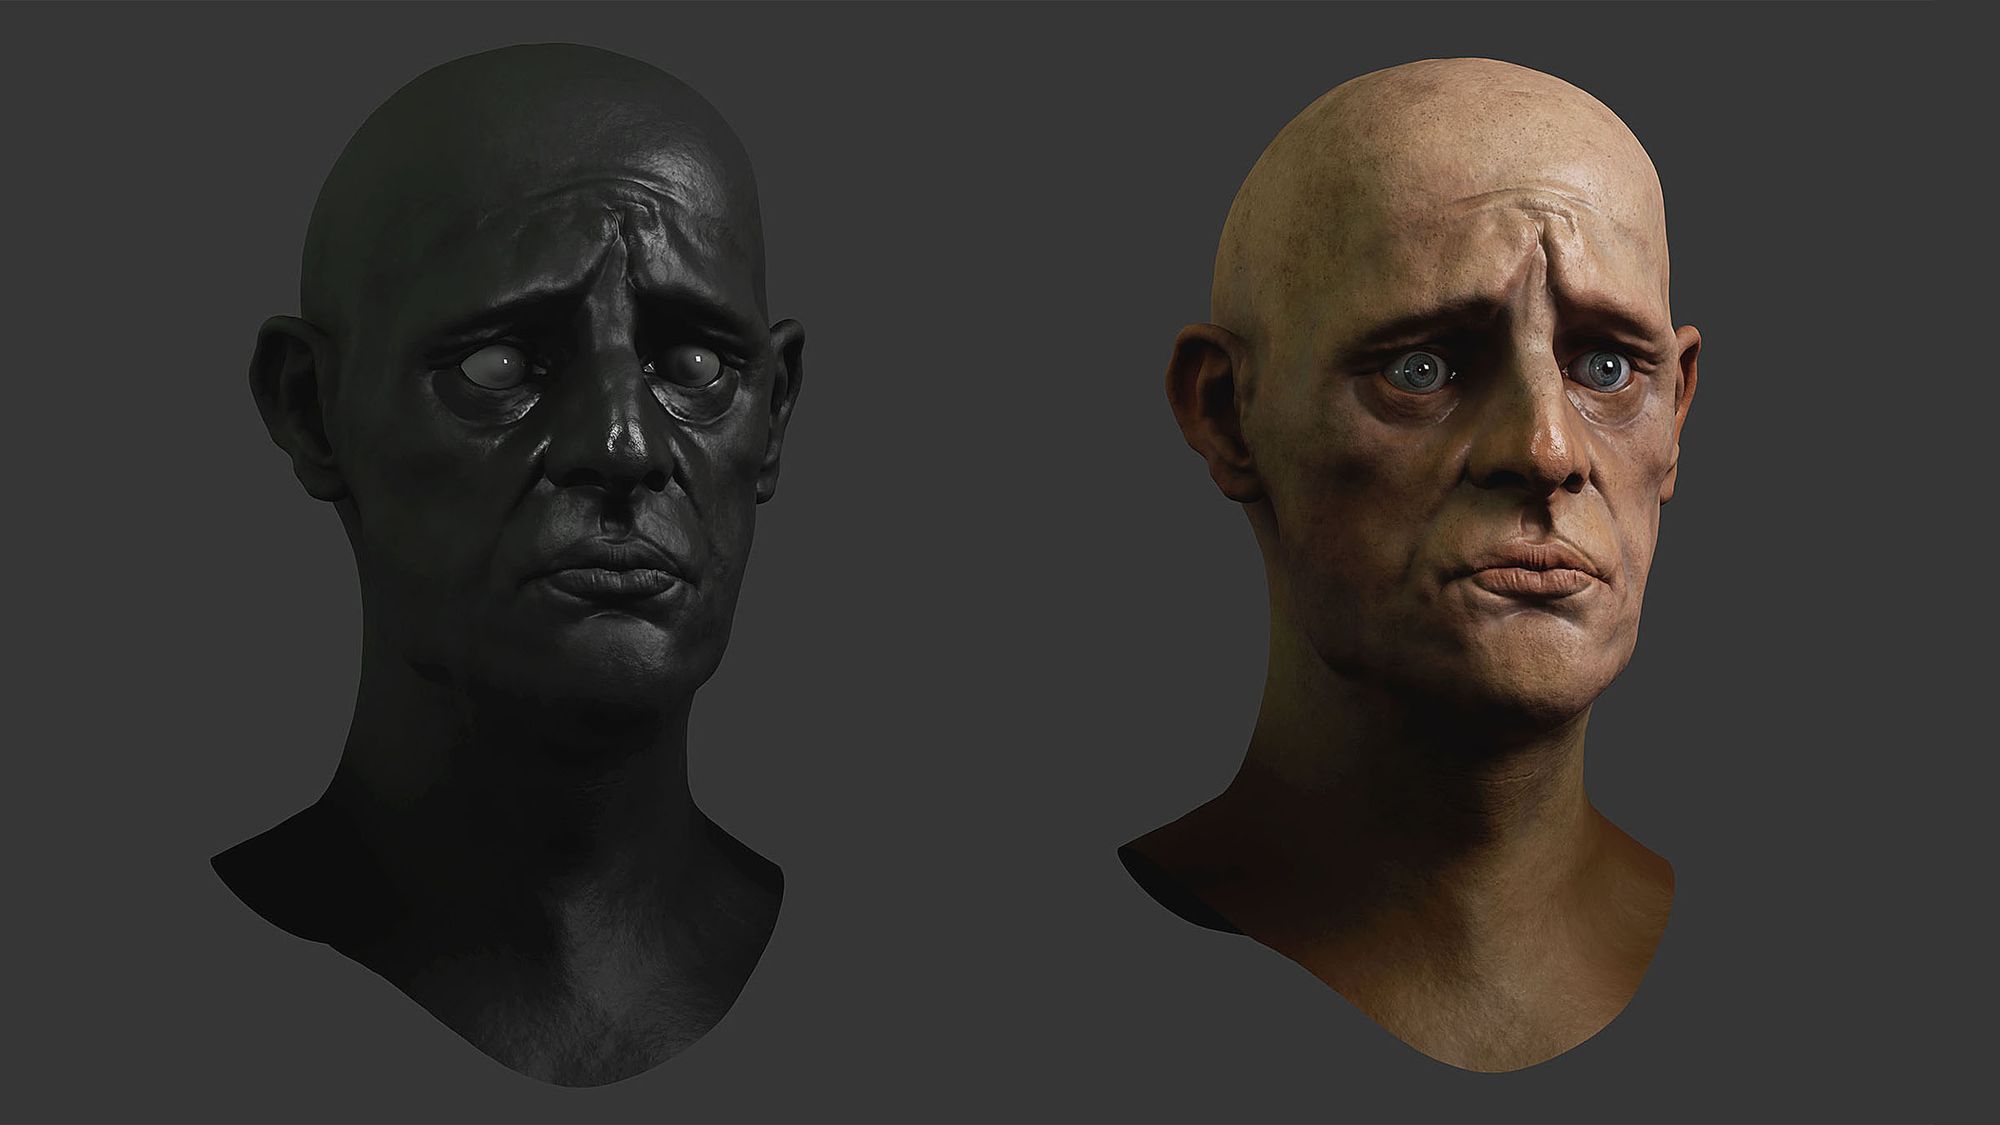
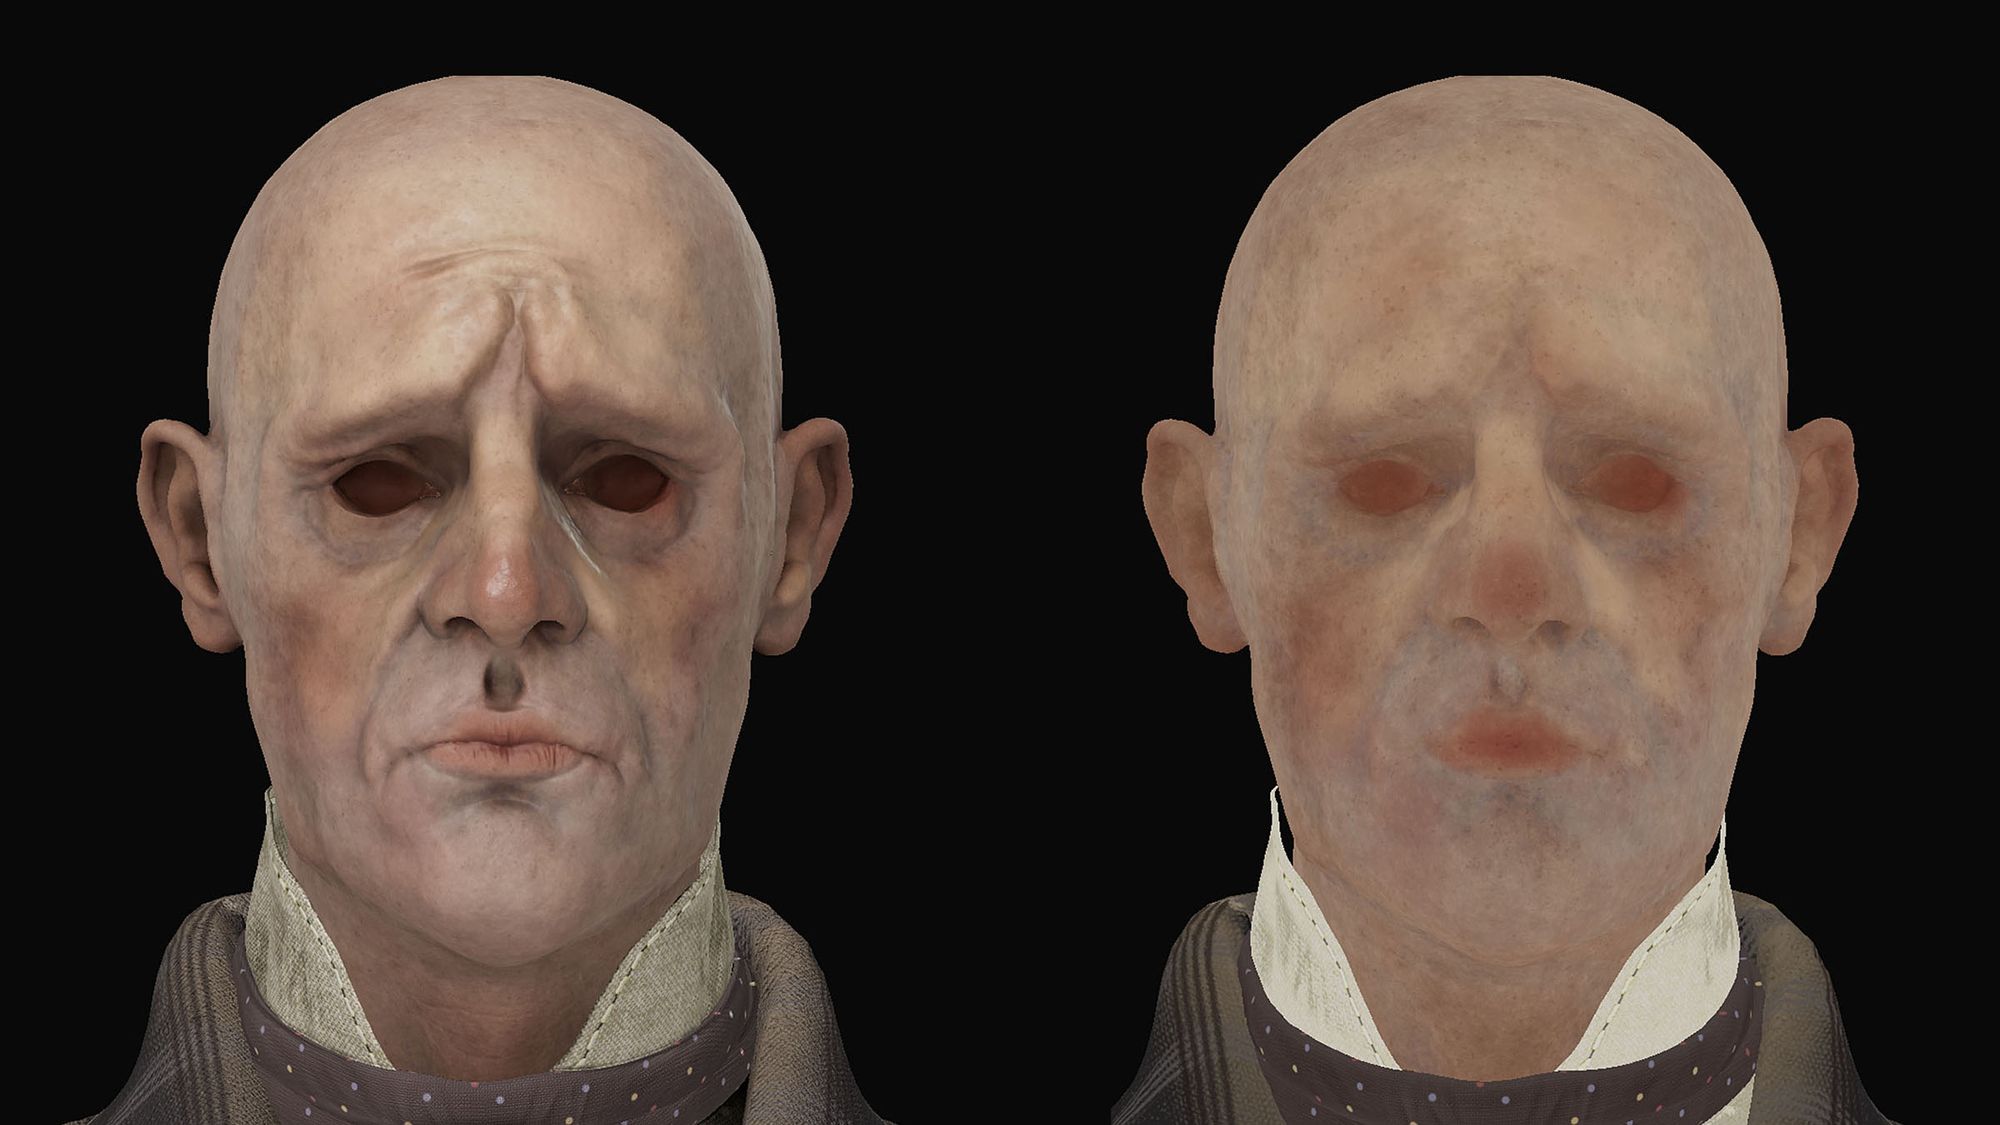
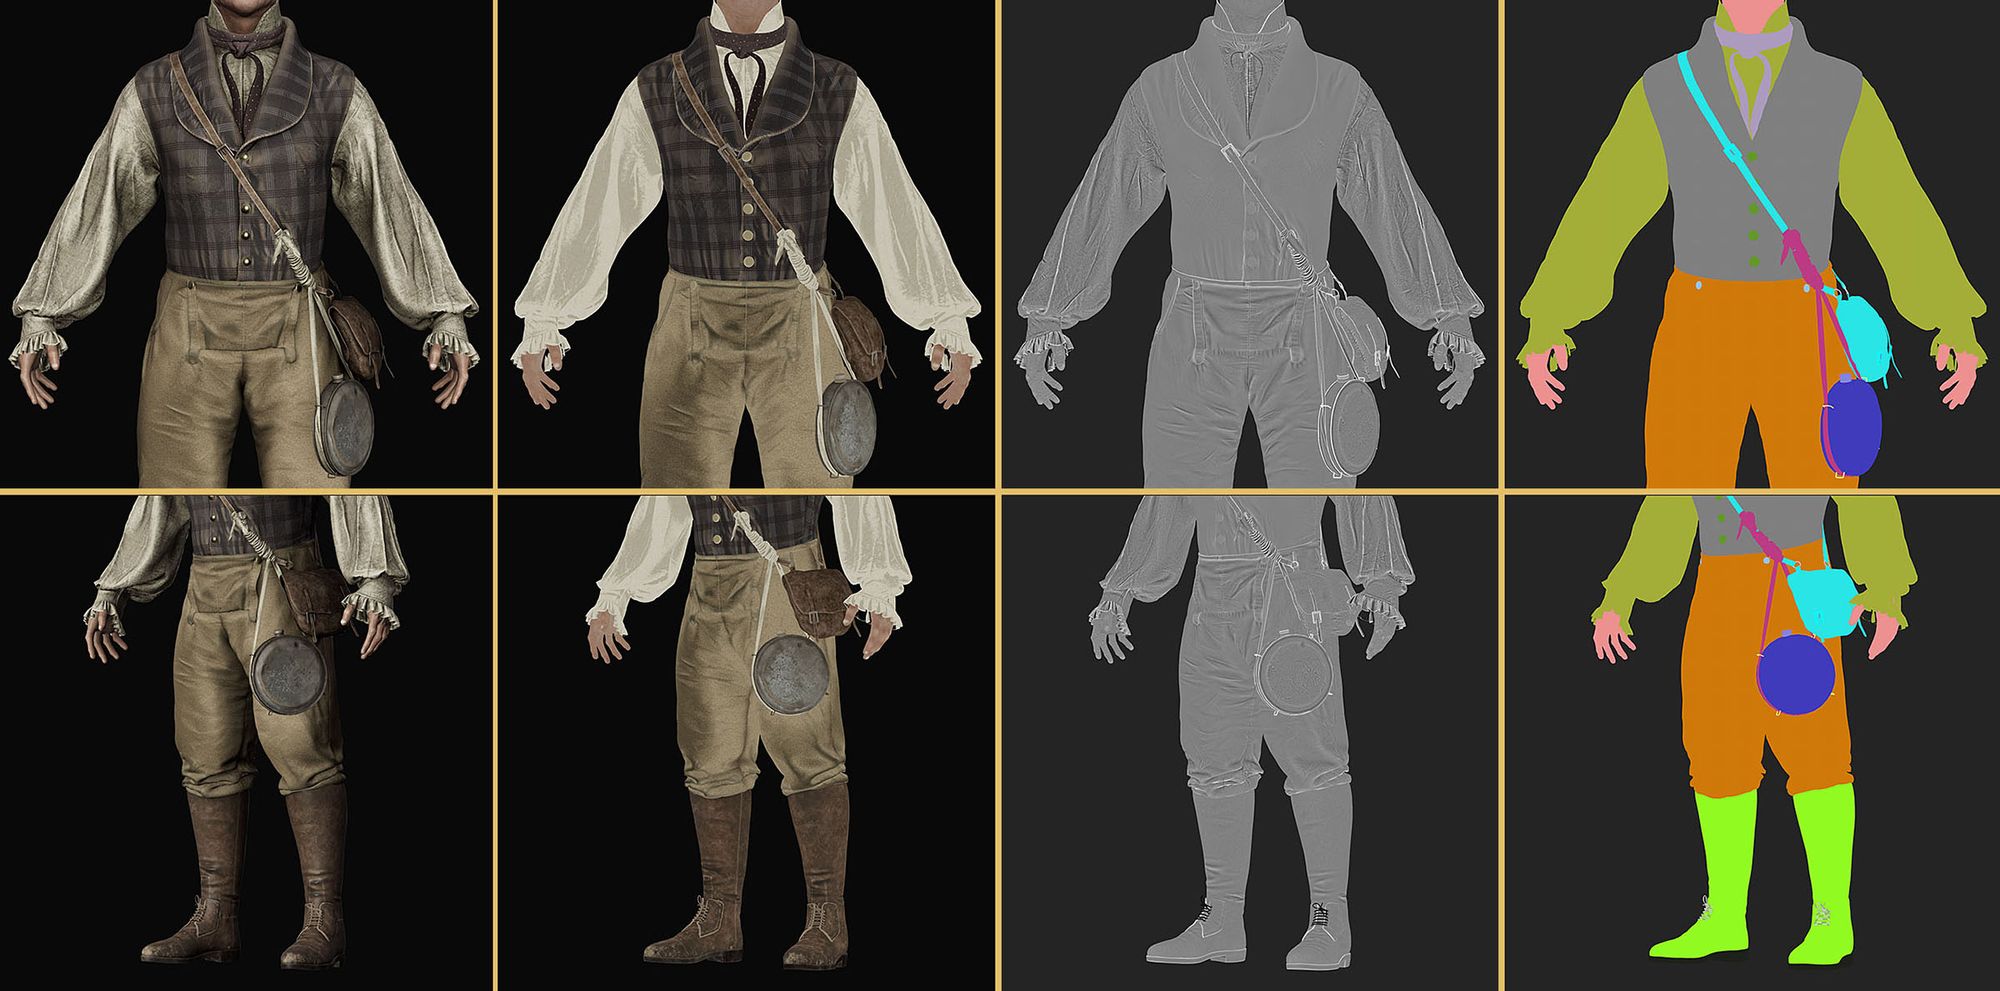
As mentioned at the beginning of this article, I textured the character of Calvin in Substance 3D Painter, taking advantage of the details I already had on my high-poly sculpt, from baking them down, plus some manual tweaks to the normal map. To create my skin diffuse, I started introducing as much variety and imperfections as I could, in a limited amount of time. I divided this process into three steps: I manually painted first a red-ish layer representing the blood vessels, second a blue-ish layer for the veins, and third a yellow-ish layer for the fat pads and eventually the bony areas.
💡
Remember to use Fill Layers with Masks to work in a non-destructive way; you don’t want to paint everything again if you need to adjust a specific area.
Layering of blood vessels, veins and fat pads/bony areas on the diffuse map.
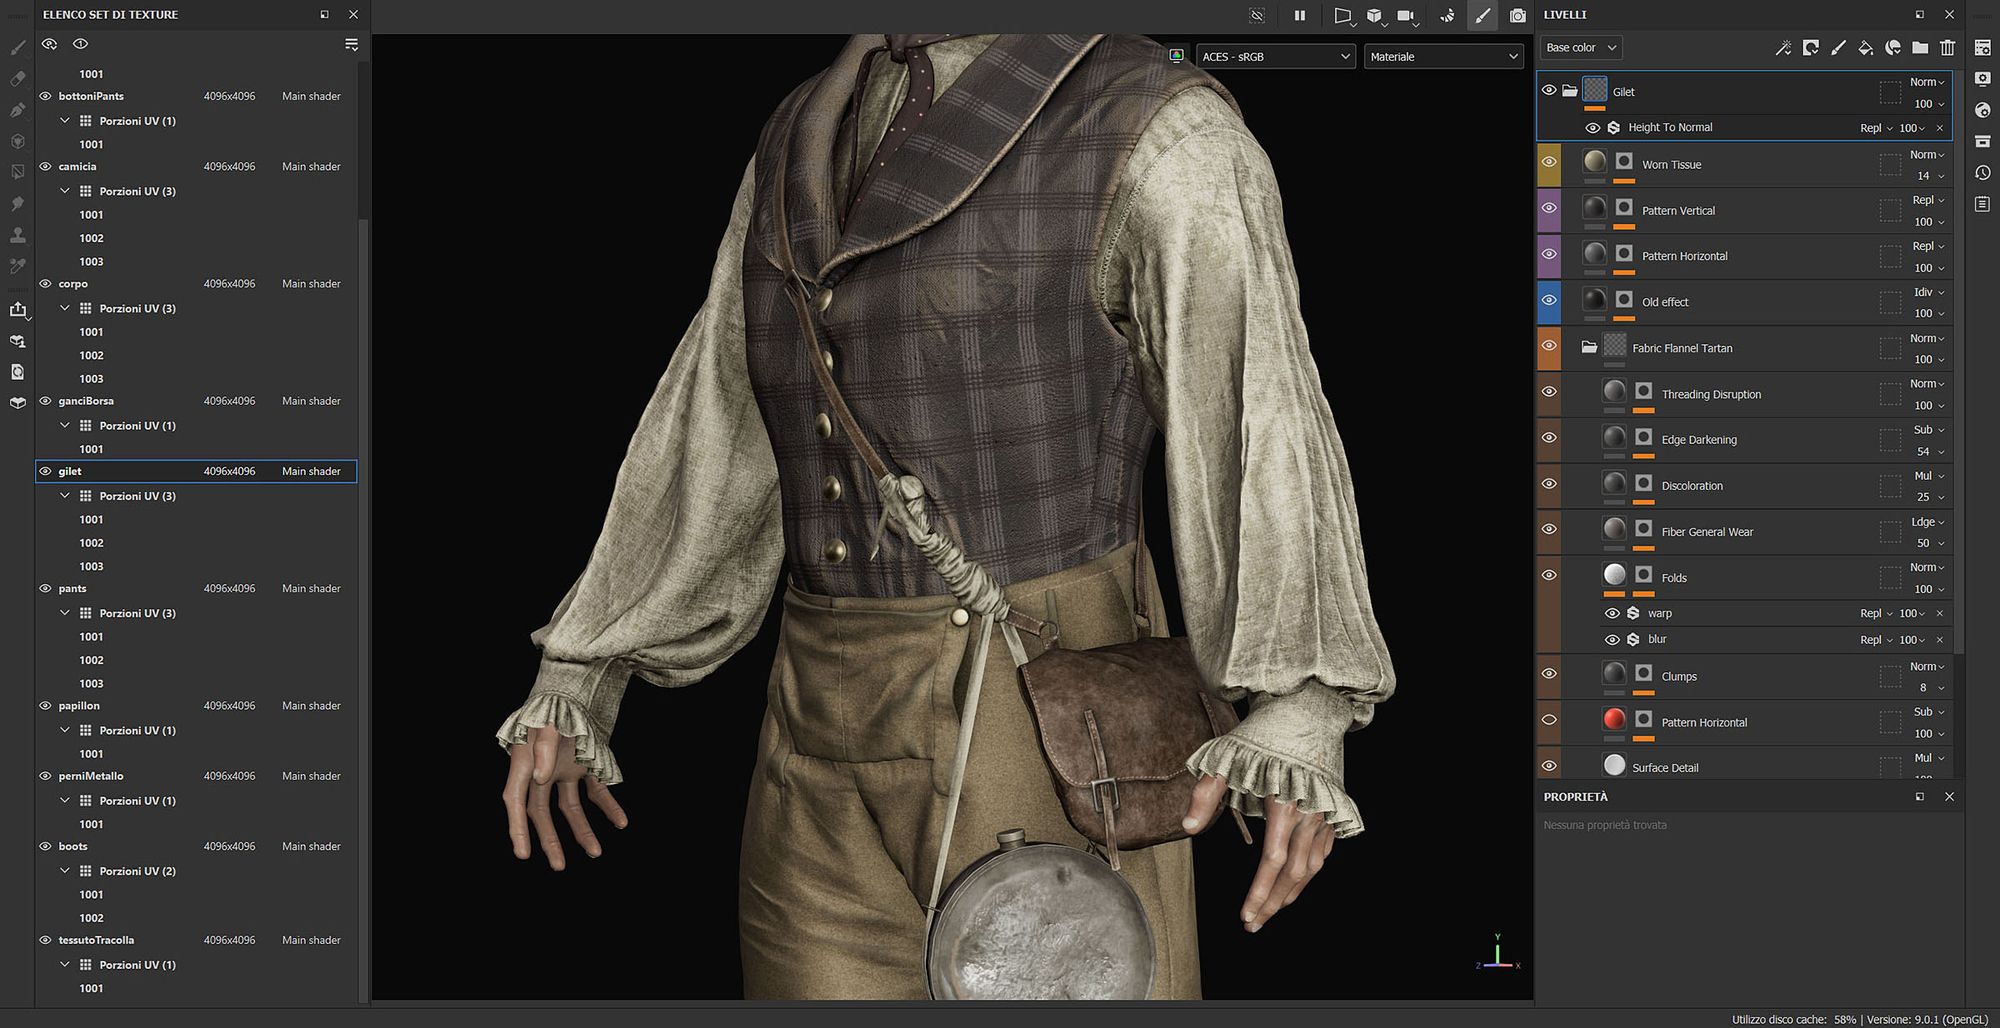
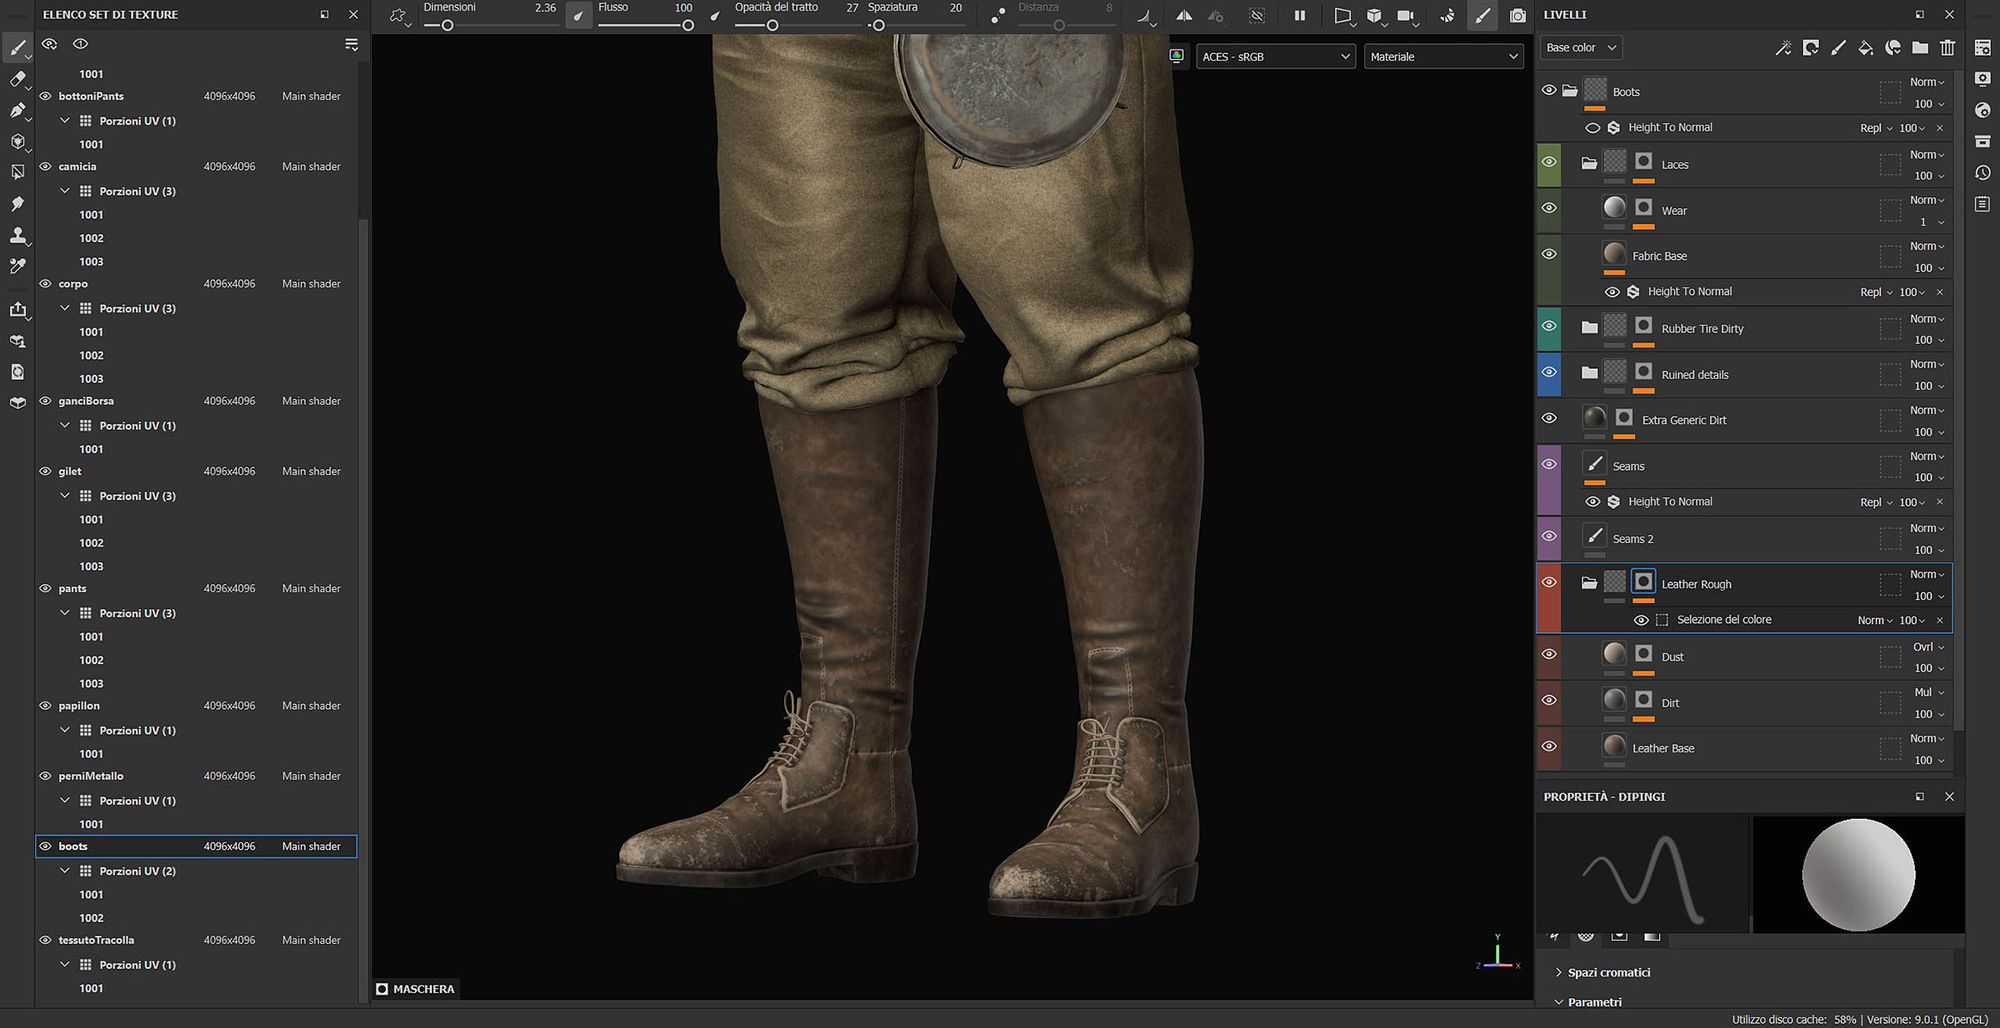
Talking about the clothes, I wanted to give them a “worn” look, typical of old clothing, with a touch of dirt because of his travel in the story, to get to the church of Jerusalem’s Lot. So to achieve that result, I mainly used the baked curvature and ambient occlusion maps as masks, to achieve a dusty and dirty effect only within some areas, like clothing folds, cavities, and fibers. In addition to this, I made sure to convert the height map into normal map information using the Height To Normal generator.
Regarding normal maps, I used Marmoset Toolbag to bake down the most problematic ones. Thanks to the Skew painting tool in that software, I could easily solve some artefacts derived from the intersection of different points of the baking cage.
Using the Skew painting tool you can get rid of artifacts from your normal map.
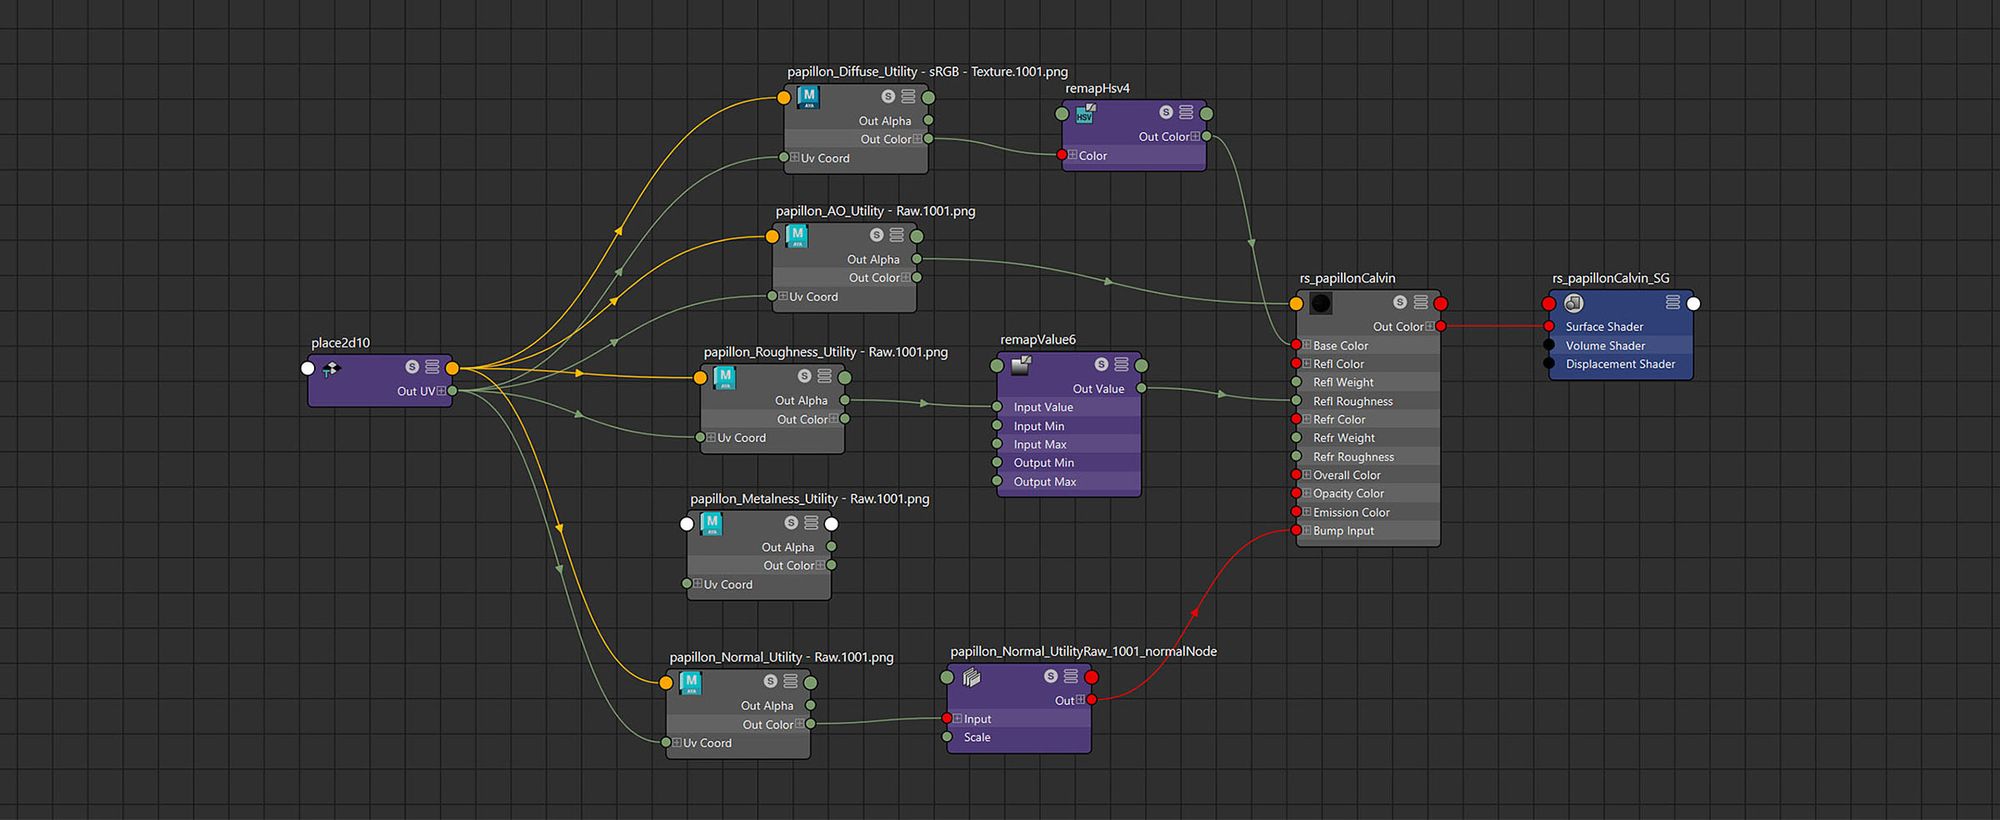
To showcase and render the final clothes with the purpose of portfolio presentation, I used Redshift in Maya: I assigned a Redshift Incandescent material to the character's body, equivalent to a Maya Surface Shader that doesn’t get affected by the lights already in the set and only shows the color you pick as it is.
About the overall shaders, I mainly used Redshift Materials throughout the entire scene.
Example of a basic Redshift shader.
Rendering the character
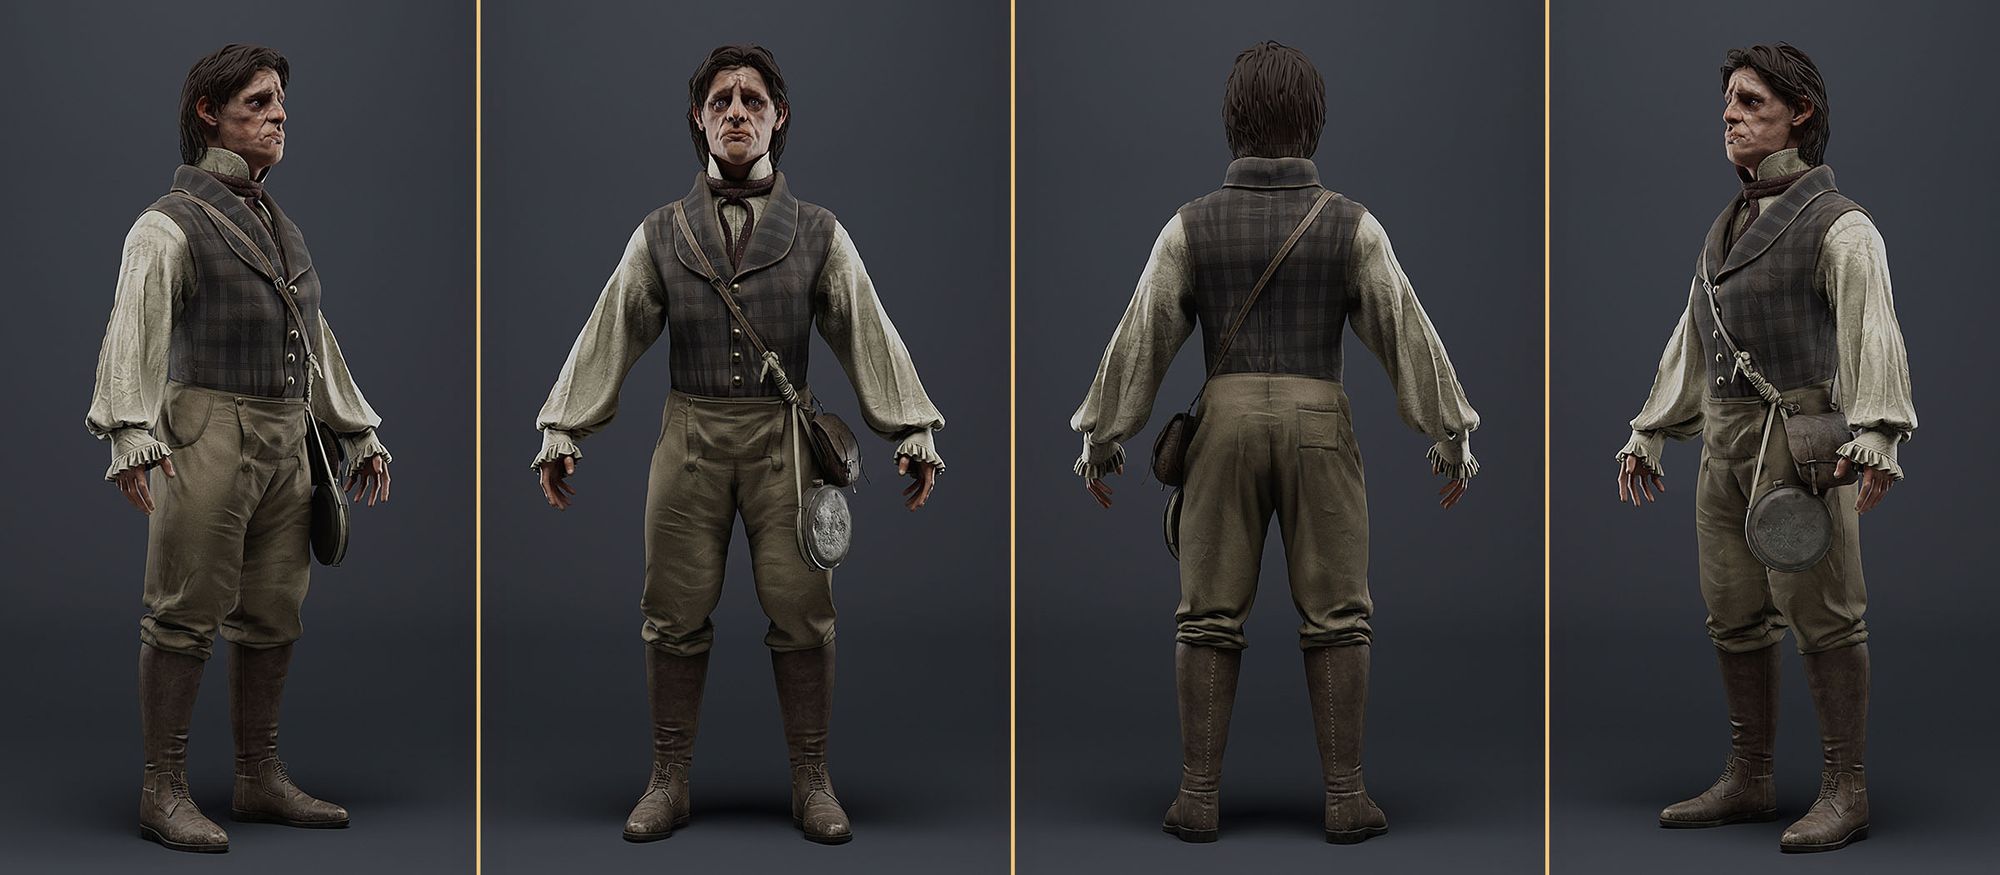
I decided to render out Calvin McCann in different scene setups, some with more artistic freedom, some more realism-oriented.
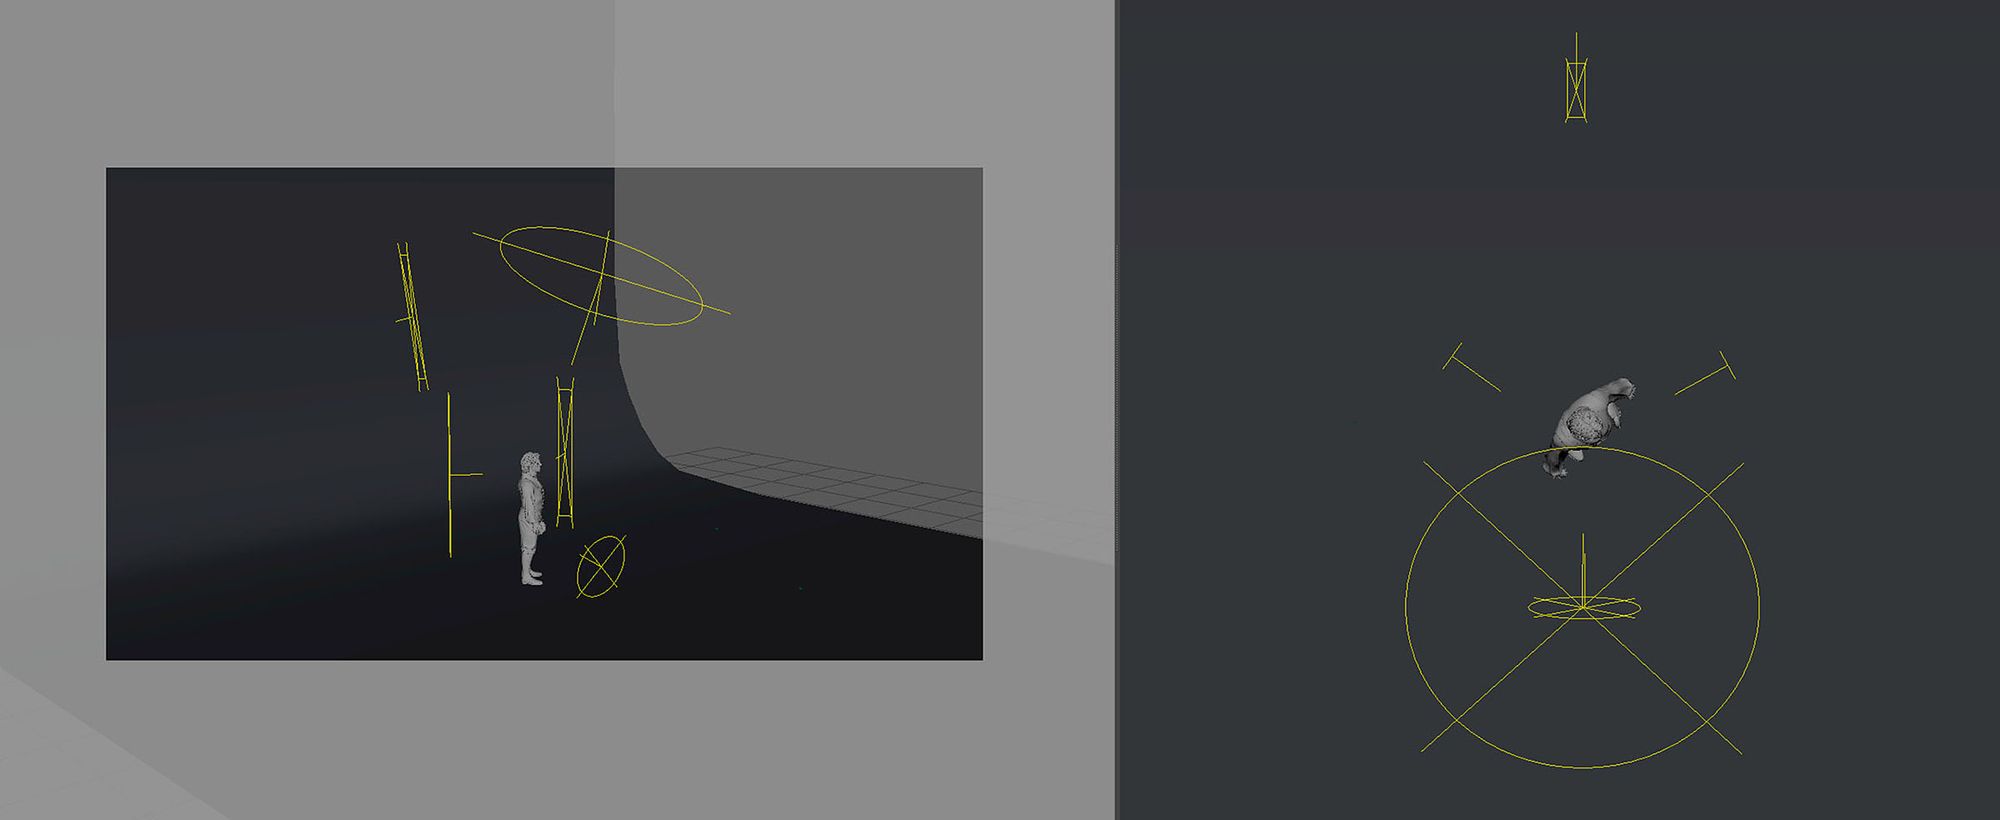
I created the first setup with flexibility in mind, so I could reuse it for other shots. In the image below, you can see how I placed a key light, a couple of rim lights, and a couple of fill lights both for Calvin and the background. The latter is a backdrop with a Redshift Material assigned at a mid-value roughness and a very slight blue-ish base colour.
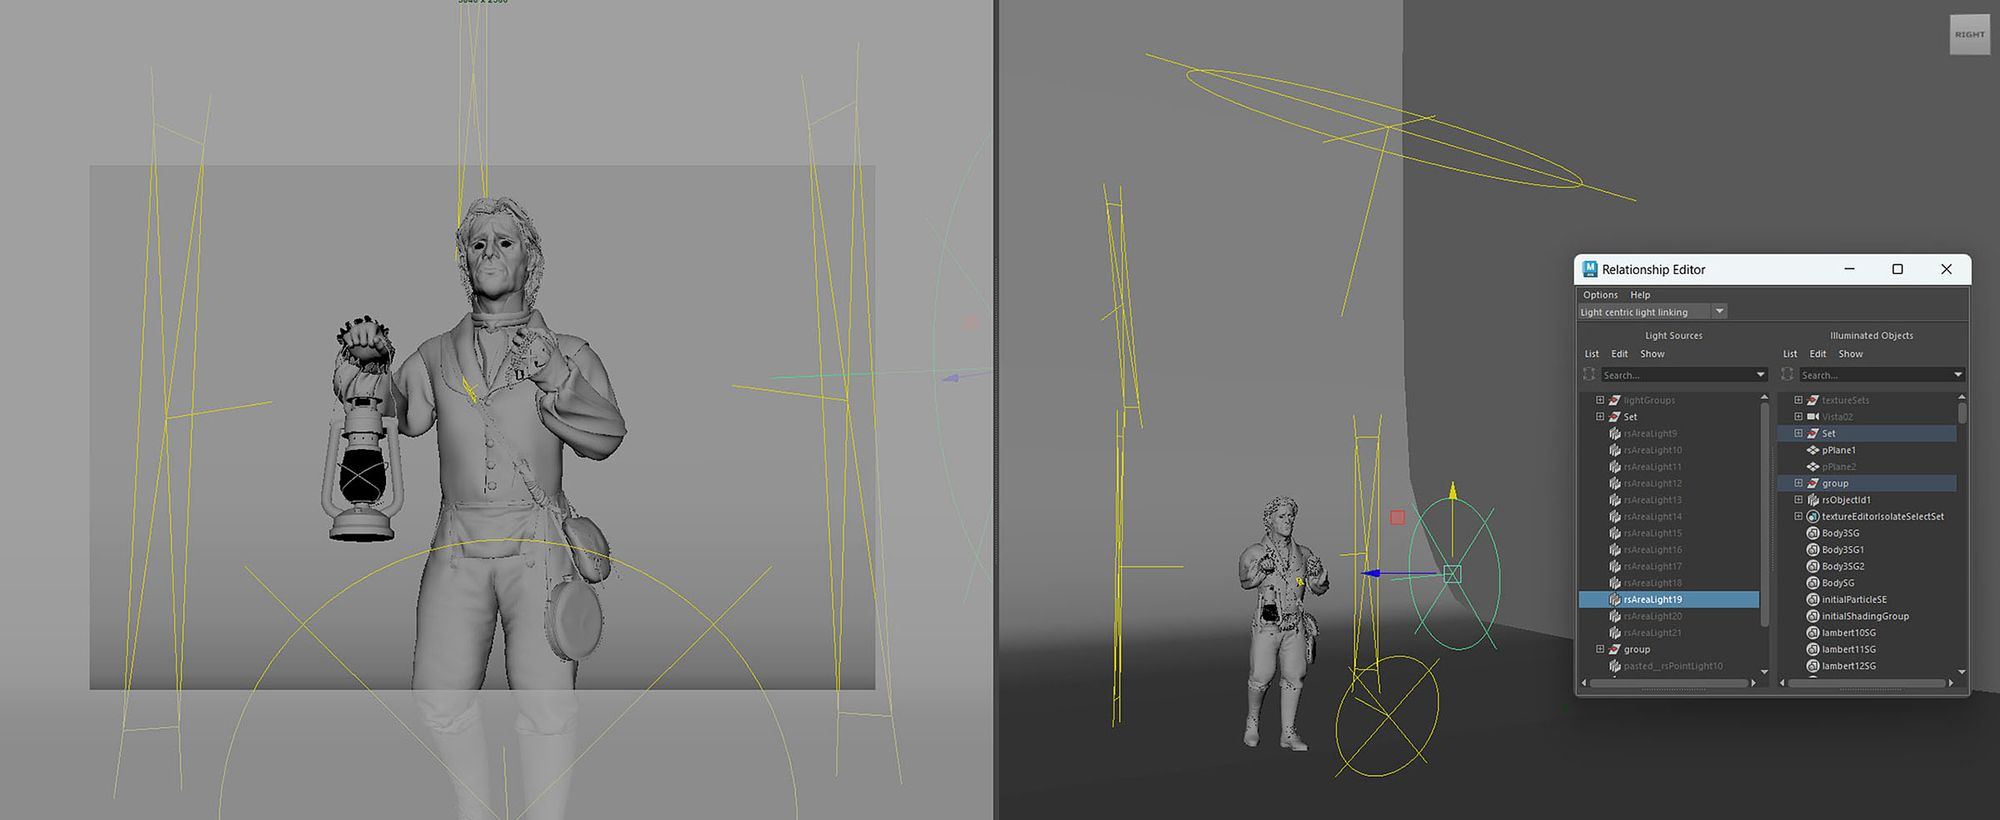
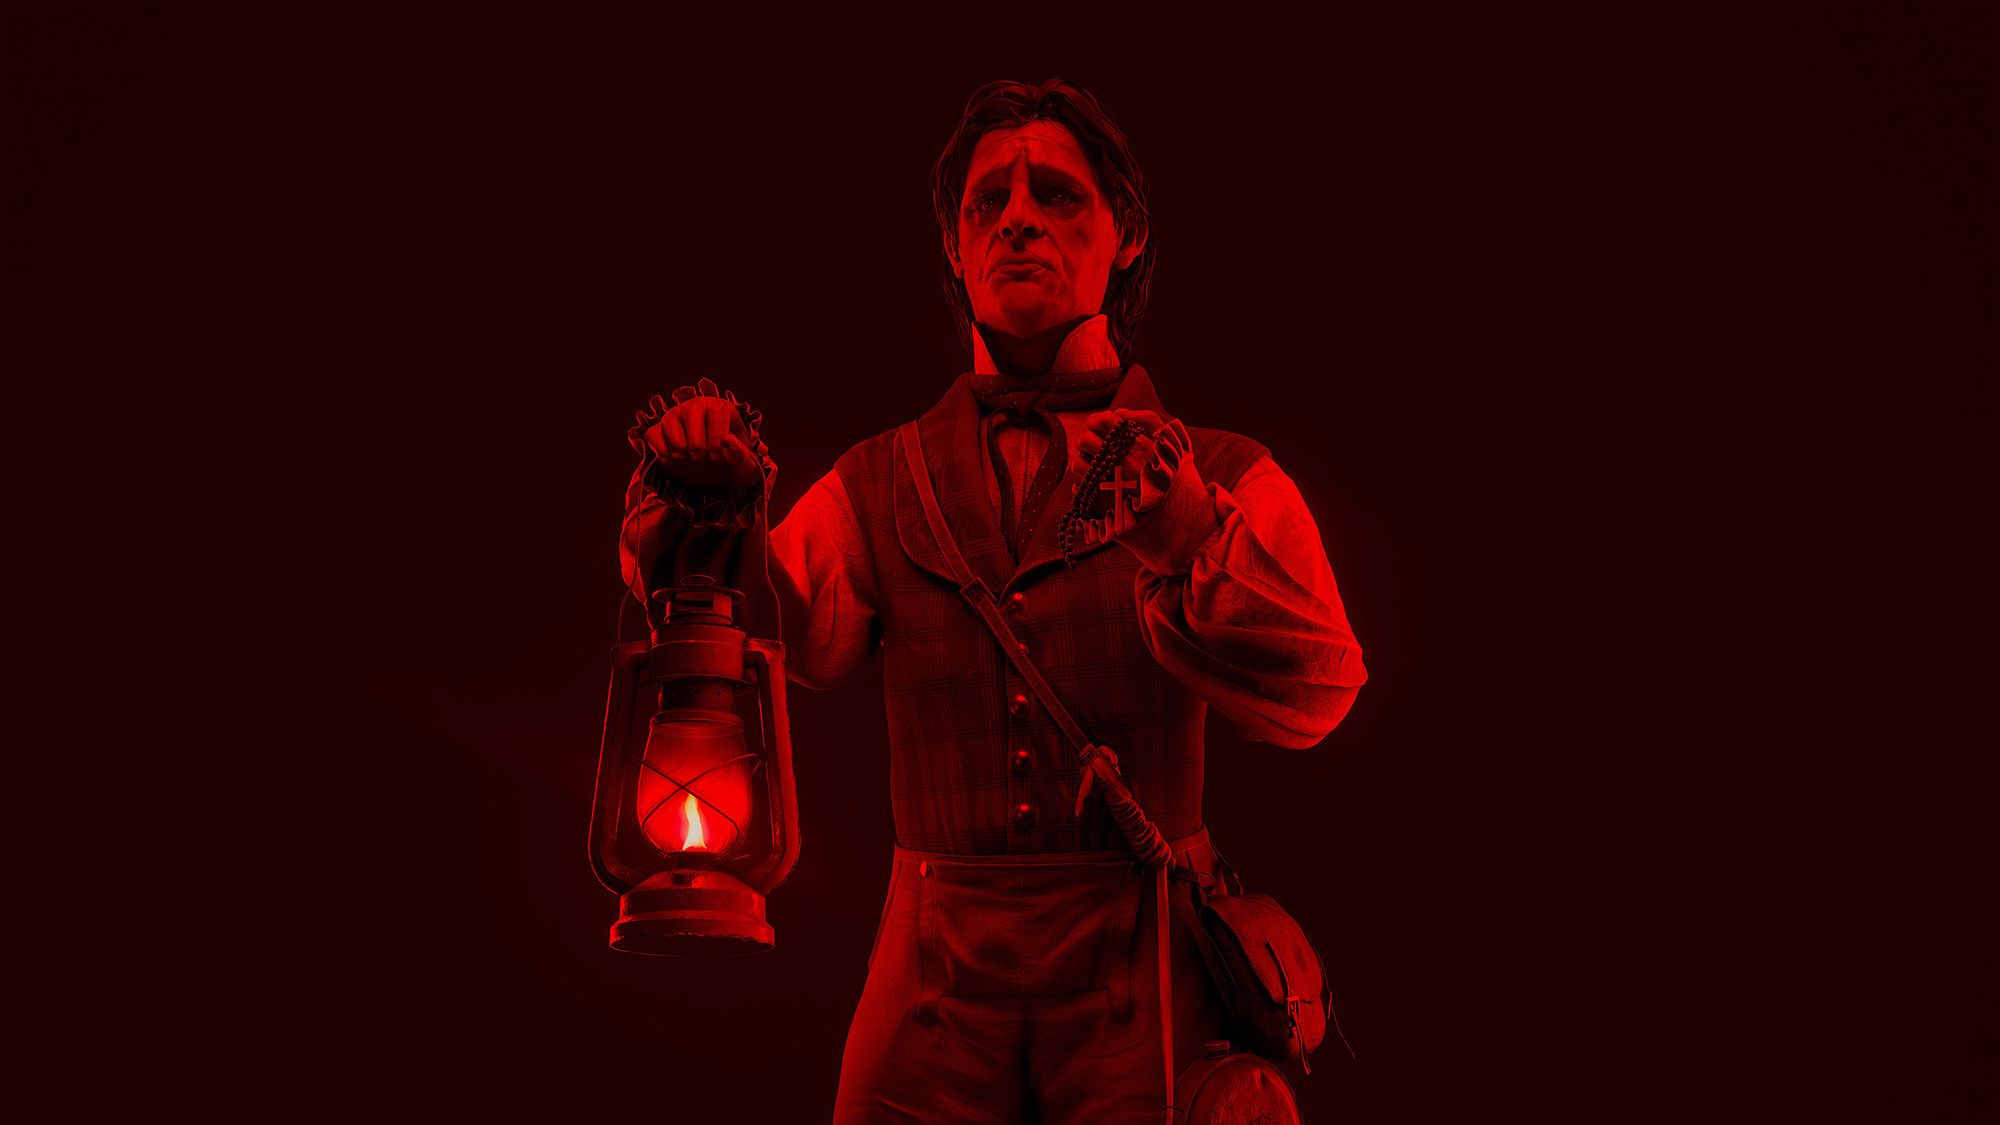
As I stated, I could achieve a different shot by just adding a couple of lights maximum, tweaking their colour, and making them project light only onto some meshes, by taking advantage of the Relationship Editor (Light Linking > Light-centered), but without faking too much light behaviour. For the next shot, I also opted for an artistic all-red-ish look.
Finally, I did one more render, by the time I had already finished building the environment of the abandoned church. I faked sun rays leaking from the ceiling using two spotlights placed out of the shot.
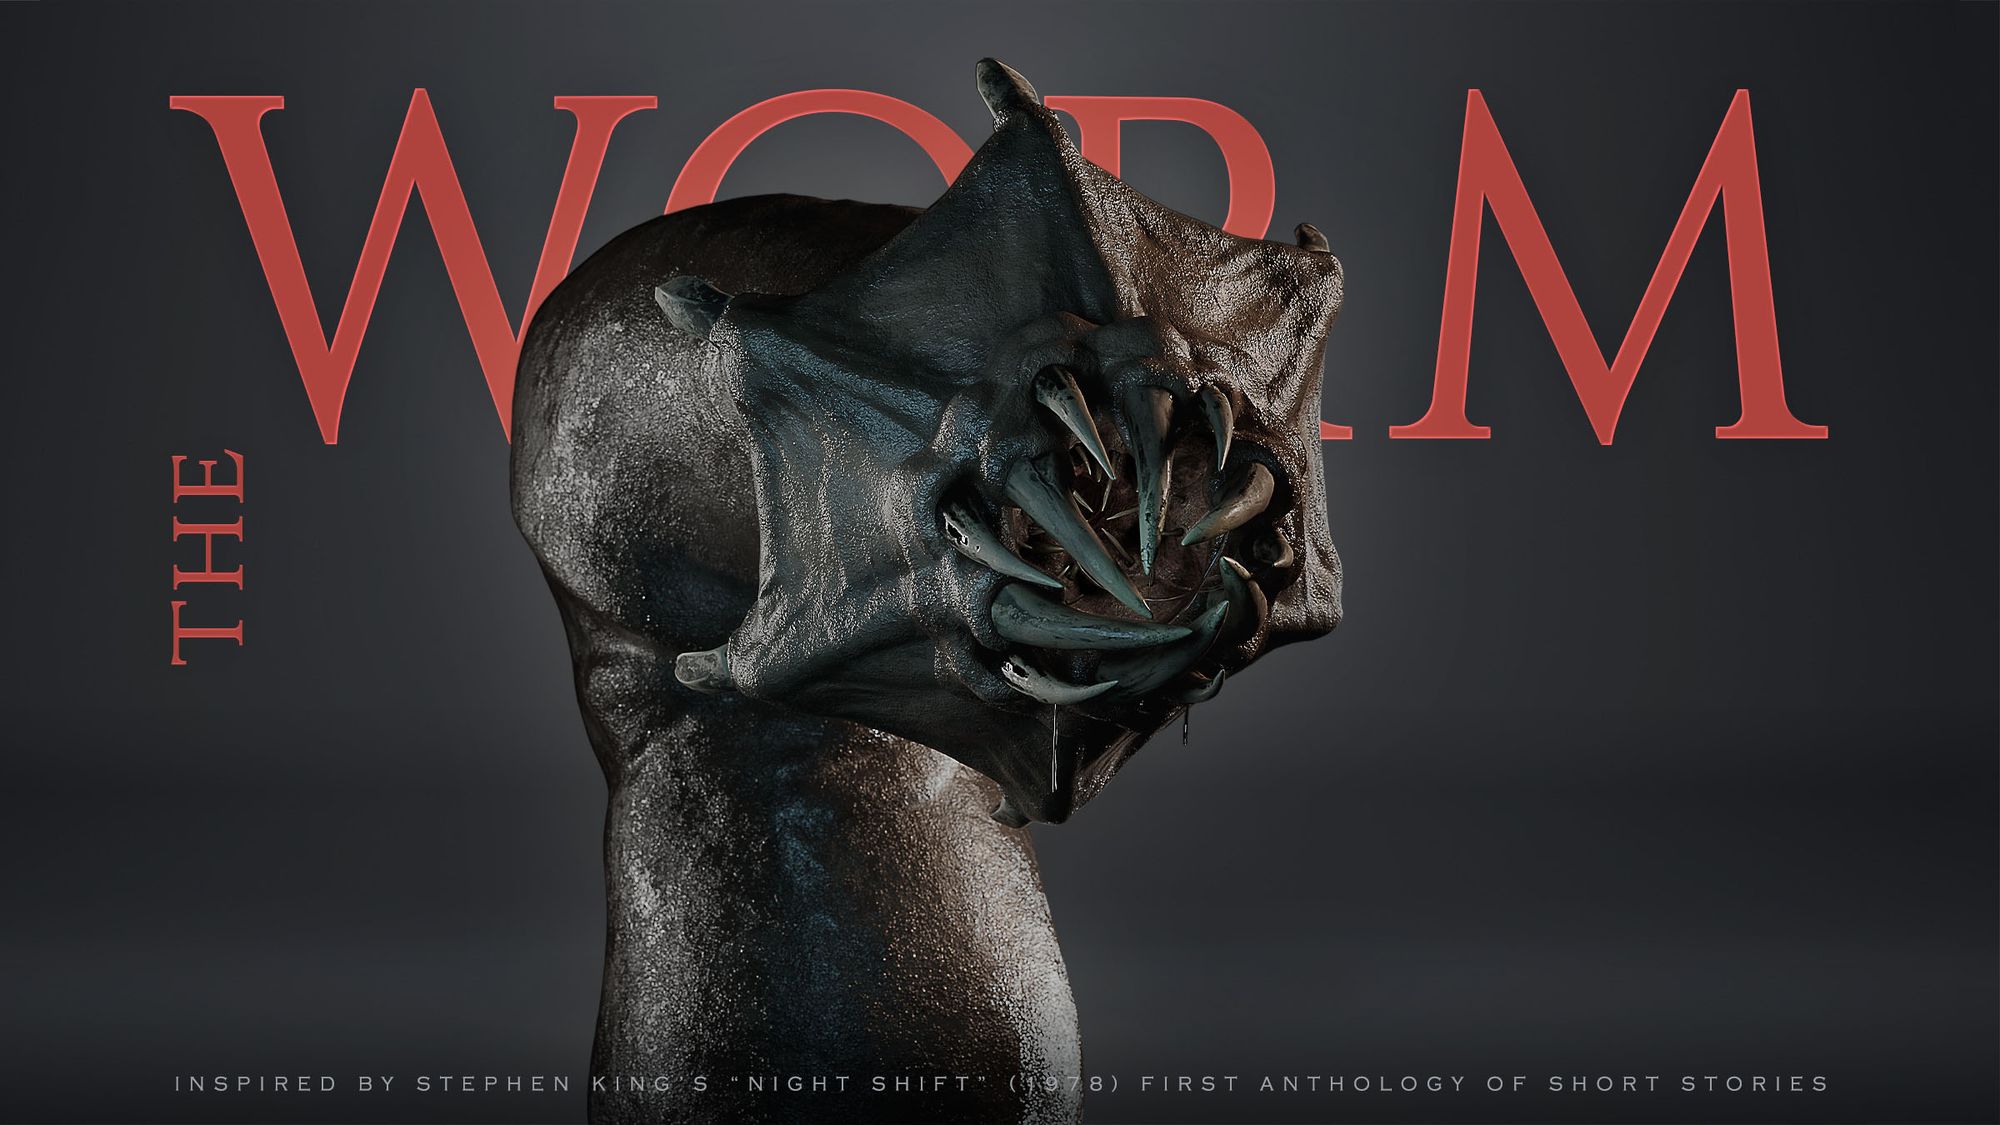
Making of The Worm
The ancient creature
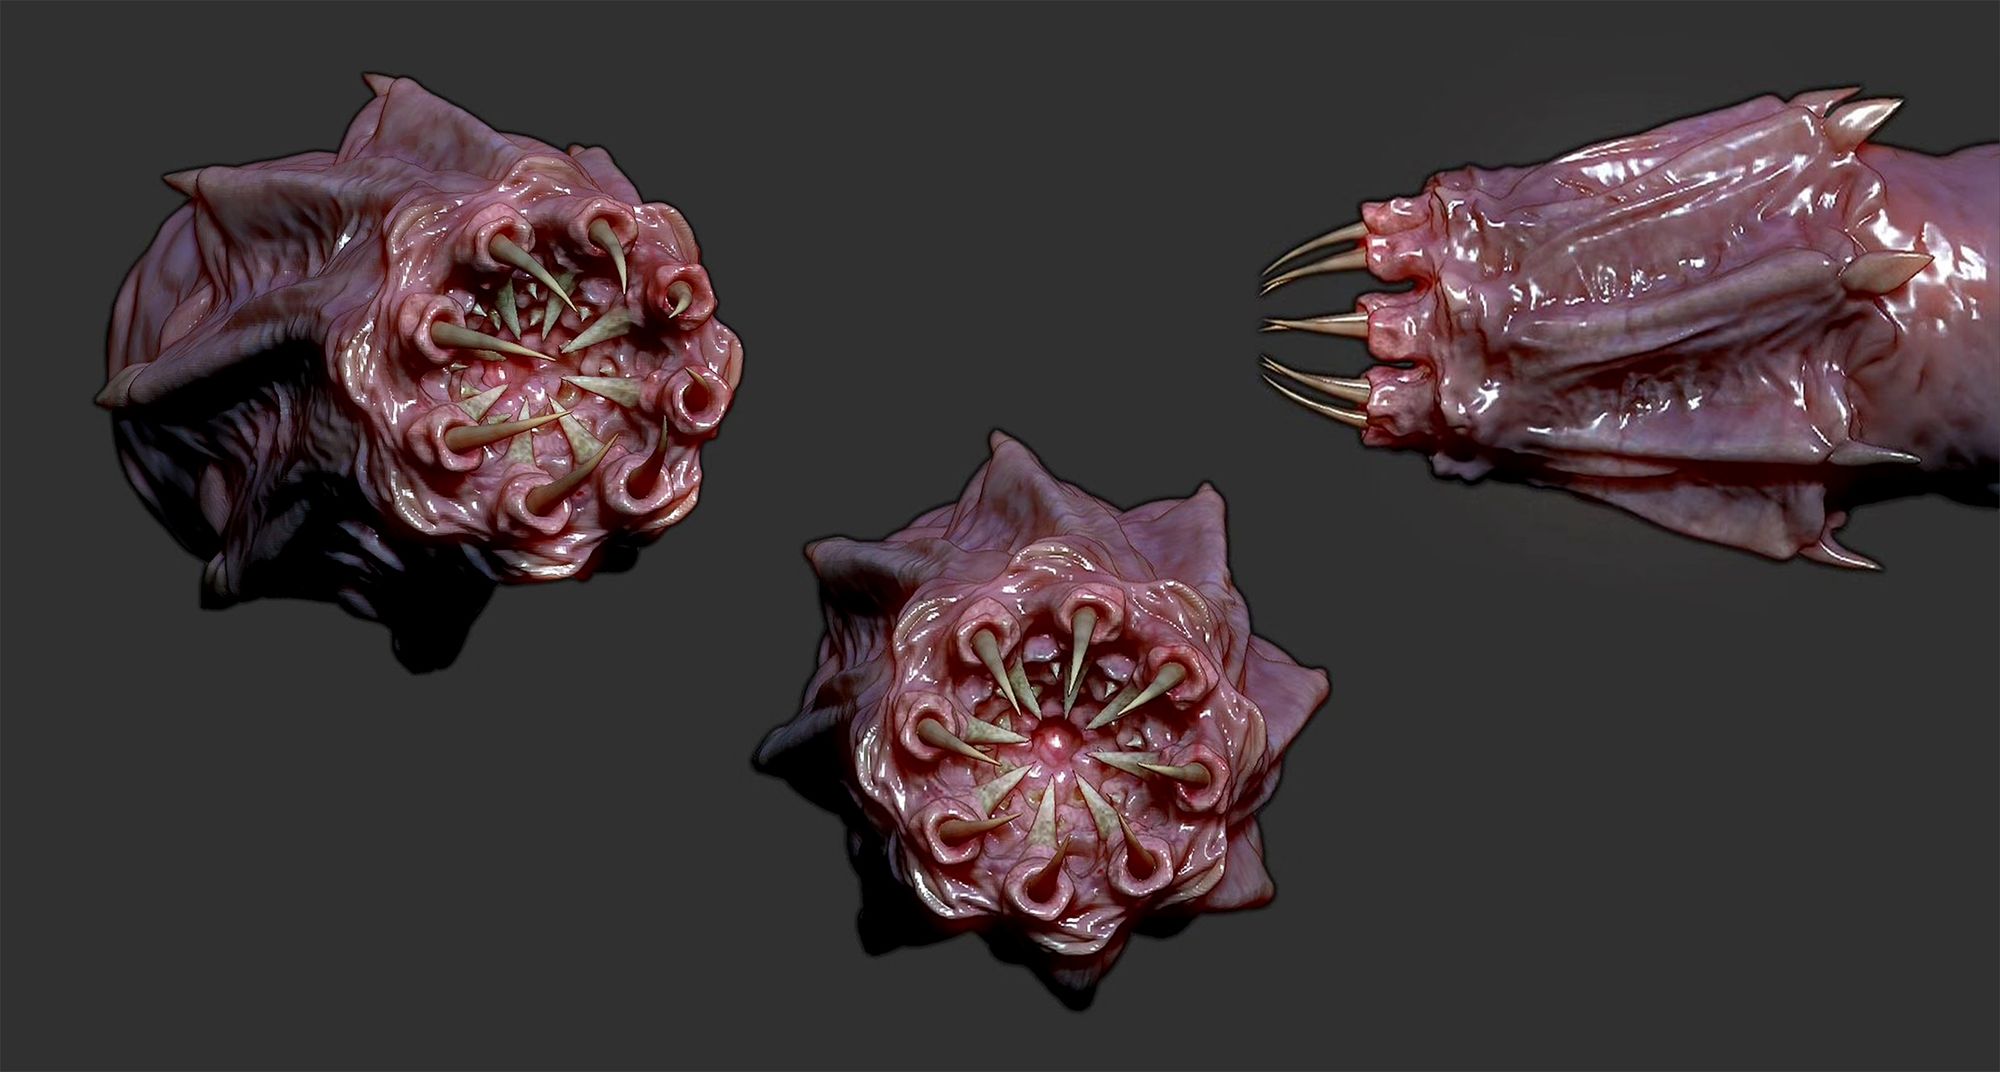
Modeling and sculpting the creature
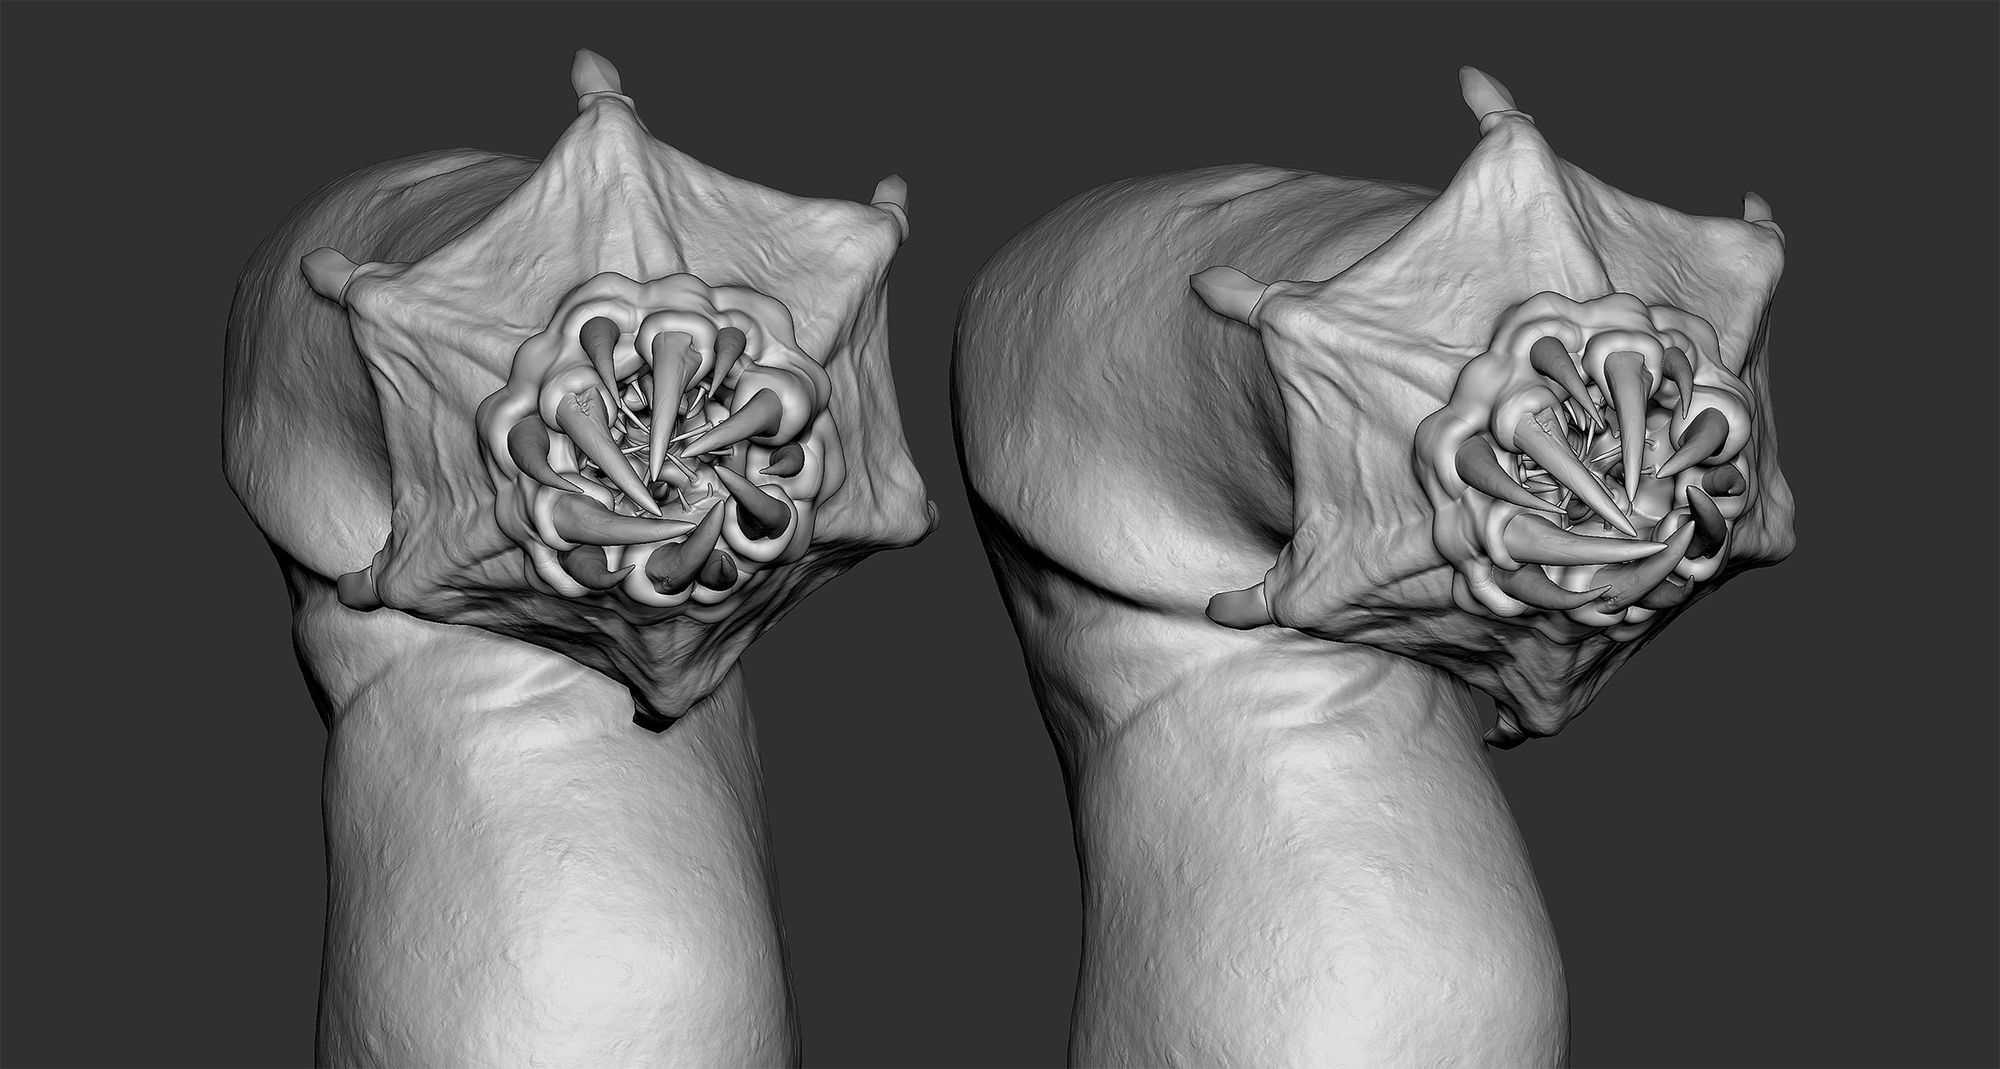
Although I had already sketched out my hypothetical worm-creature, I experimented with different shapes and colour variations in ZBrush, so I had a blast with a bit of concept sculpting and polypainting!
Concept sculpting and polypainting.
I ultimately decided to proceed with my initial drawn concept. In ZBrush, I began with a sphere and shaped its primary volumes using Dynamesh. I then ZRemeshed it to maintain sculpting details using subdivisions, following a similar process to sculpting Calvin. Since I didn’t need to rig and animate this creature later on, I sculpted it directly in pose, leveraging radial symmetry initially and introducing asymmetrical traits at later stages.
Clay material render.
Texturing the creature
Before exporting a mesh from Maya for texturing in another painting software, I took extra steps to prepare.
First, I assigned different Lambert materials to my meshes to define texture sets in Substance 3D Painter. If I know that four elements of an object will be metallic, then I assign them the same material to define a texture set that will represent the metallic components.
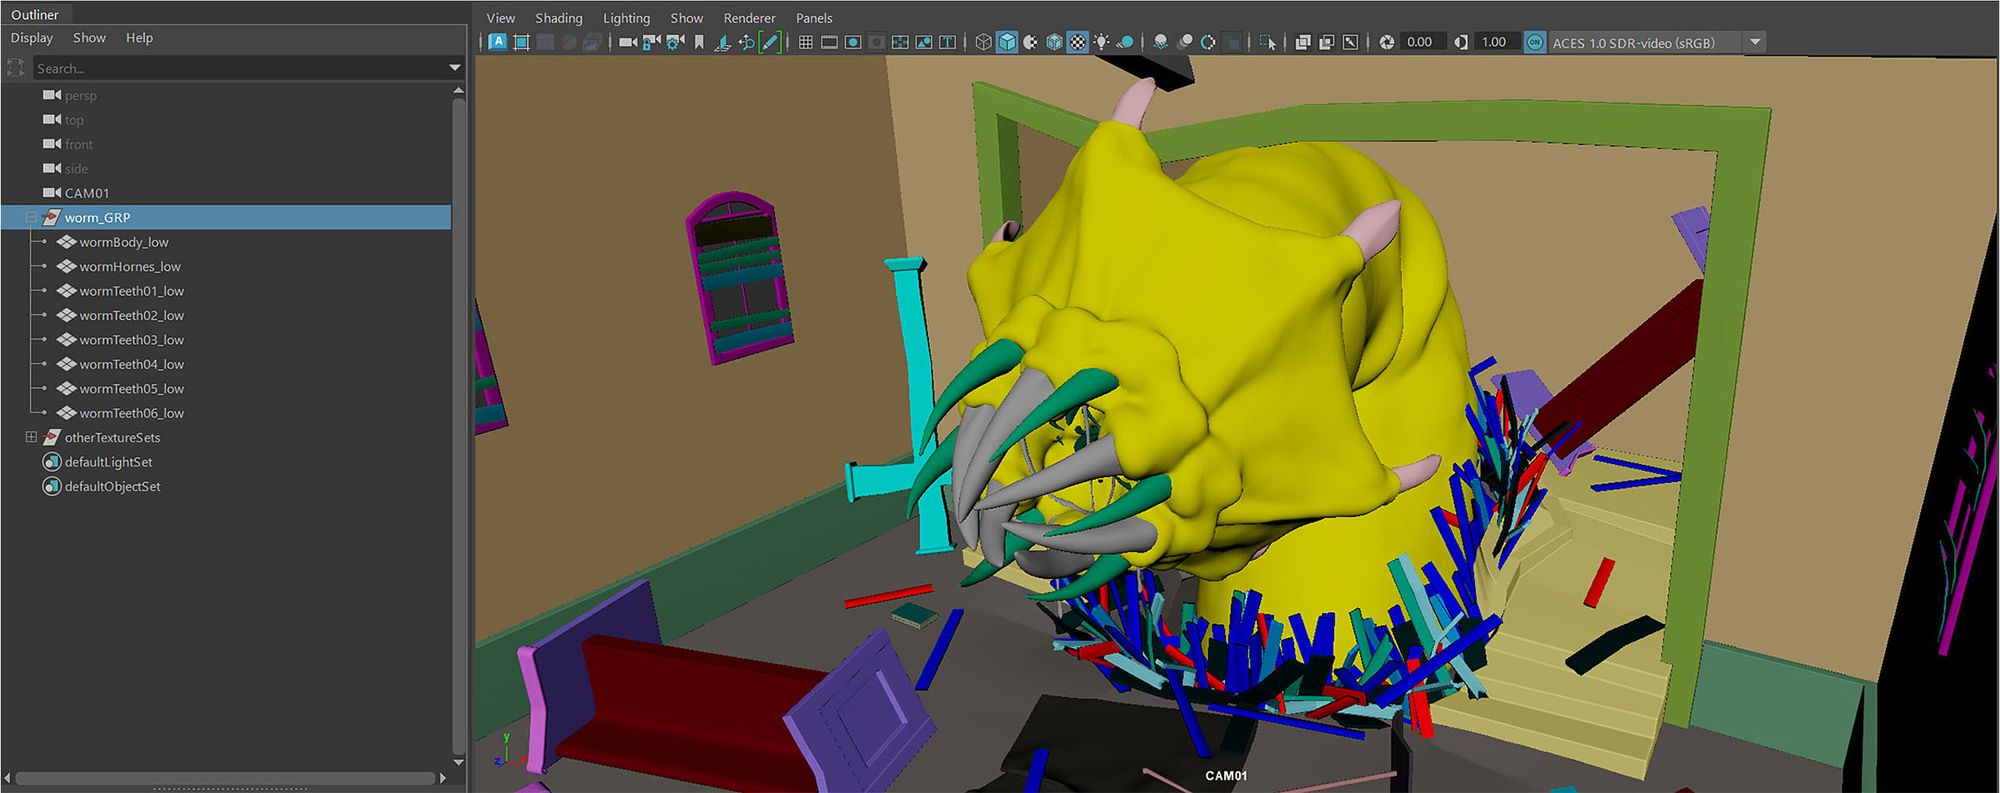
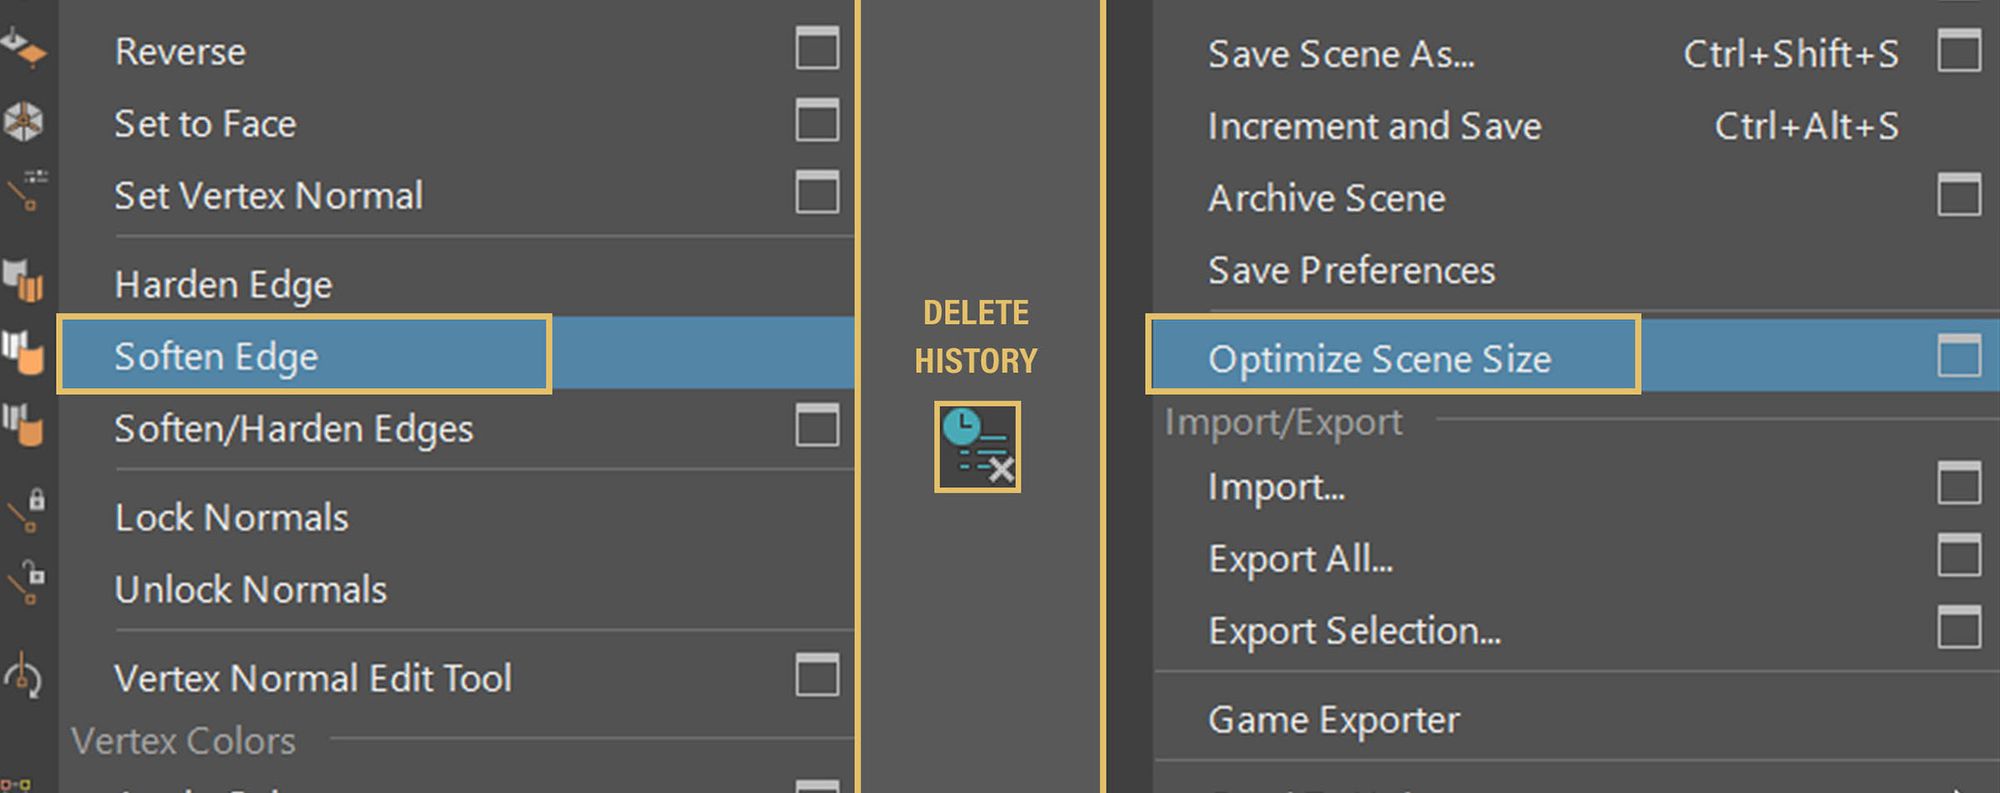
Then, I saved a backup copy of the file, deleted unnecessary elements from the scene, softened edges (Mesh Display > Soften Edge), deleted history, and optimised the scene file (File > Optimize Scene). We have successfully optimised both our file and meshes for the baking stage.
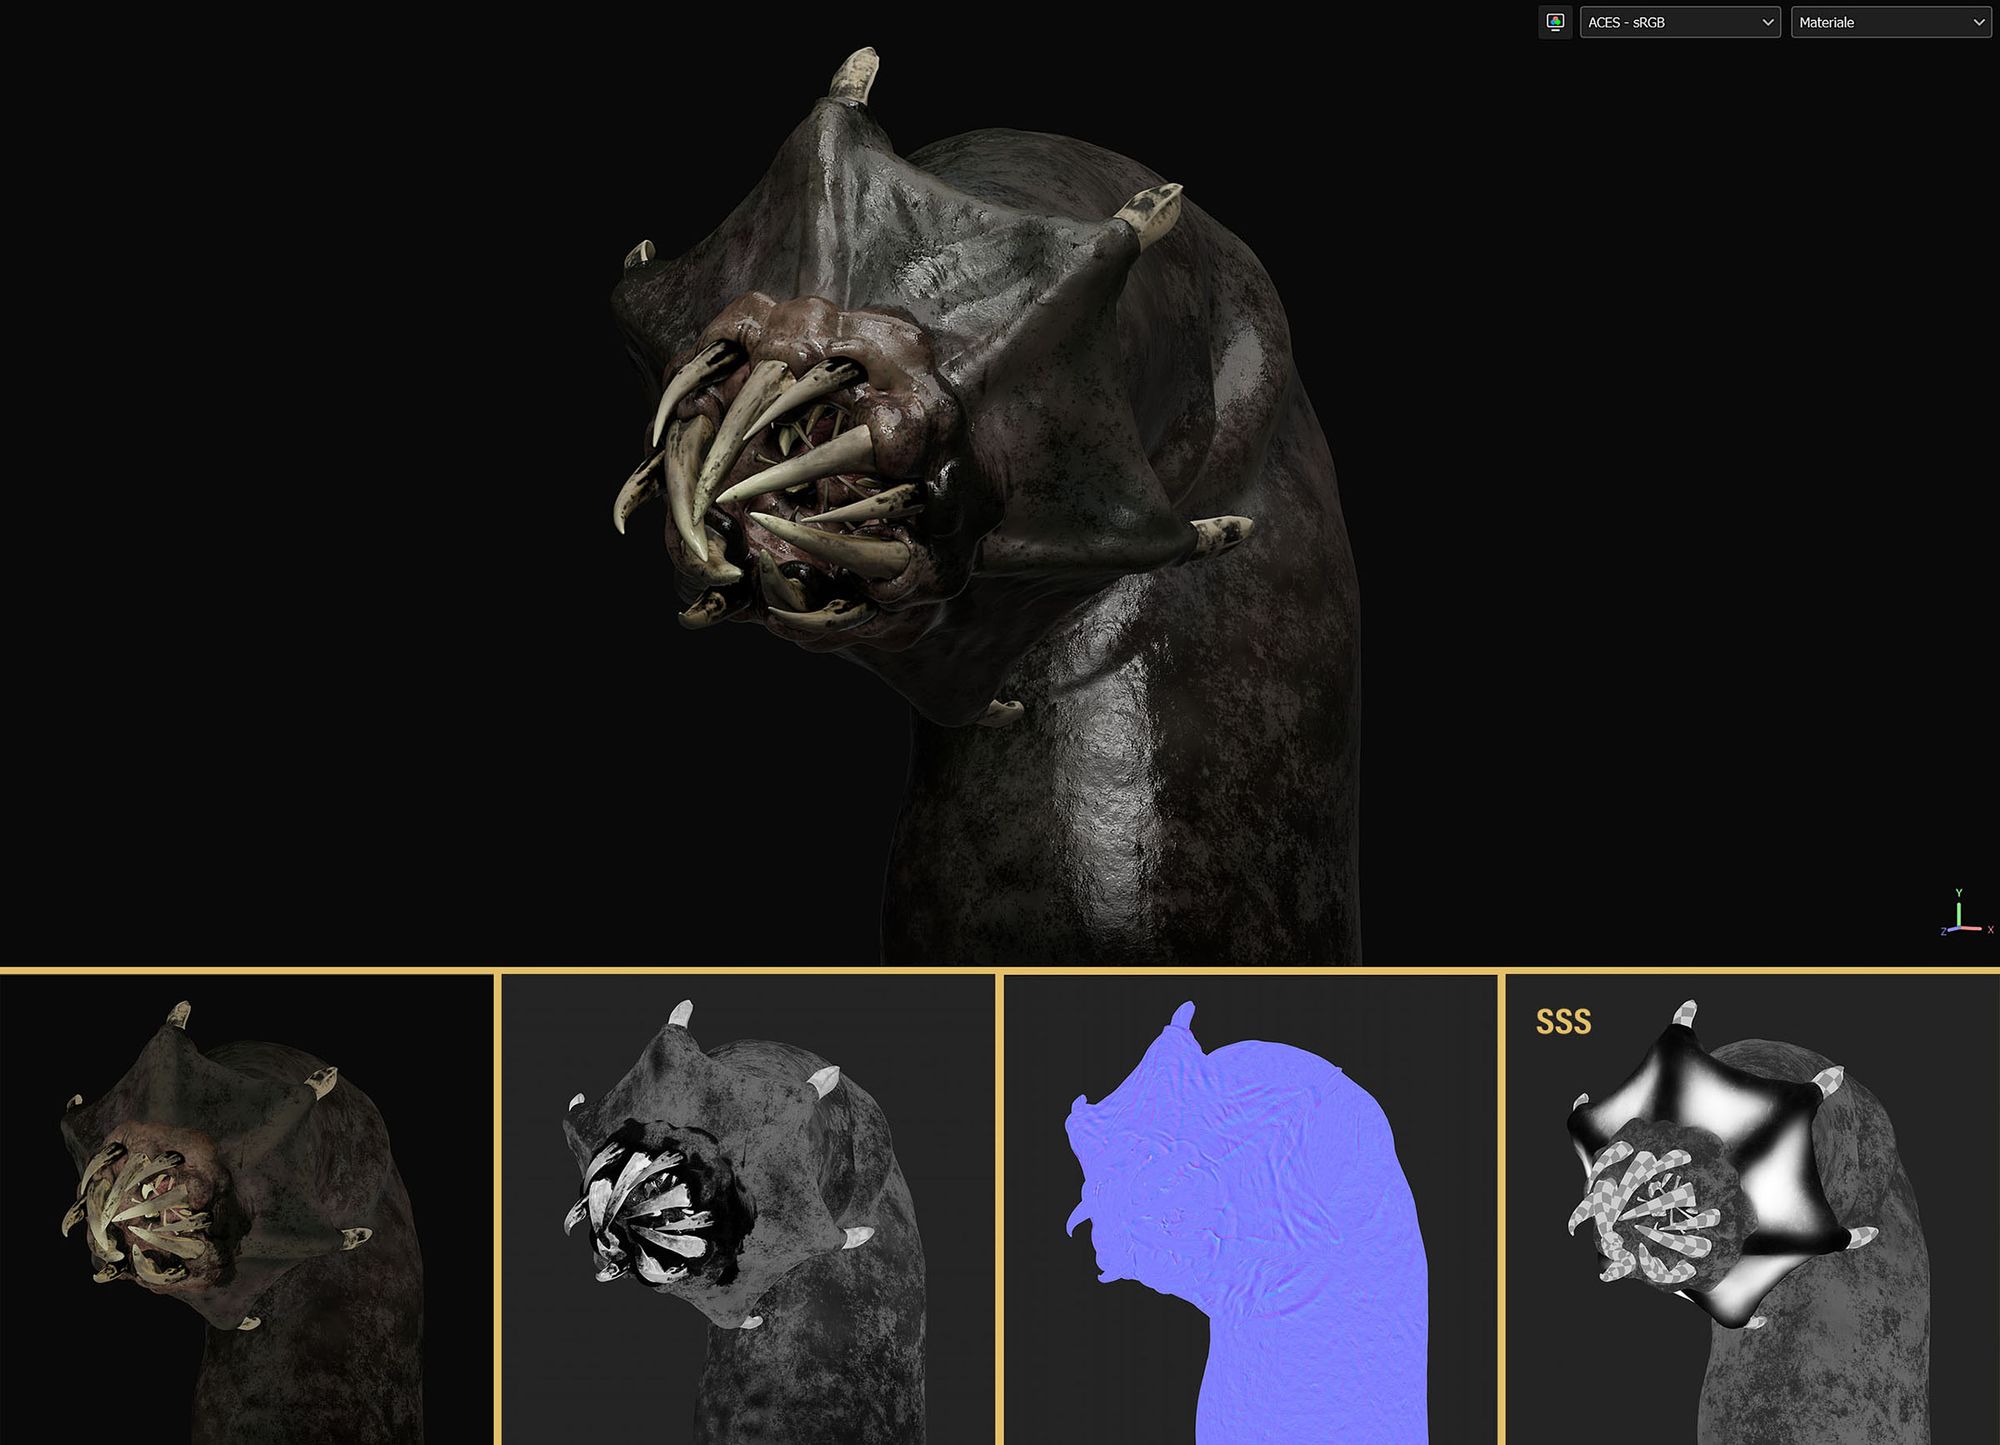
For texturing, I aimed to give the worm creature a crusty and slimy appearance. Utilising skin damage and imperfections baked from the high-poly sculpt, I added further detail to normal maps using Fill layers, Painting layers, Generators, and Filters within Substance 3D Painter. Additionally, I painted a Sub Surface Scattering mask to control translucency on specific areas of the worm's body (for example avoiding it on bony areas).
Shader, diffuse, roughness, normal, SSS.
Making of Jerusalem's Lot
The abandoned church
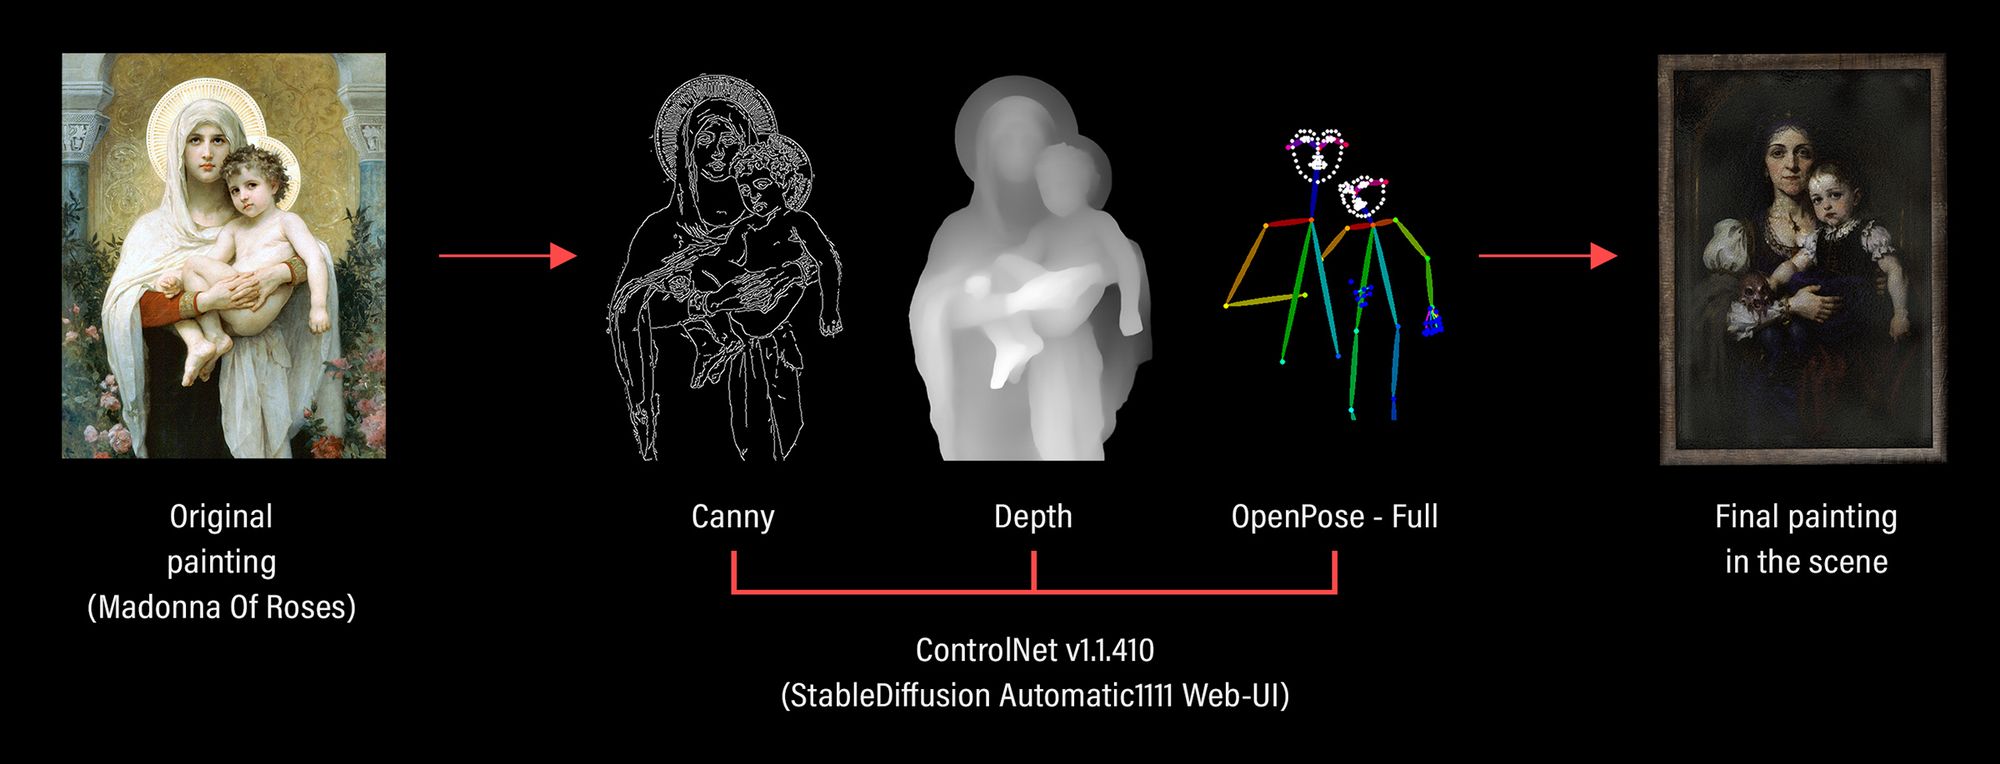
Implementing AI into the workflow
Recognising the potential of Artificial Intelligence as a powerful tool for experimentation, I integrated it into my workflow. I utilised Stable Diffusion Automatic1111 Web-UI and ControlNet script to extract specific poses of subjects from images or paintings. This data, stored as maps, enabled me to generate new content based on textual prompts while maintaining the exact poses of the subjects. Therefore I obtained three “maps”: Canny, Depth and OpenPose. To sum up, Canny identifies the borders of each of the subjects, Depth gives us a depth map to determine the proximity of the elements, OpenPose creates a sort of rough skeleton rig (face, hands and body).
Generation of Canny, Depth and OpenPose.
The image below clearly shows the result of combining those three maps, a textual prompt, a custom StableDiffusion checkpoint and a Lora.
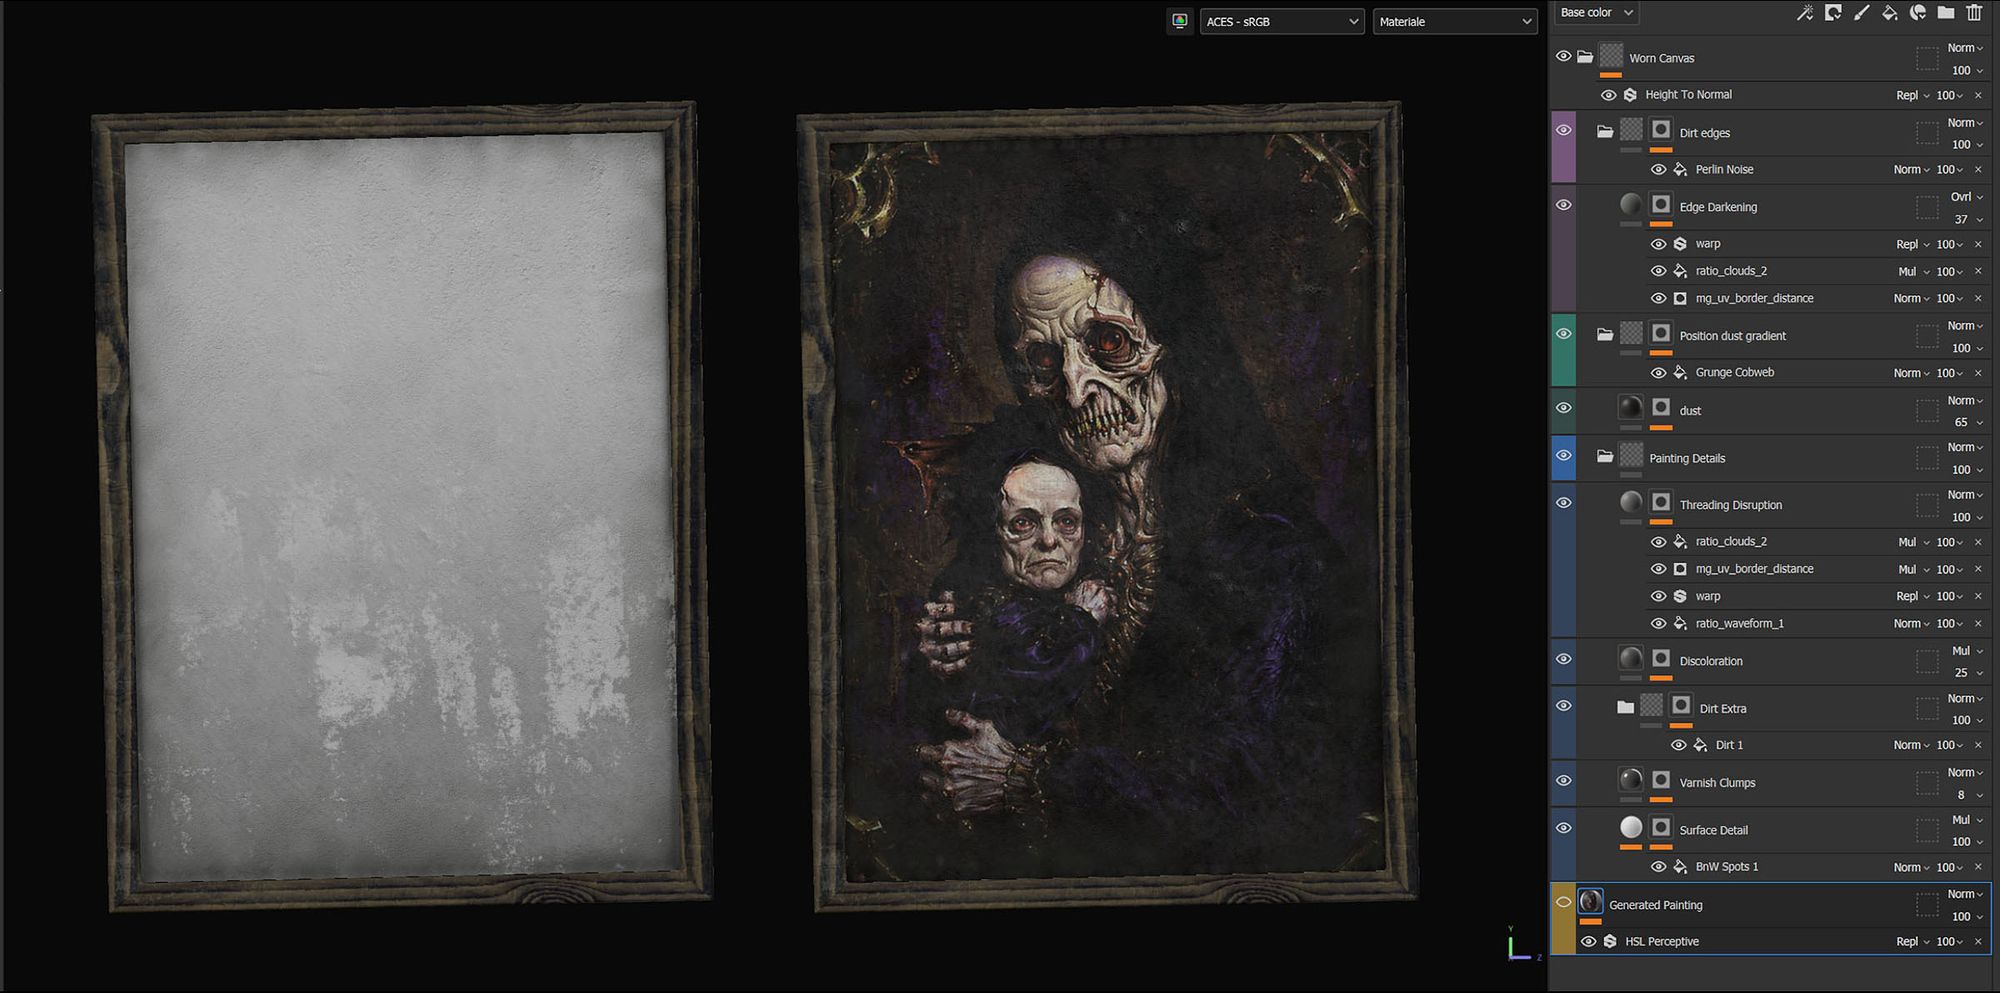
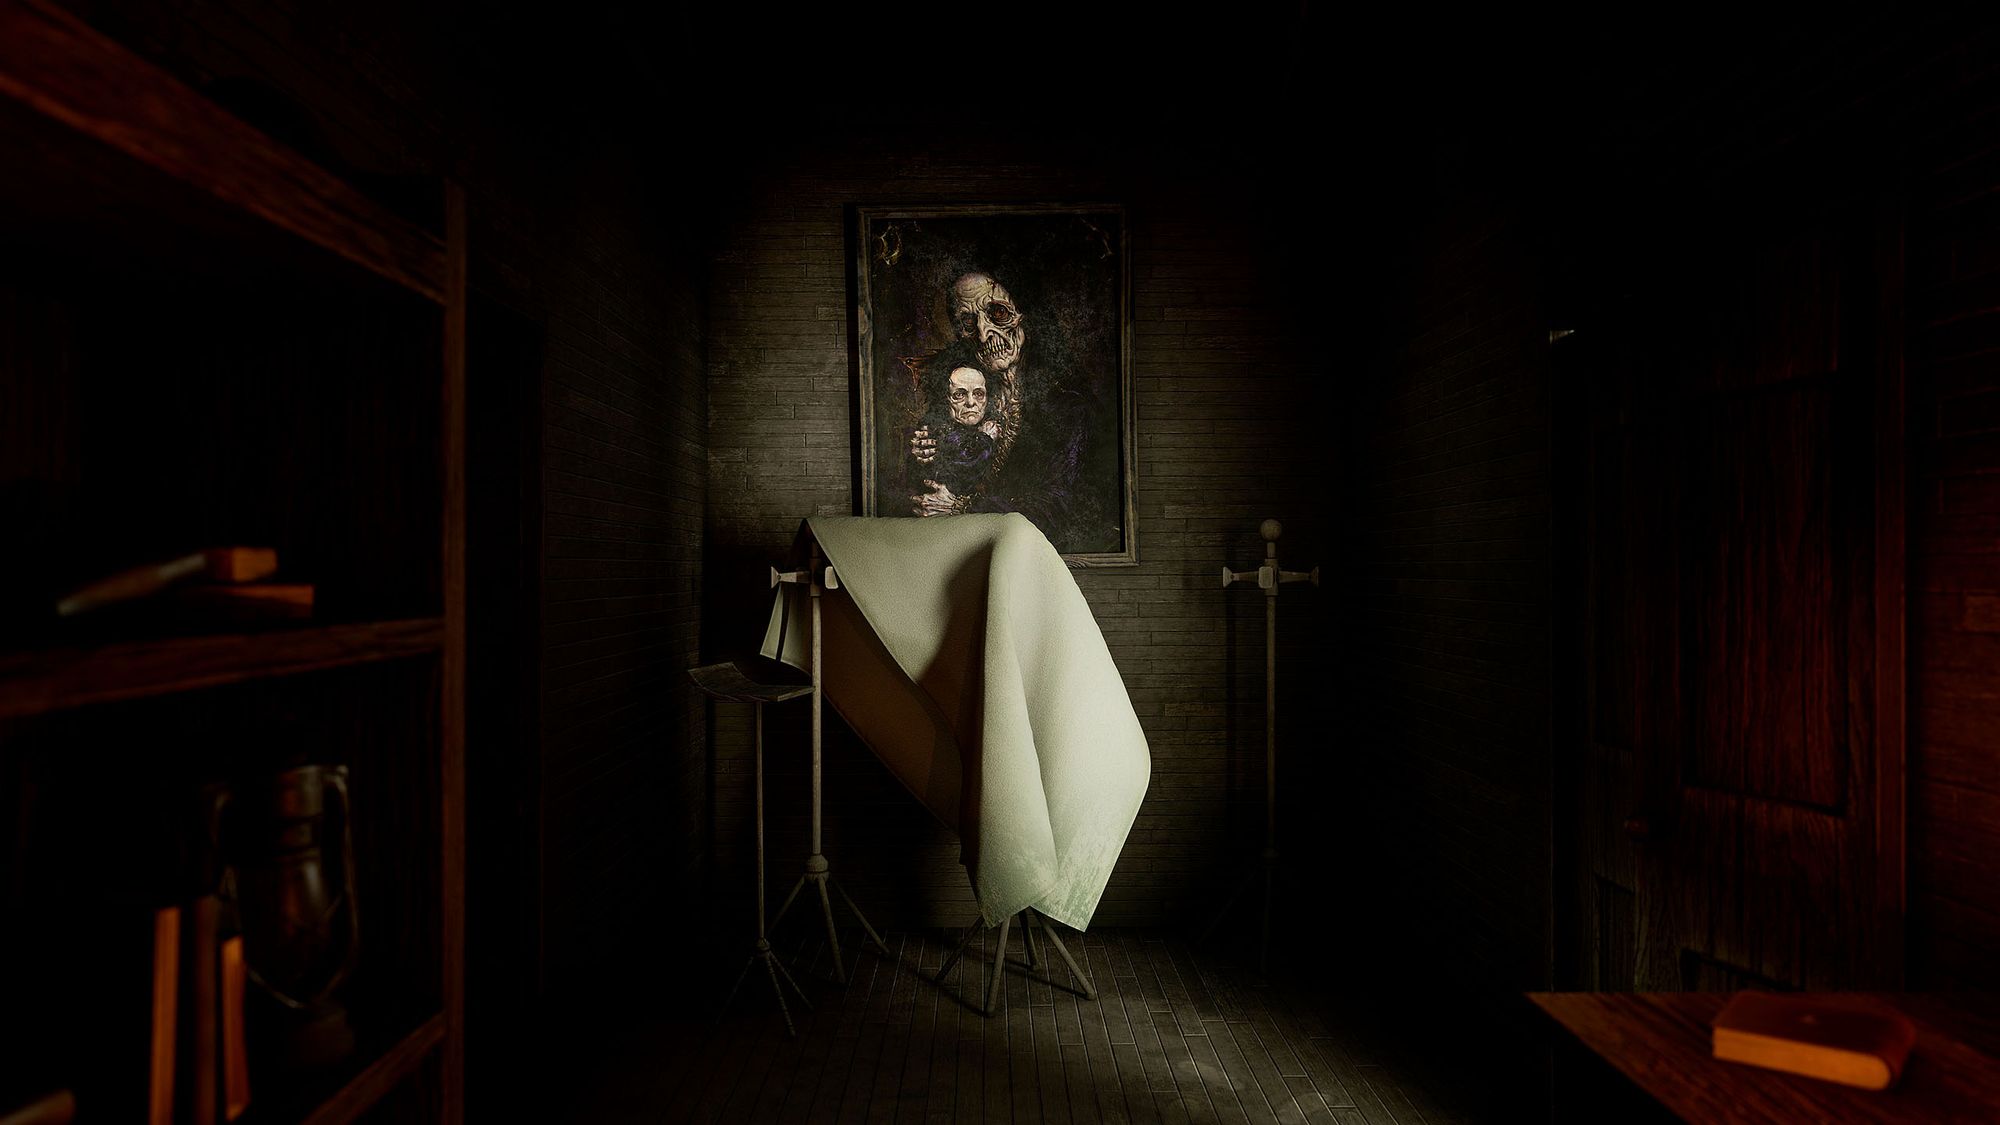
By generating three paintings using this technique, I later imported and projected them onto my 3D models inside Substance 3D Painter, refining them with additional details such as dust and a worn canvas effect.
Texturing over the generated image.
💡
I used three paintings from the 1700s to 1800s as references for generating the new ones with similar poses. Since these paintings are from that era and now of public domain on the internet, their copyright has expired.
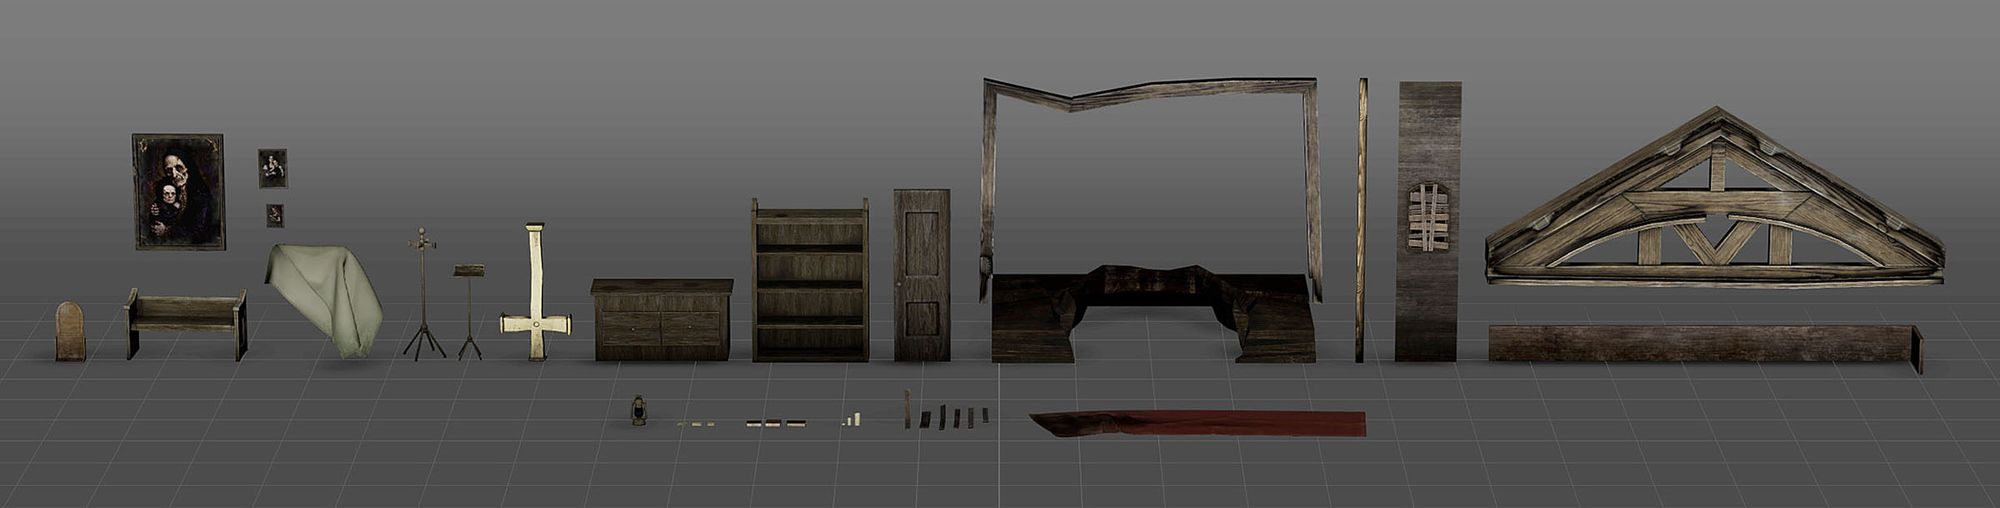
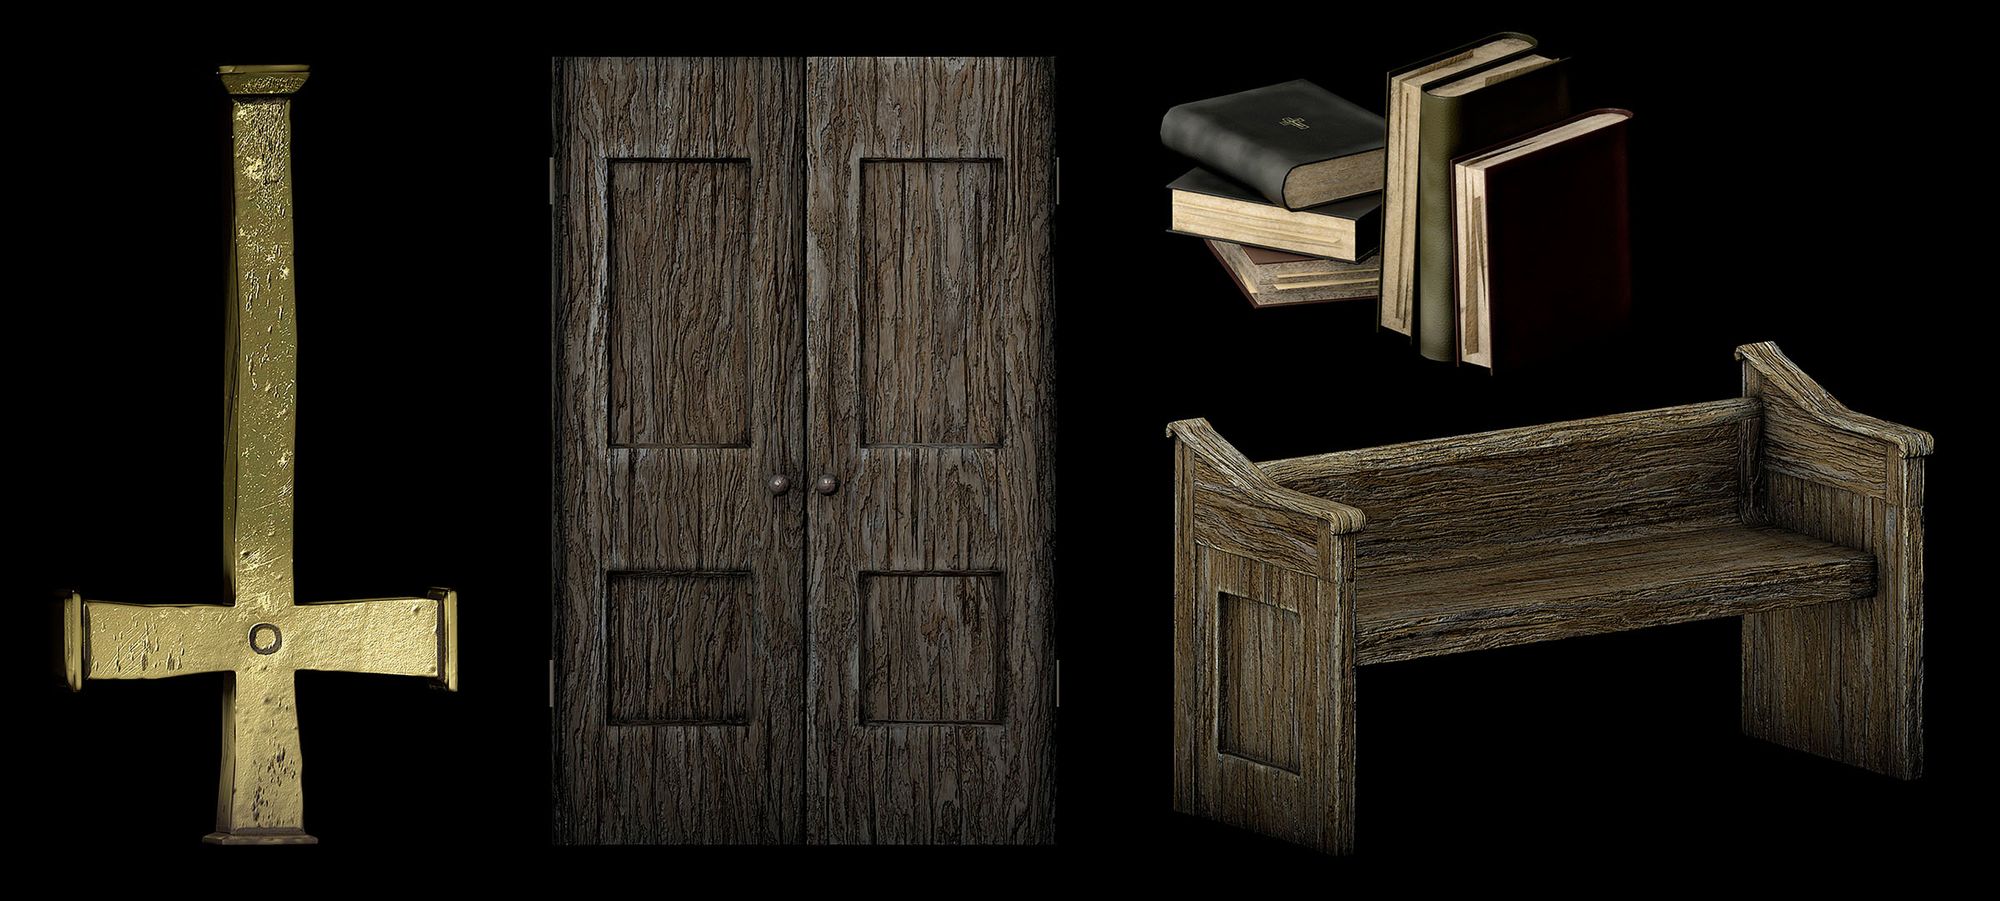
Modeling props
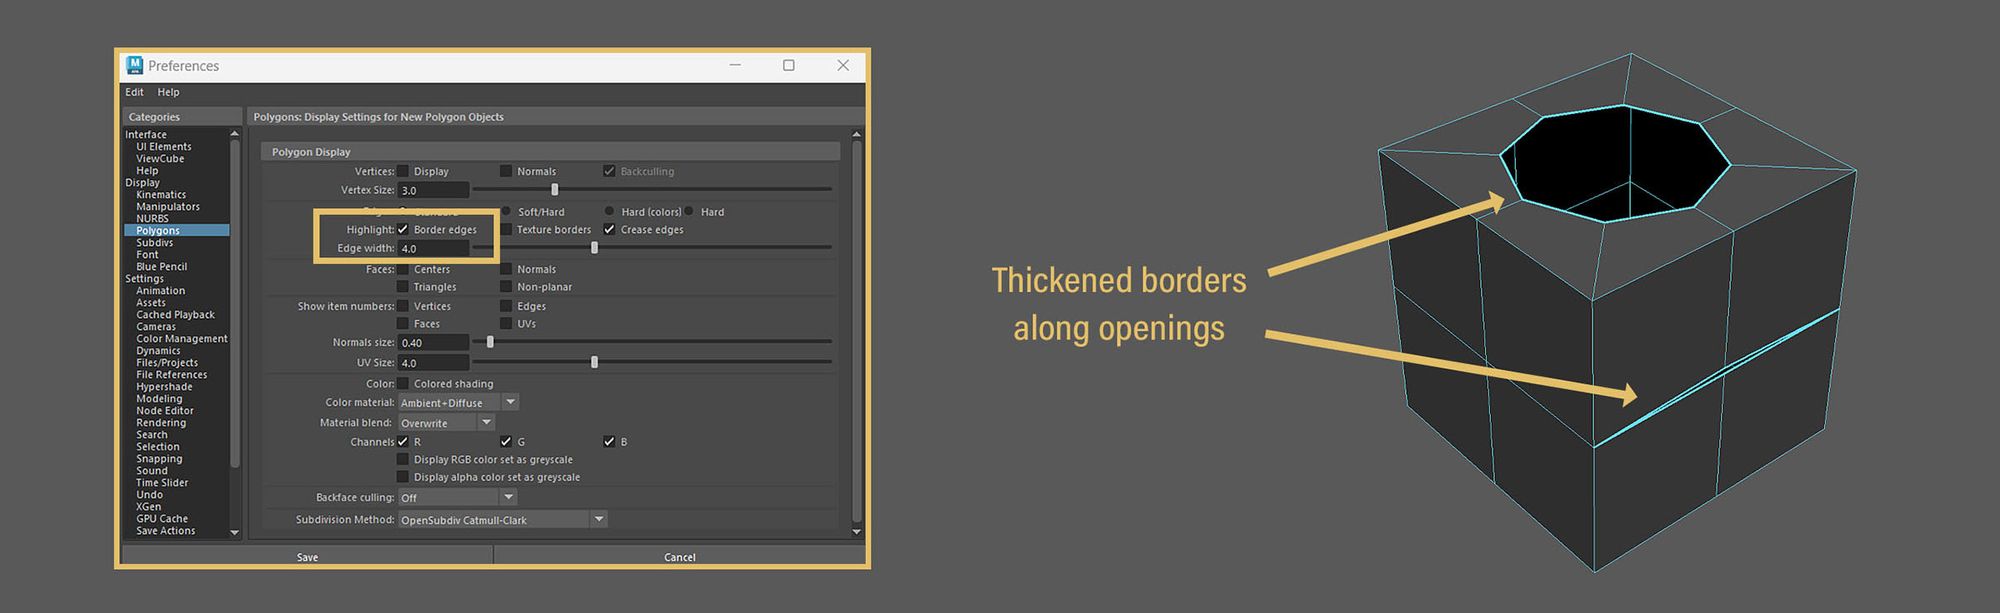
When modeling props in Maya, I utilised various features to streamline the process. These included radial symmetry, instances, mirroring, and the Modeling Toolkit. Before I start explaining them further, I would like to mention an extremely useful setting in Windows > Settings> Preferences> Modeling. Check the box Border edges under the Highlight row, and set Edge width at a value of 4.0. This setting allows you to see whether there are holes or separated edges in your mesh by thickening their surrounding borders.
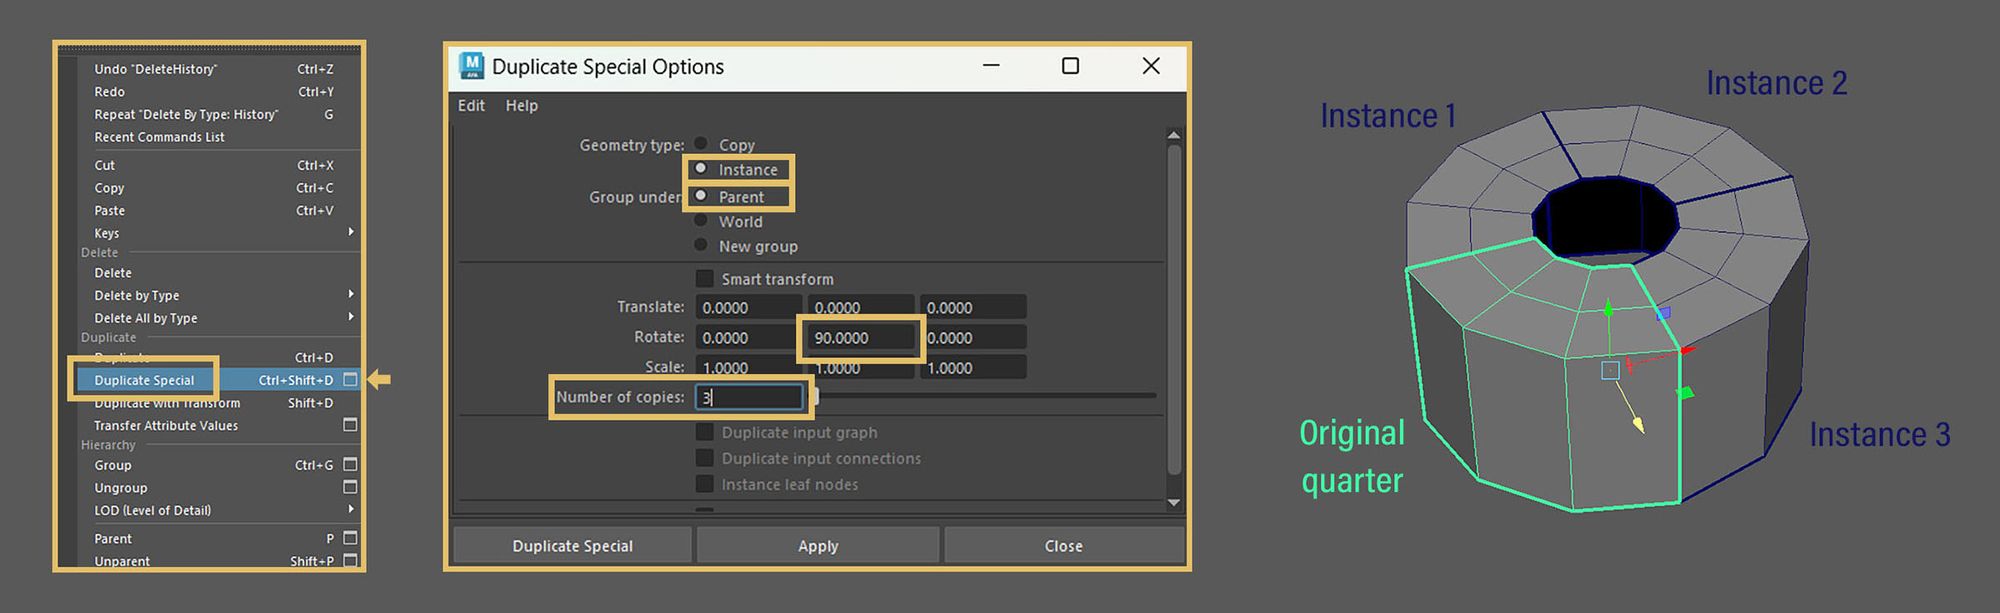
Let’s suppose I want to model a kind of cylindrical prop. I add an edge loop to divide its height in half, I delete the bottom-half part, and I create a hole in the middle of the cylinder’s cap. You can see the thickened borders where there are openings thanks to the option we previously enabled. Now let’s go to the top view, select a quarter of the cylinder, press Ctrl + Shift + I to invert the selection and delete the other three quarters.
Be sure the pivot is still in the center of the original cylinder. Now in object mode select the quarter you have, go to Edit > Duplicate Special (option box) and switch Geometry type to Instance, then Group under to Parent. Also, since we want to use radial symmetry to model all four quarters of the cylinder at the same time, in the same dialogue window we set the Number of copies to 3 and the Y-Rotation to a 90-degree angle. We are telling the software to create three copies (instances) of the cylinder’s quarter we have, but rotating each of them 90 degrees along the central Y-axis (360/4=90 degrees rotation for each quarter duplicated).
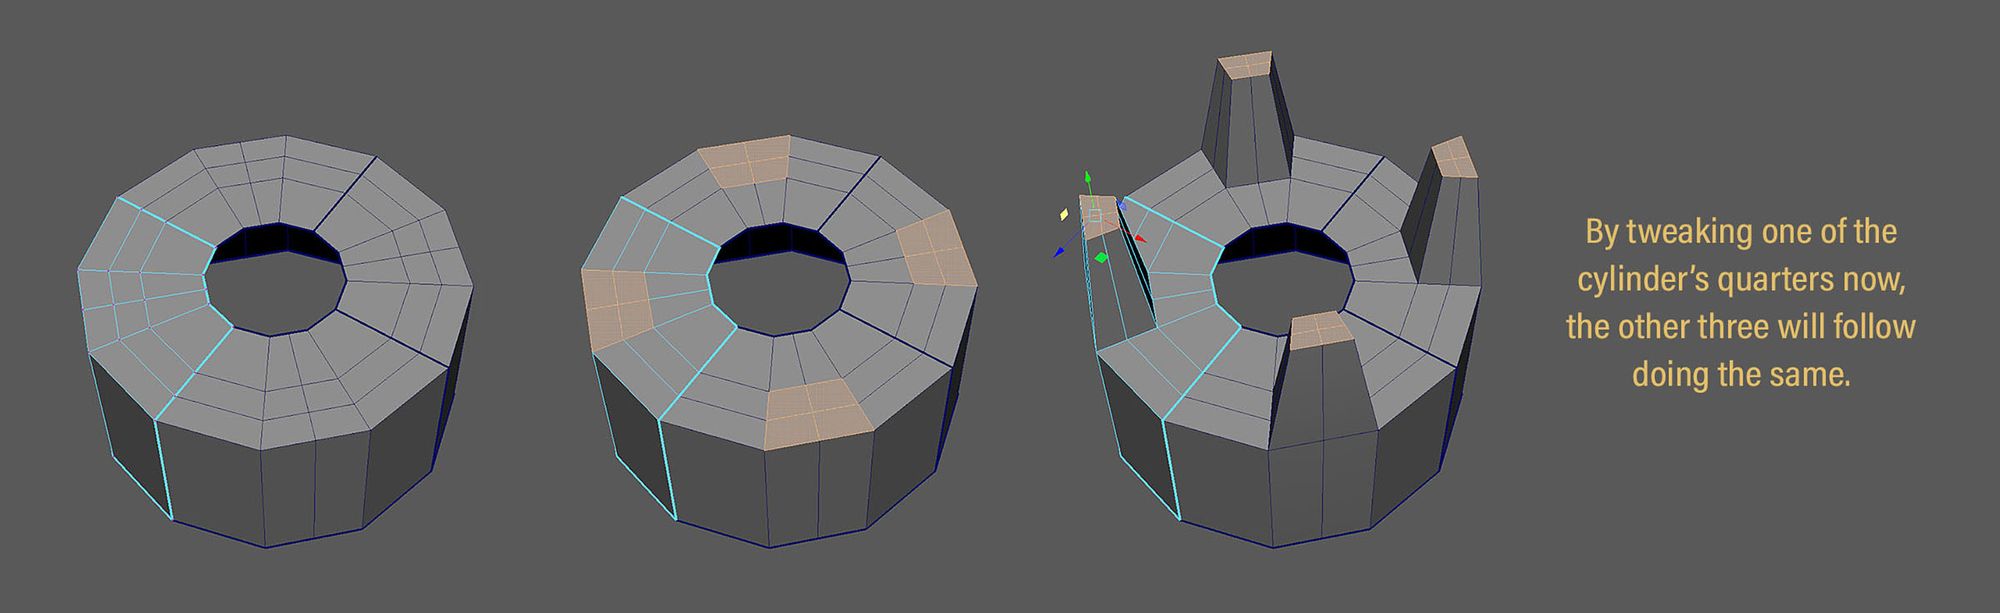
You’ll see that if you start making modifications to one of the cylinder’s quarters now, the other three will follow doing the same. This way you focus on modeling one of the four sides and struggle less.
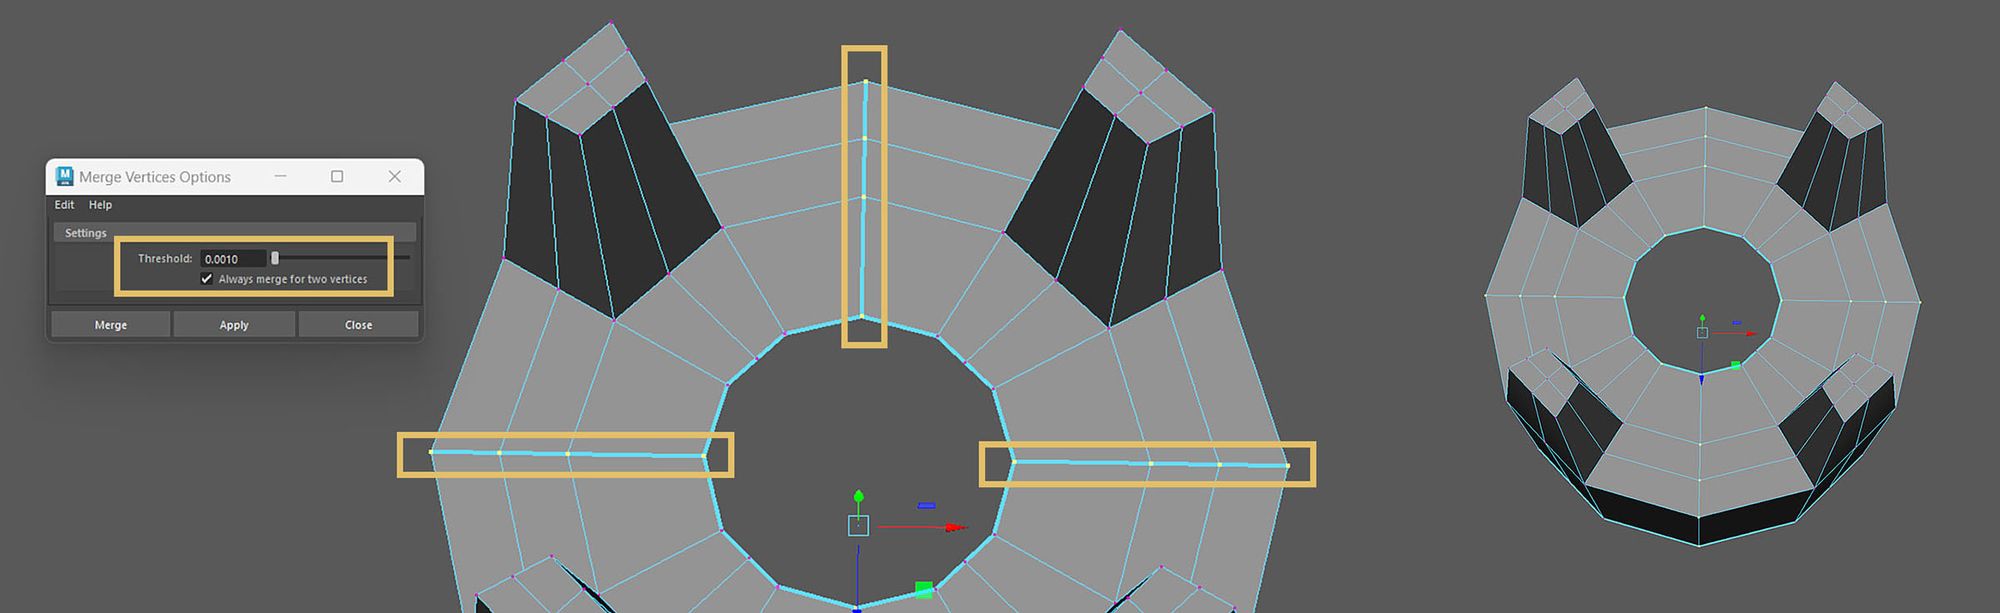
Once you have finished tweaking the shapes, you can combine your four quarters together by going into Mesh > Combine, then delete the mesh history and merge the vertices together to go back to a single mesh.
As for the last step you can snap the object’s pivot to half of the original cylinder’s height and proceed mirroring it along the negative Y-axis (going from up to down). Remember to uncheck the Cut geometry box, set Mirror Axis Position to Object (we are using the object’s pivot), check Combine with Original (to merge vertices directly) and set a low-value custom threshold. Done!
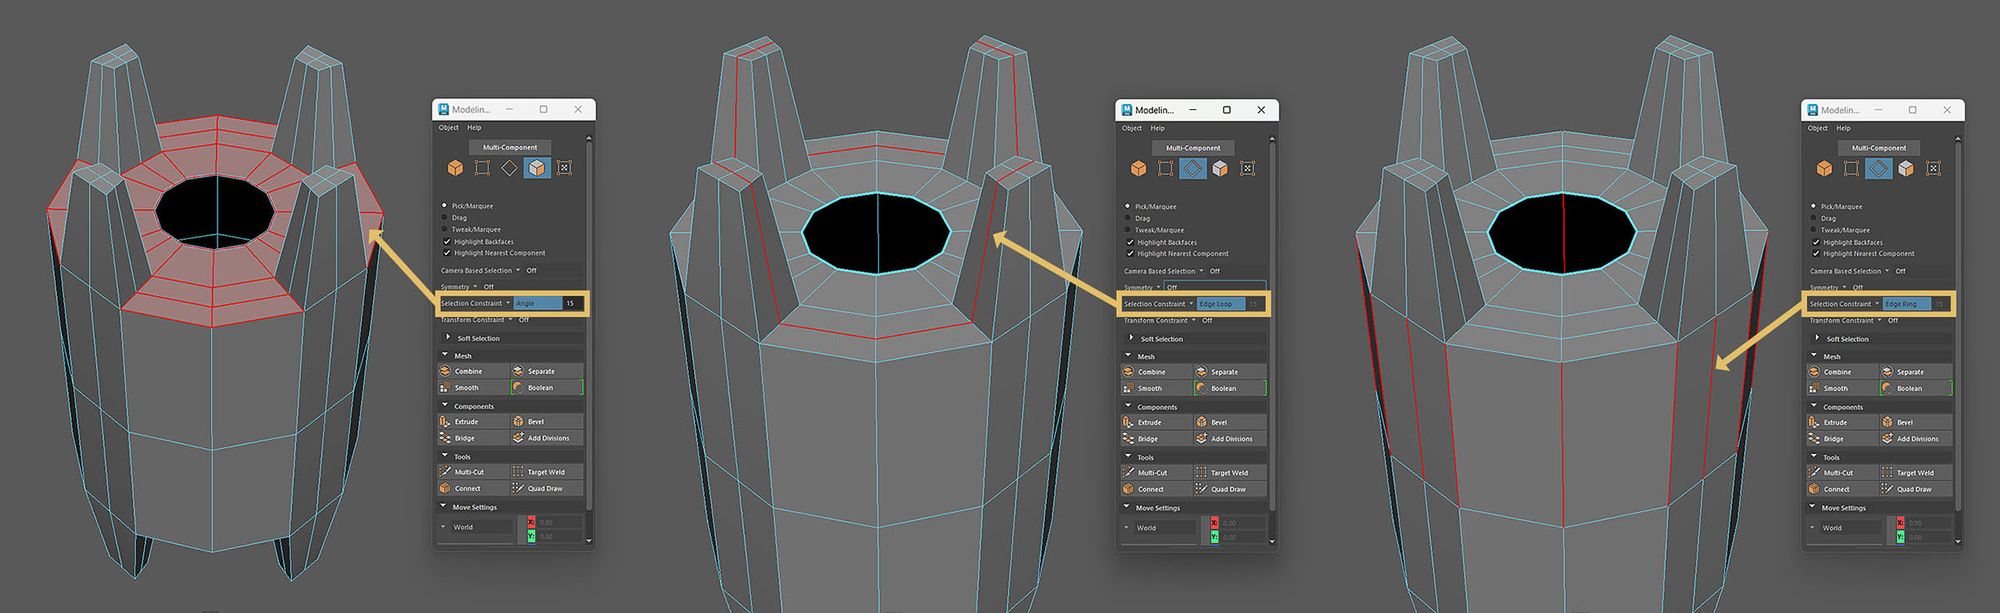
I want to show you one last incredible feature before moving to the next paragraph: the Modeling Toolkit, located below the Attribute Editor tab on the right side of the screen. By changing the Selection Constraint type, it allows me to select entire areas based on angular value, entire edge loops, or entire edge rings with just a single click.
Modularity of the environment
Since I wanted to work efficiently, I modeled my scene while also thinking about its modularity.
I ensured modularity in the environment by modeling objects in a way that allowed them to be positioned next to each other effectively.
Texturing props
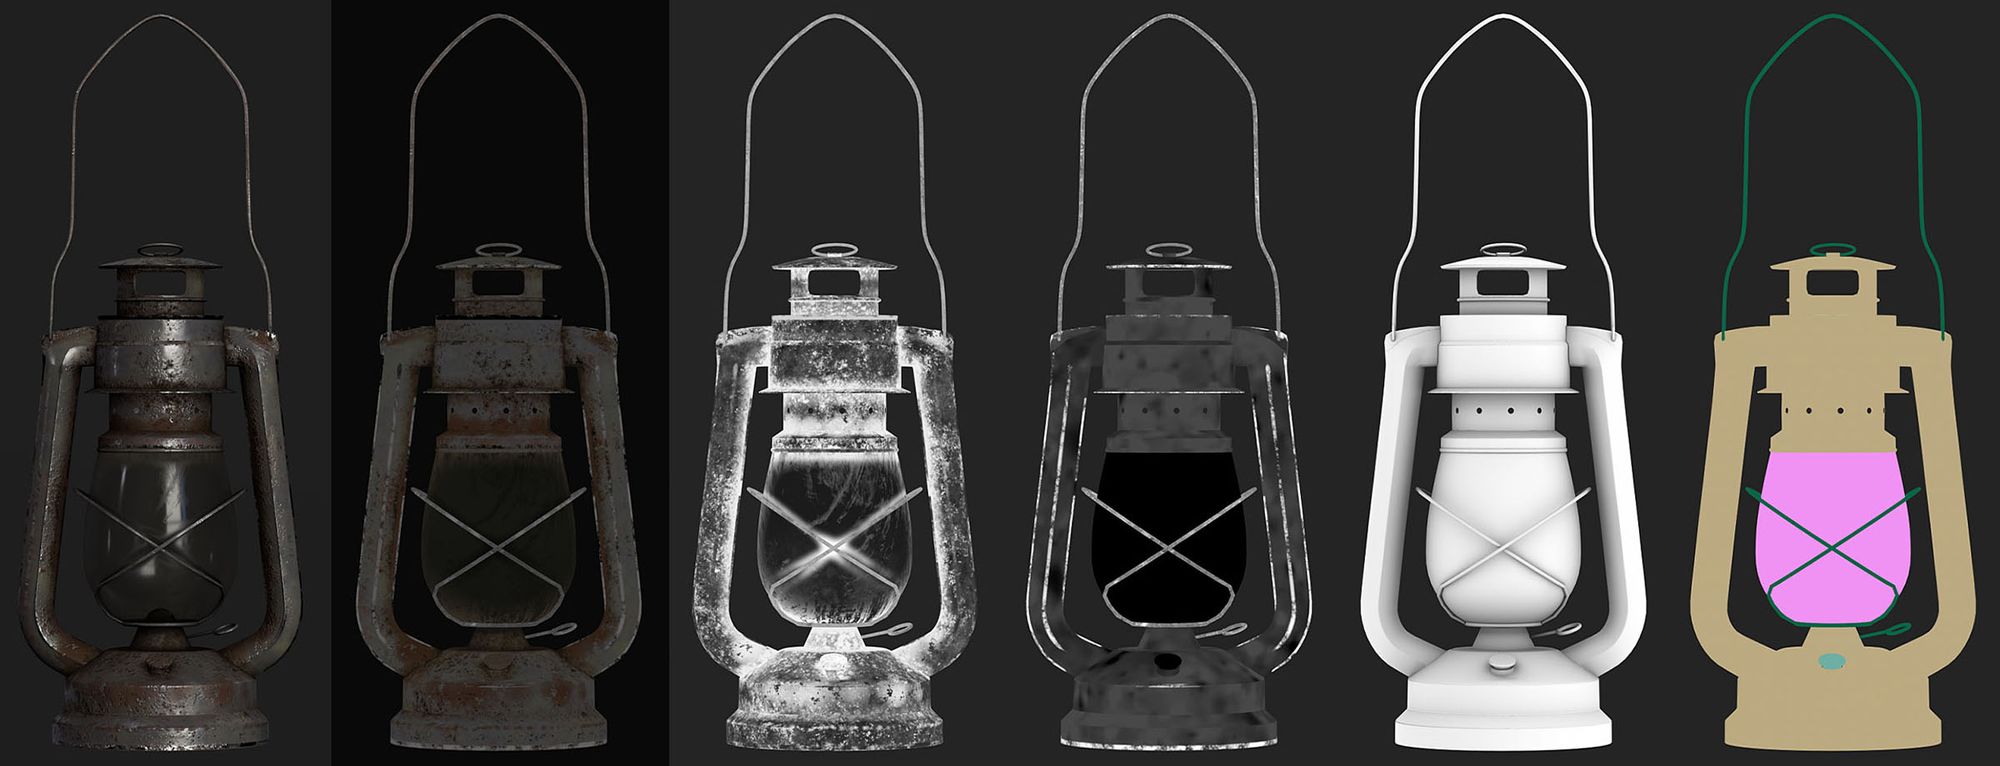
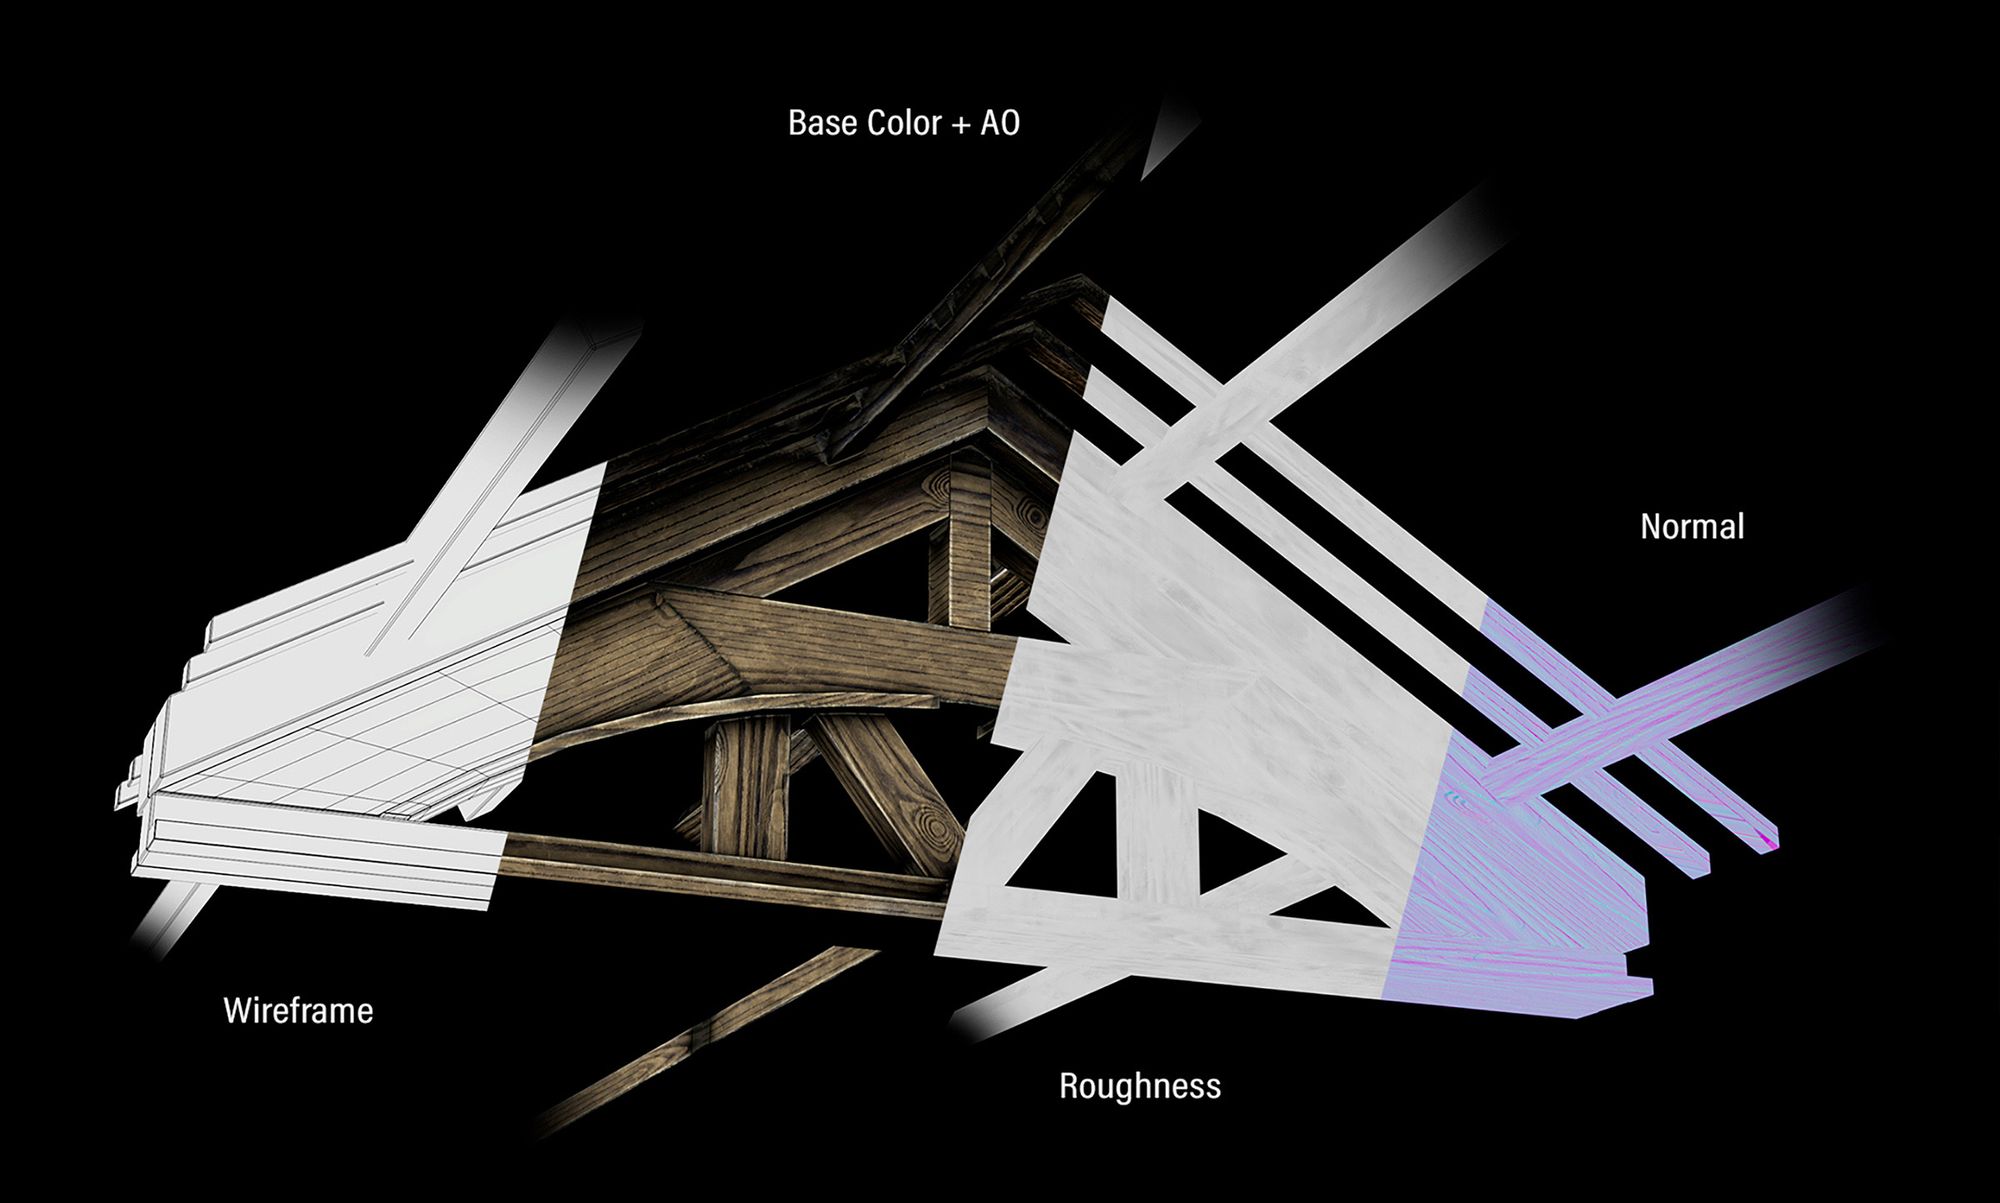
For portfolio presentation, I employed 4K textures for all my props and relied heavily on curvature, ambient occlusion, and position maps during the texturing phase.
Example of textured props from my scene.
The first two allowed me to add lots of imperfections masking out specific areas, like edges, areas of intersection and recesses. About the third one instead, it allowed me to create a linear gradient, for things like dirt prone to accumulating close to the ground surface and fading away as it moves towards the upper side of an object.
Following the standard PBR texturing workflow, I generated diffuse, ambient occlusion, roughness, and metalness maps for most props.
Additionally, I created an old wooden material for the walls, floor, and ceiling using Substance 3D Designer, exposing parameters for further tweaking in Substance 3D Painter.
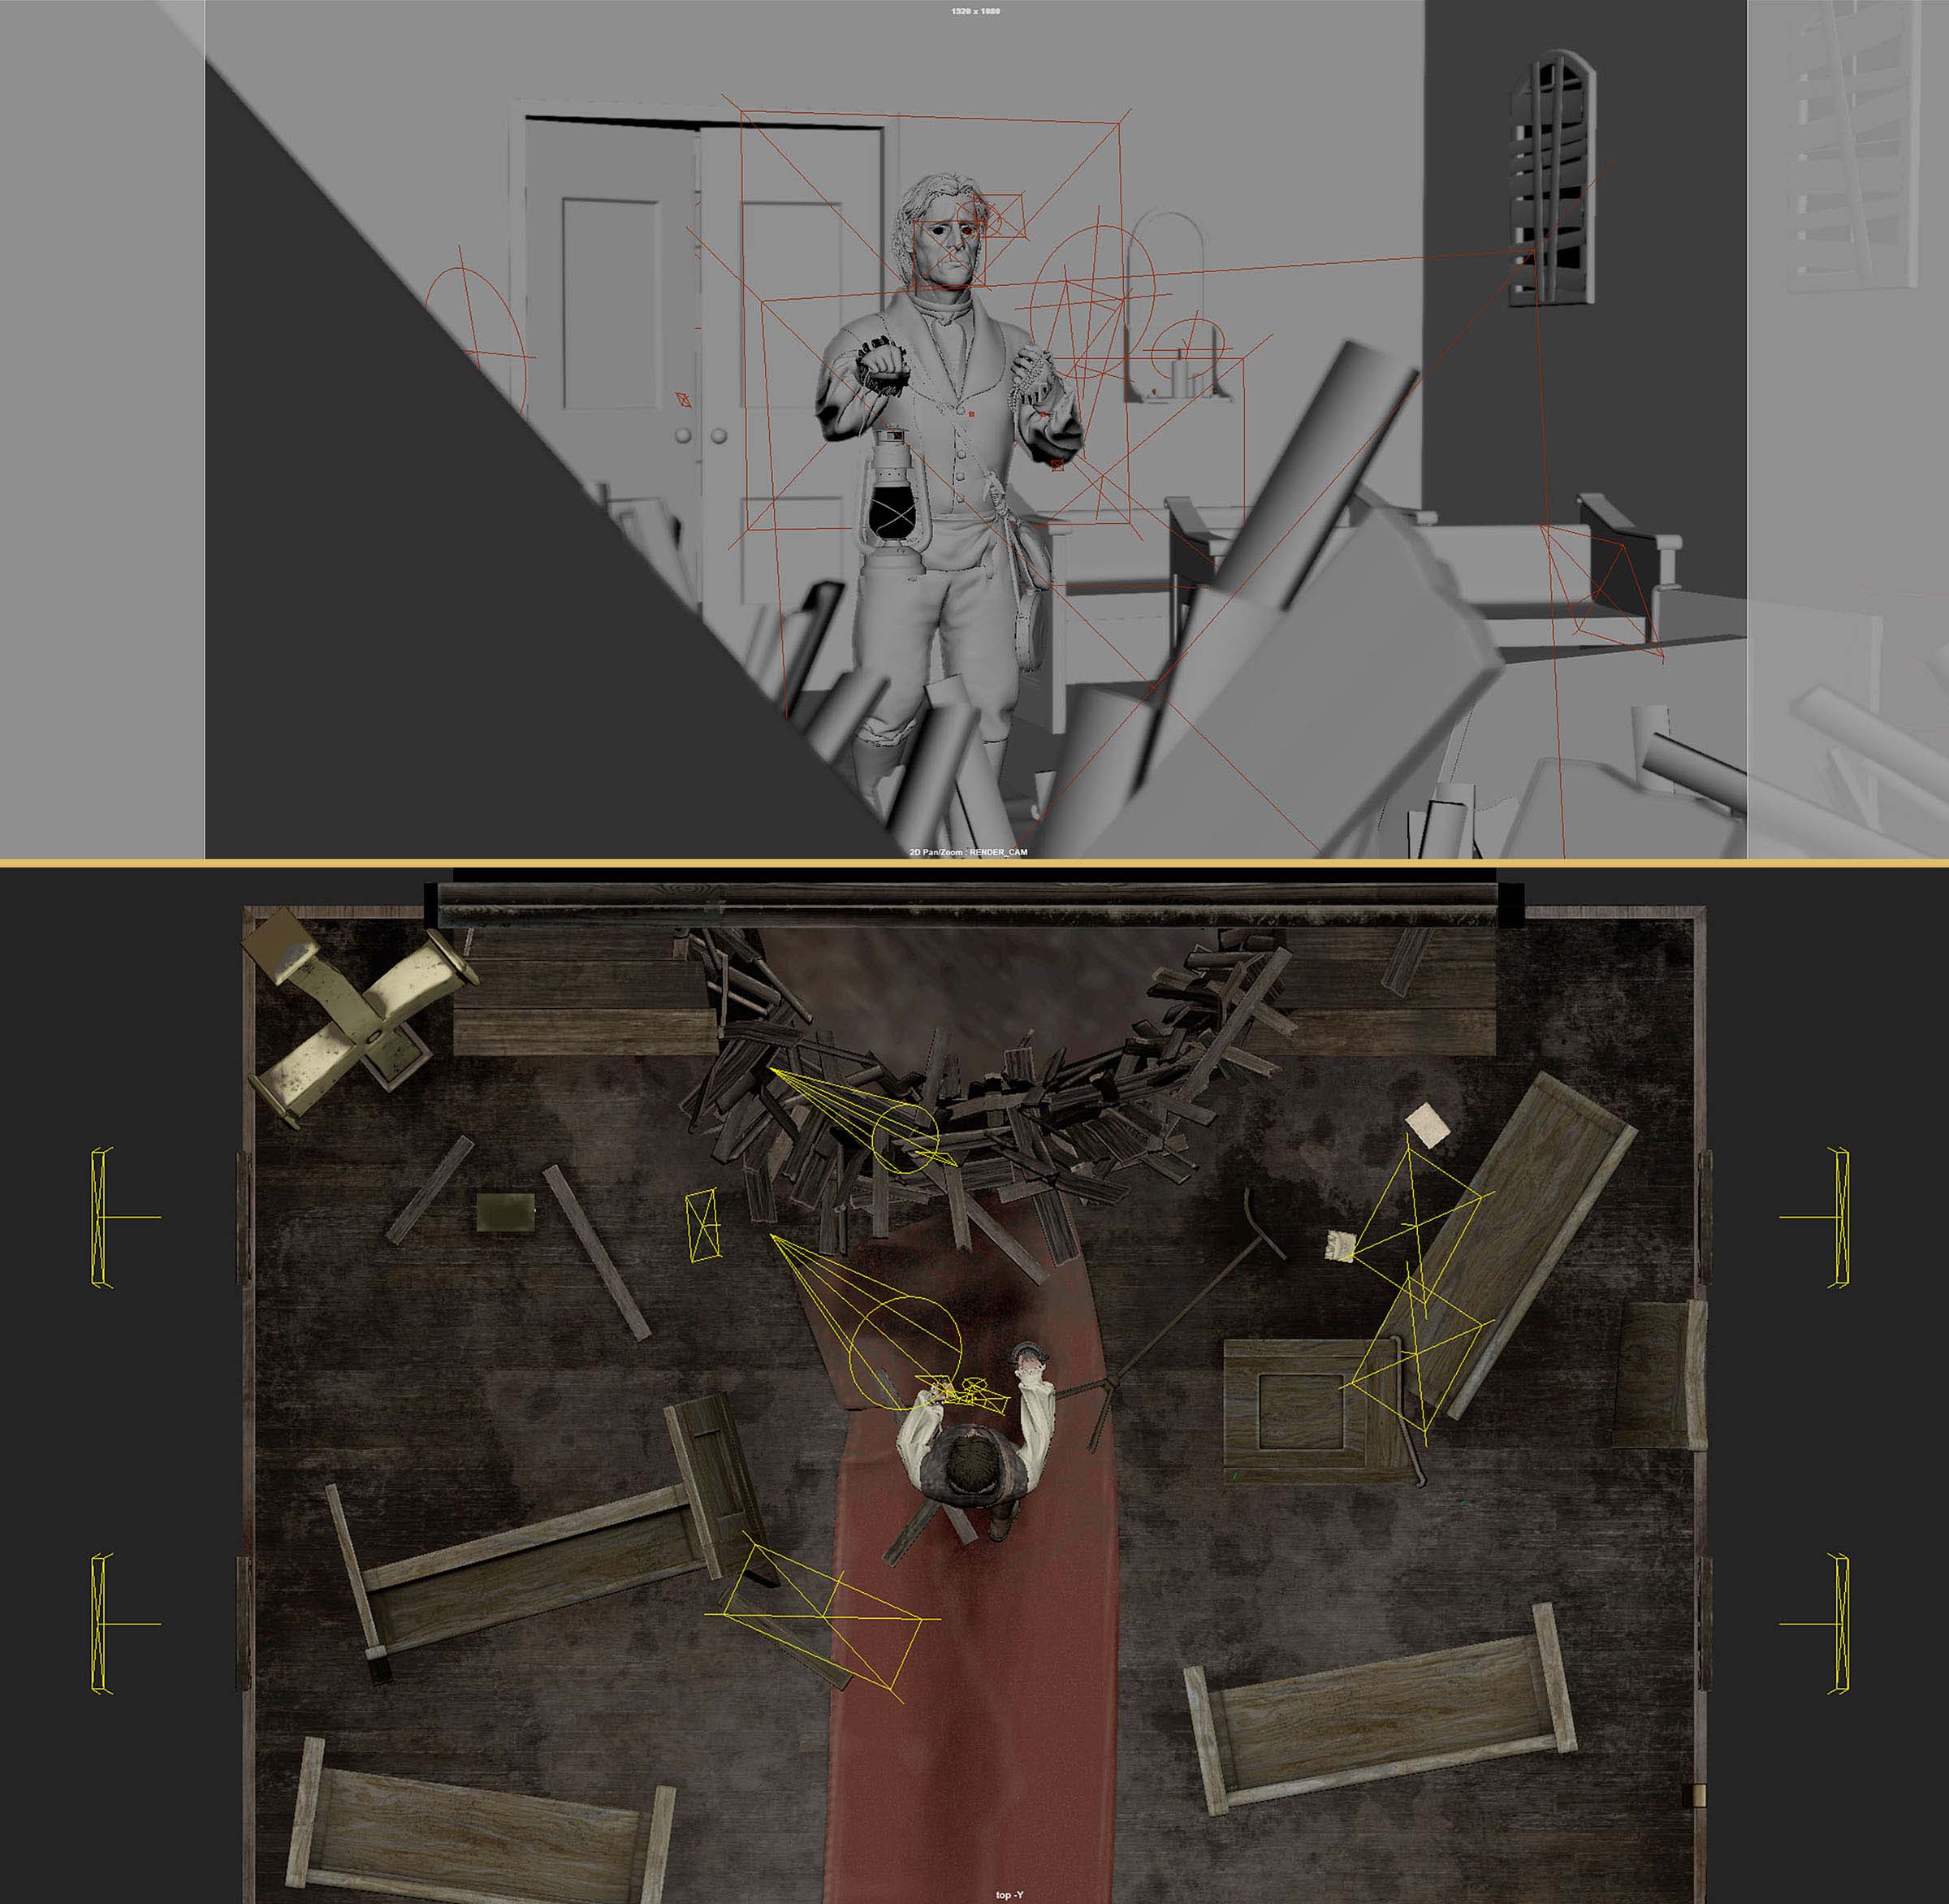
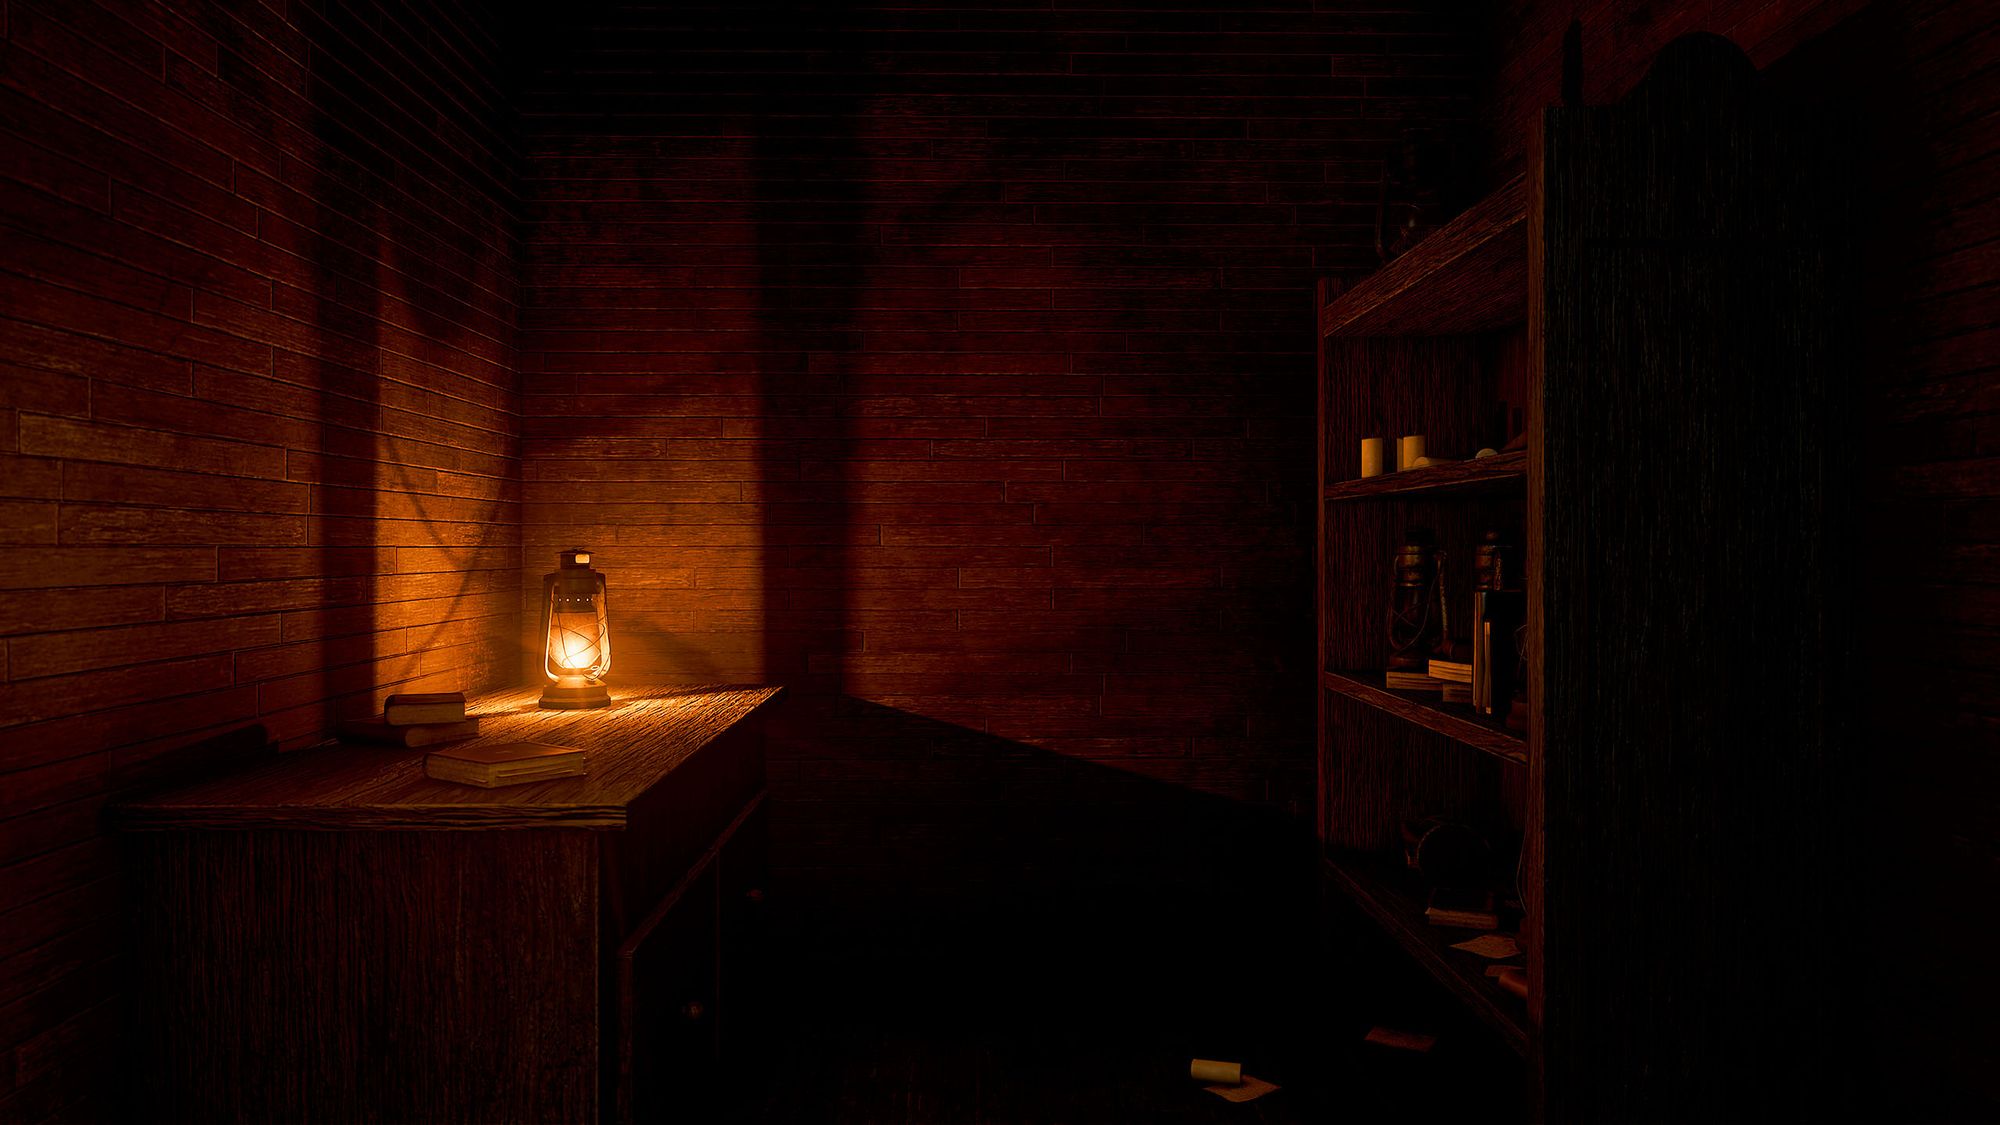
Rendering the final scene
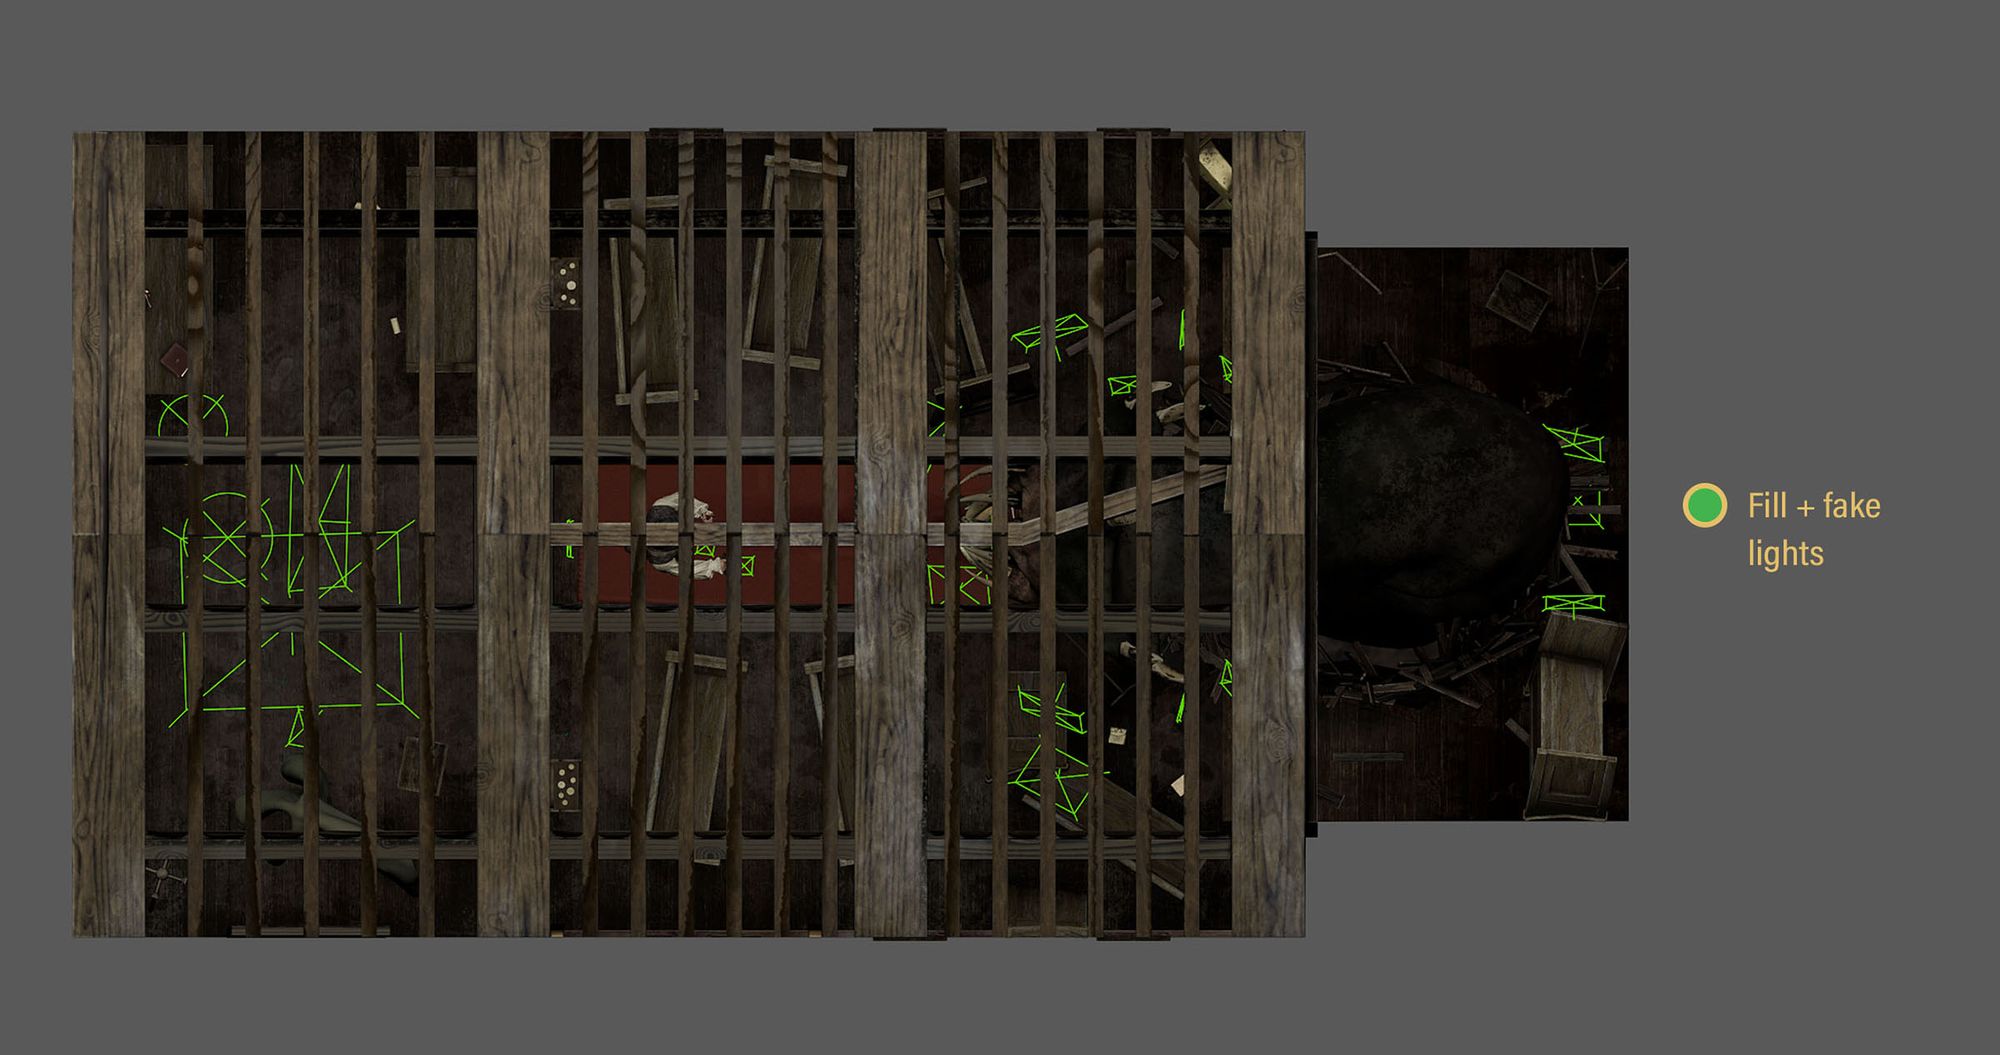
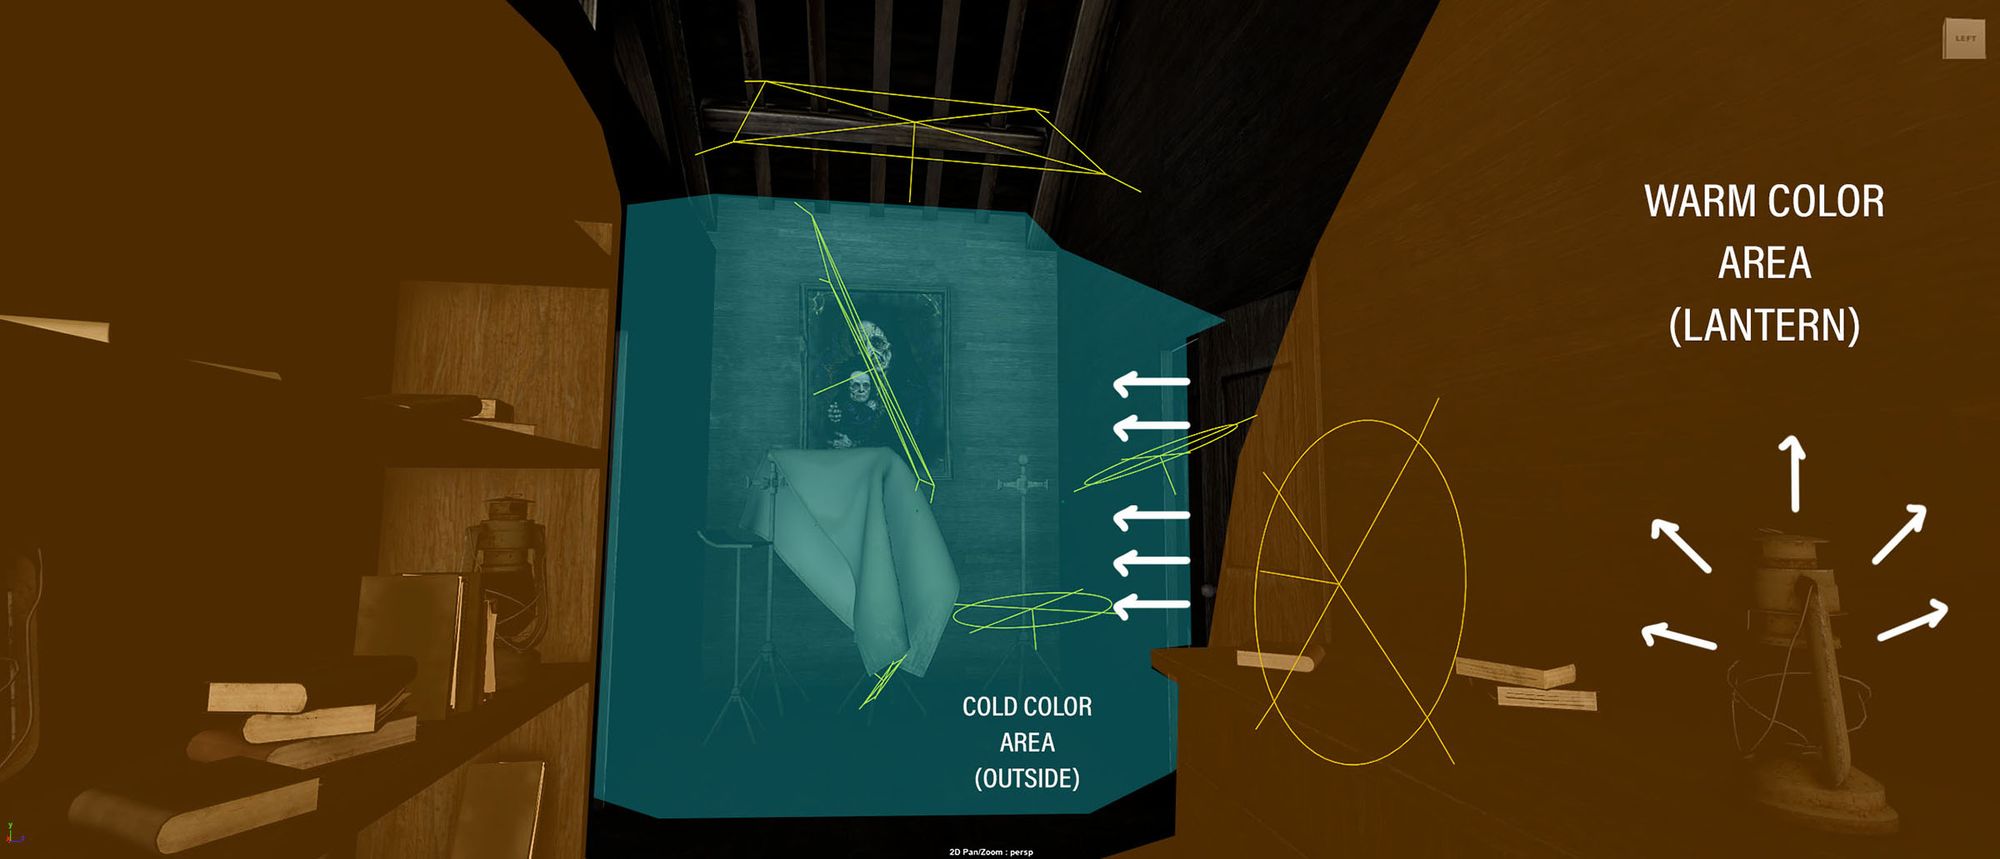
In the final stage, I assembled the scene with Calvin, The Worm, and the church's environment, primarily using area lights, point lights, and the Light Linking editor. I strategically placed key lights to illuminate specific areas such as Calvin’s lantern, the ground hole, and the light passing through windows and the entrance.
Fill lights were added to prevent overly dark areas, and fake lights were employed for artistic effect.
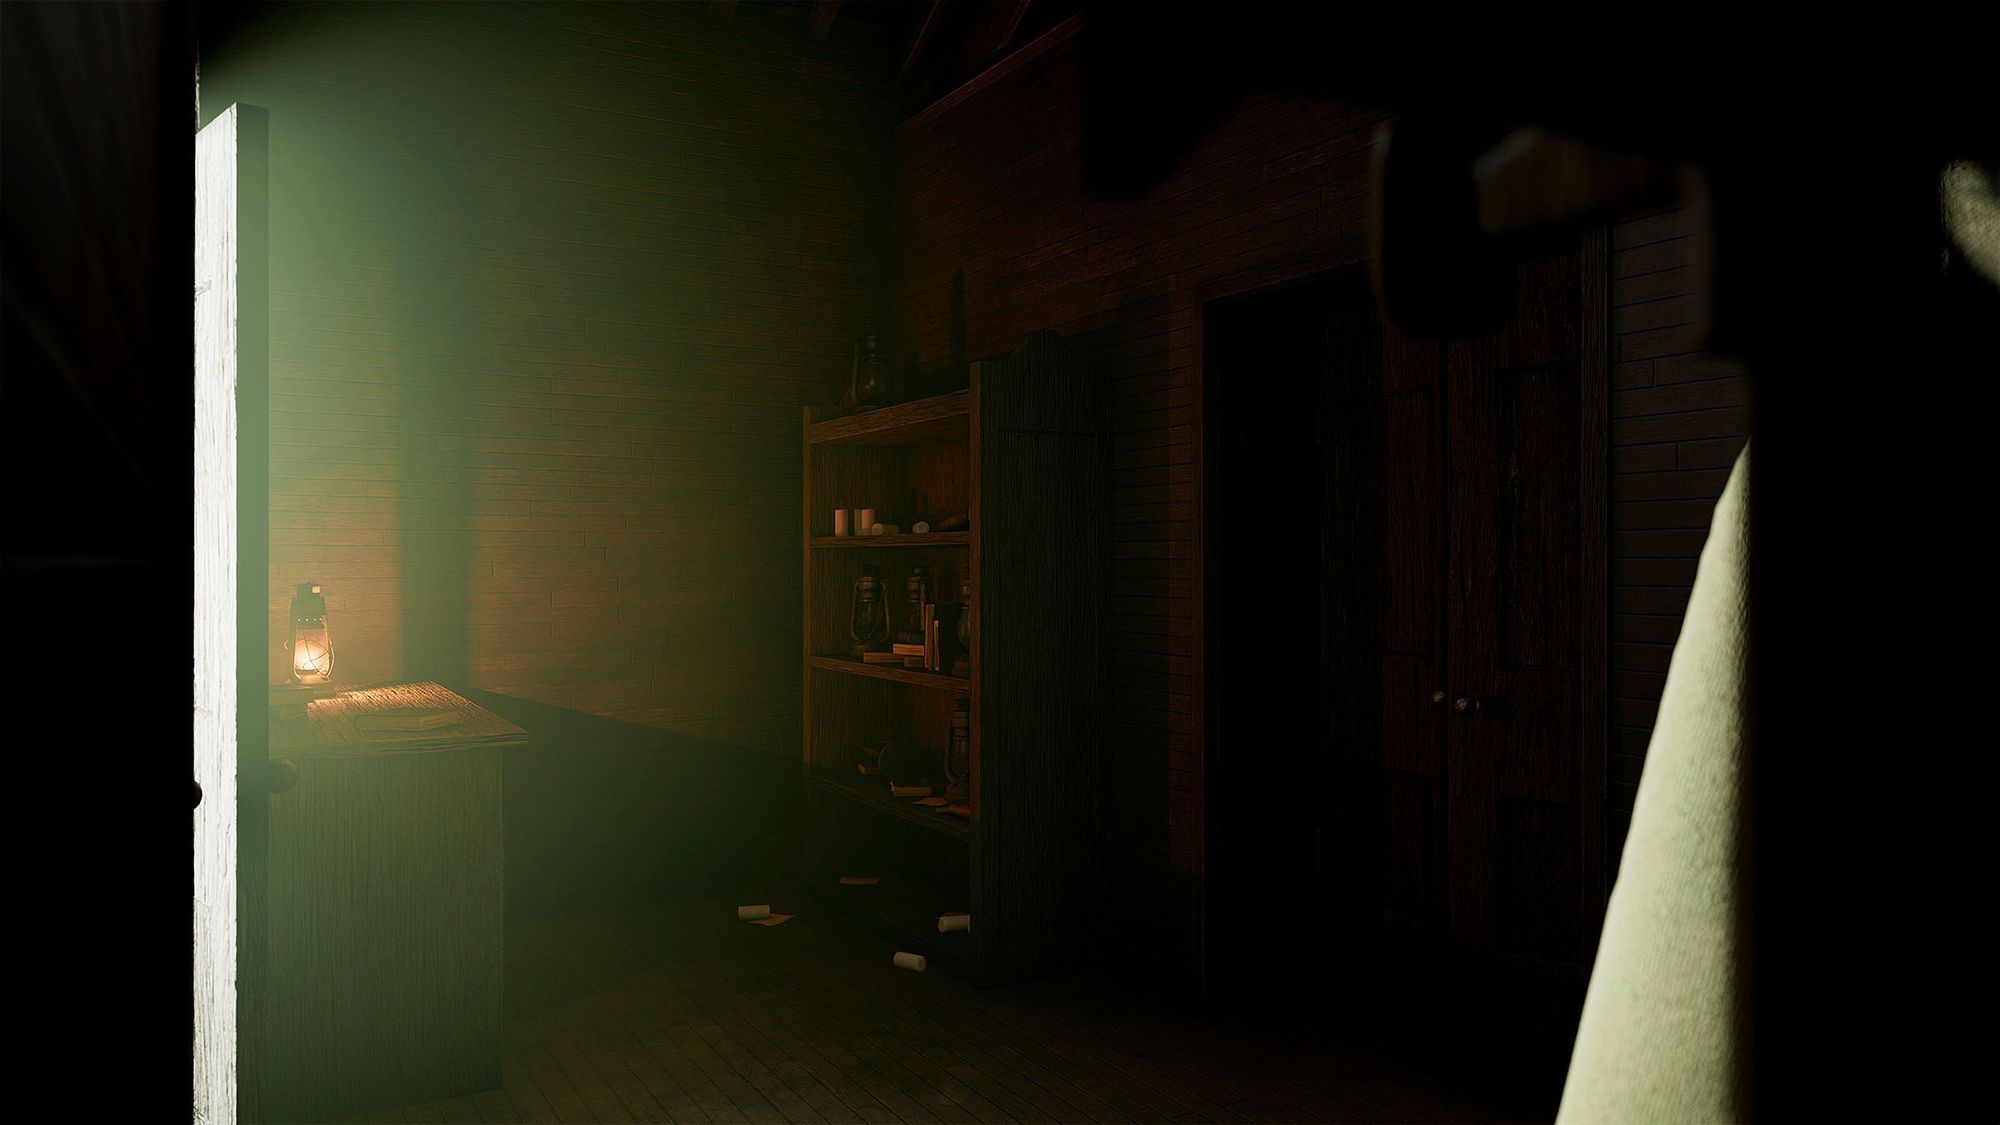
I aimed for a contrasting look in the entrance area, juxtaposing cold and warm light sources to enhance the scene's atmosphere.
Additionally, I introduced a small amount of atmospheric volume to simulate light rays passing through dust, ultimately rendering the scene using Redshift.
Conclusion
Although this project presented numerous challenges over several months, it provided valuable insights for technical and artistic growth. I extend my gratitude to those who supported and assisted me throughout the project, as well as to The Rookies staff for this incredible opportunity. For further exploration of my work, please visit my profile on The Rookies or my Artstation portfolio. If you have any questions, feel free to reach out. Enjoy your day!