How to Make a Short Film in Toon Boom Harmony
Jordan Auclair shares insights on using Toon Boom Harmony for her final year short film, "Penny and the Sugary Scheme."
Jordan Auclair shares insights on using Toon Boom Harmony for her final year short film, "Penny and the Sugary Scheme."

Jordan Auclair, a student at Centre for Arts and Technology, is working towards becoming a 2D Animator in the animation industry. For this article, we asked Jordan for her insights working with Toon Boom Harmony on her short film from her final year, Penny and the Sugary Scheme.
I’m Jordan Auclair, an animator and digital artist. I’ll be going over my process of creating an animated short film from start to finish. This will cover my final project from the Centre for the Arts and Technology: Penny and the Sugary Scheme!
The first half of my project was the pre-production phase. This phase focuses on developing the foundation for an animated short film. It starts from the creation of my first pitch and ends with the completion of the character rig. The process took 3 months.
The first step of the film’s creation was making an ‘elevator pitch’ of the main concepts. This includes a short plot synopsis, concept art, and inspiration for the film. This was all put together in a short ‘pitch bible’ and presented to some peers for their feedback.

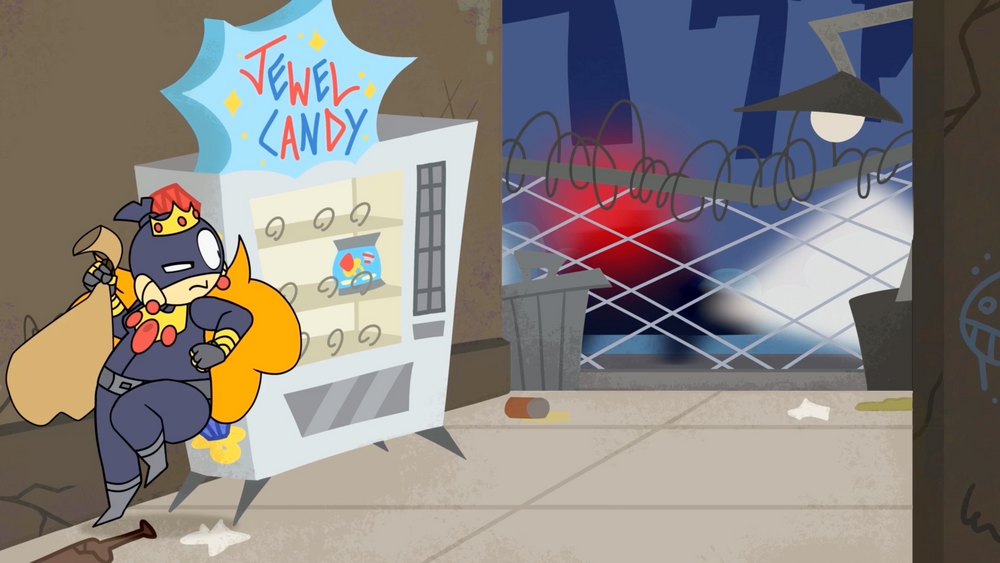
My original pitch was a bit different compared to the final product. It followed a convenience store clerk struggling to get his hand out of a vending machine. Suddenly, the doors burst open, and a thief tries to rob the establishment! She realises the clerk can only give her the money if he isn’t stuck in the machine. So, the two form an unlikely alliance, then hijinks ensue!
After the pitch, I then had to write the story. The first thing I had to do was adjust the pitch based on the criticisms it received. This includes removing the clerk character and changing the setting to a mini-mall. This removed some complexities and made the story more stream-lined.

Despite all that, there were still some hurdles when writing the script. The biggest one was establishing Penny’s motivation. She begins the story by running from the police after a successful heist. So, why would she notice a vending machine of all things? A few ideas were spit-balled, such as making Penny hungry for a little snack, but nothing stuck. After almost scrapping the project, a peer had the idea of making the machine sell candy rings. This was all wrapped together by making Penny a jewel thief. Once that was established, the story was set in stone.
As the main story was nearing completion, I made a document of the film’s art direction. This visualised the main ‘look’ of the film.

It compiles inspirations for the designs, setting, and art style. This worked like an artistic guideline I followed to make the film’s visuals more cohesive. It also gave the audience an idea on what the film would look like when the visuals were still in progress. I took inspiration from late 90’s and early 2000’s cartoons such as Dexter’s Laboratory and My Life as a Teenage Robot. I was drawn to the strong shape language and exaggerated art style for the characters. Furthermore, their painterly backgrounds had textures that worked nice with the grungy setting. For the plot, I took inspiration from slapstick cartoons like Ren and Stimpy and the Looney Tunes.
As the script was starting to wrap up, I began to create a concrete design of Penny herself. This too involved spit-balling ideas and rounds of peer feedback.
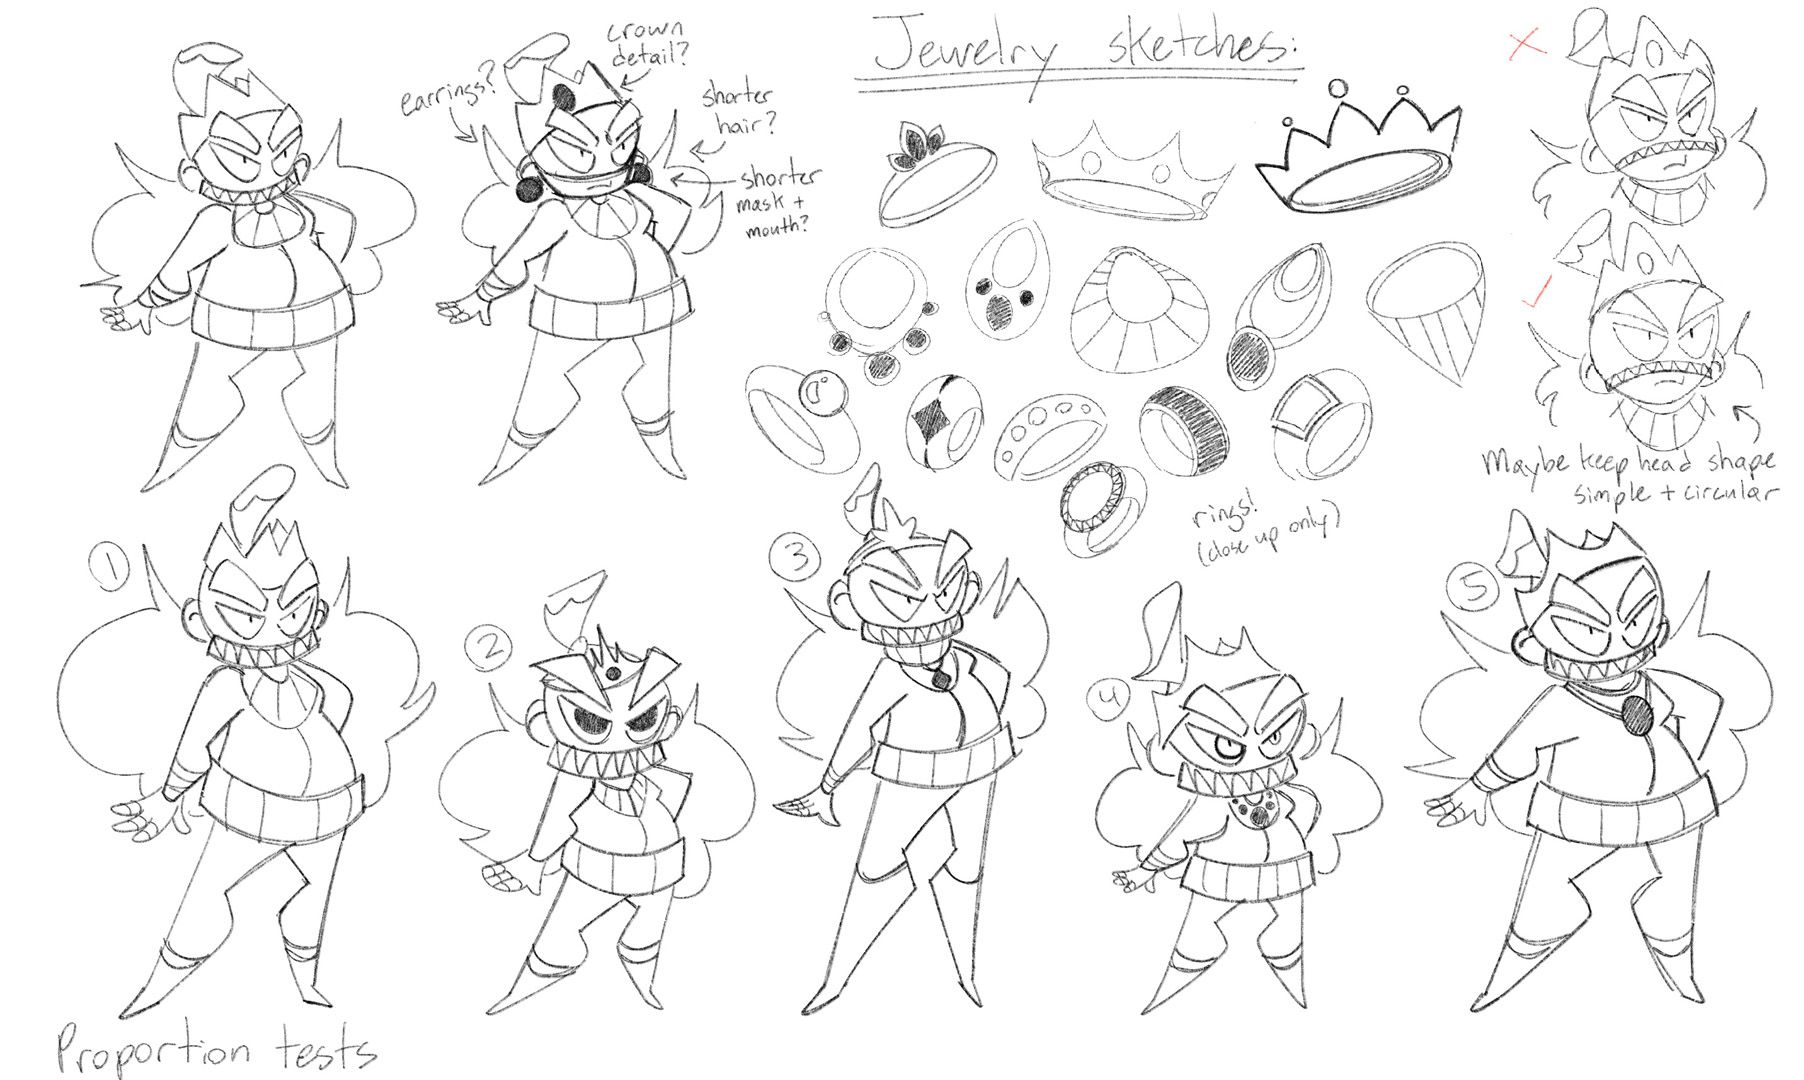

I started the process by experimenting with various body shapes for Penny’s design. I also sketched the types of jewelry she could wear in the film. After that, I made some expression tests to help me get used to the character's personality. These were all done with the Procreate app.
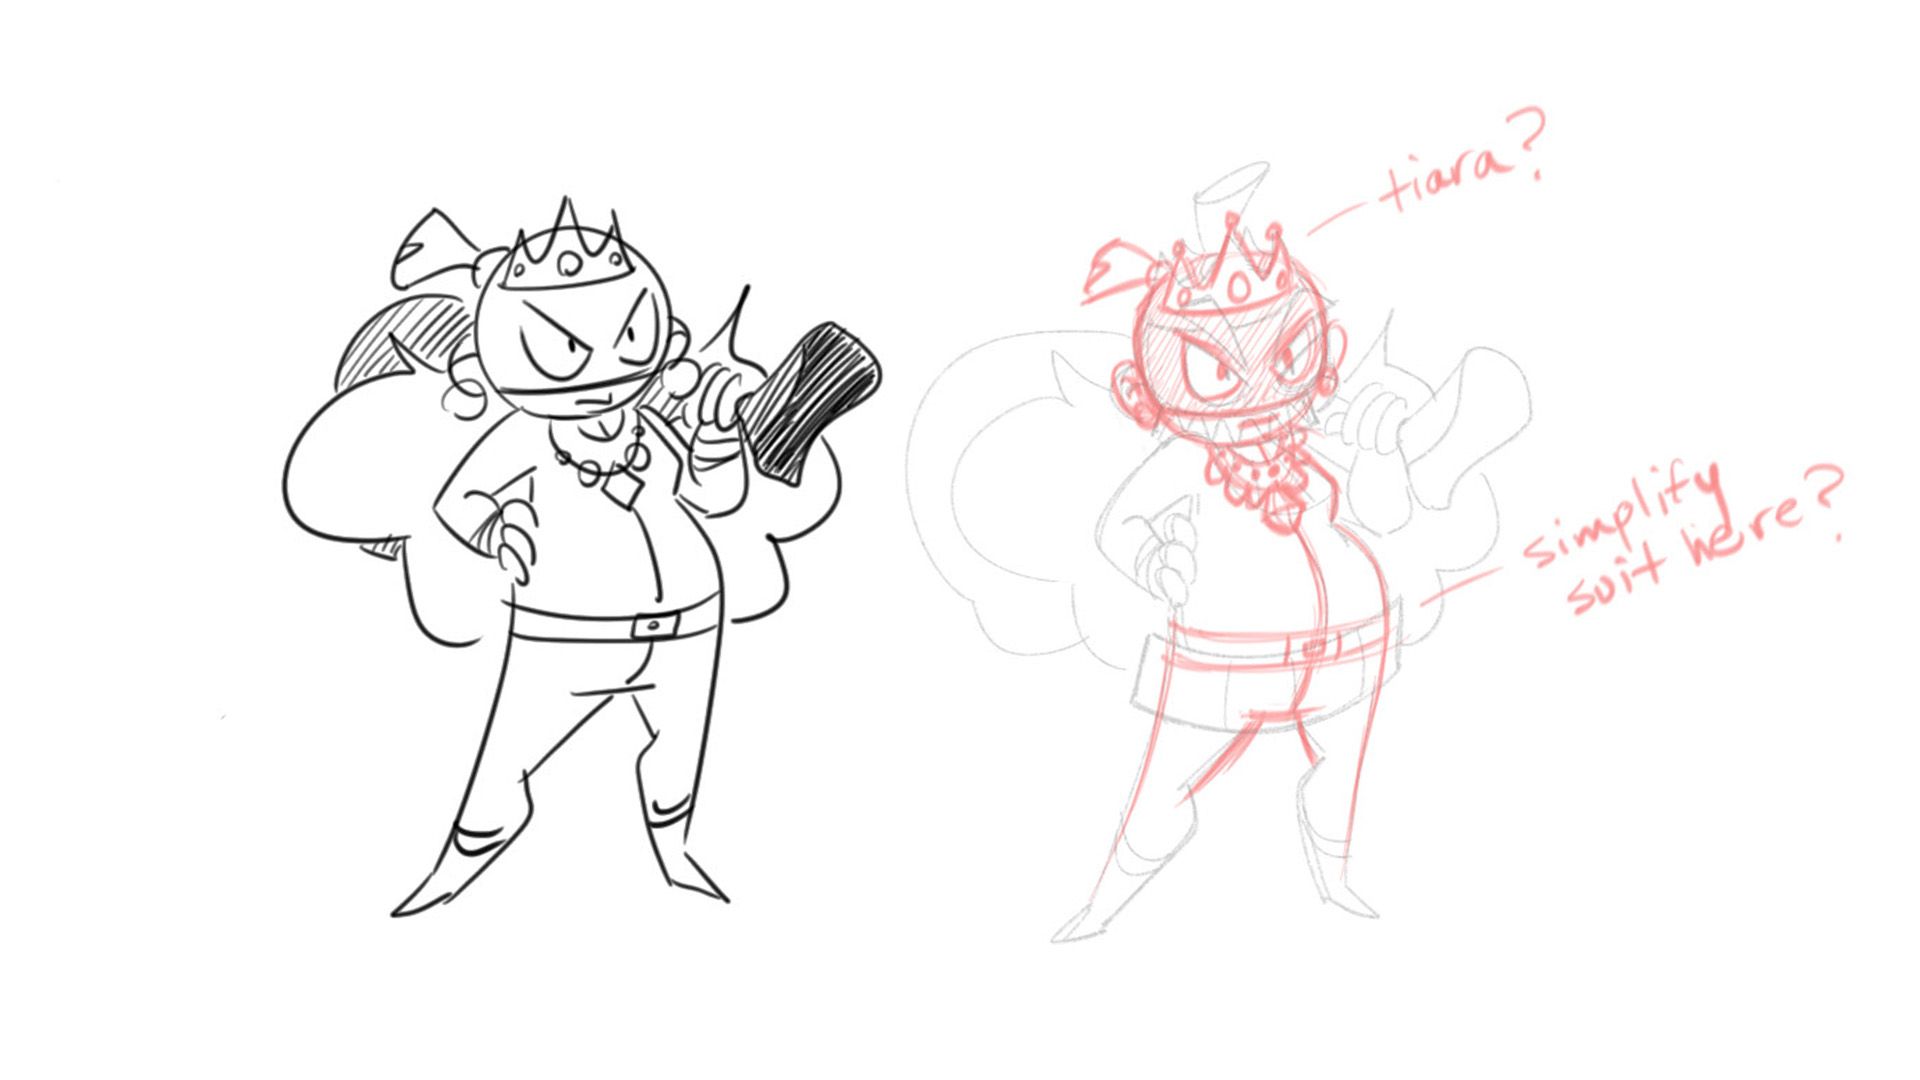
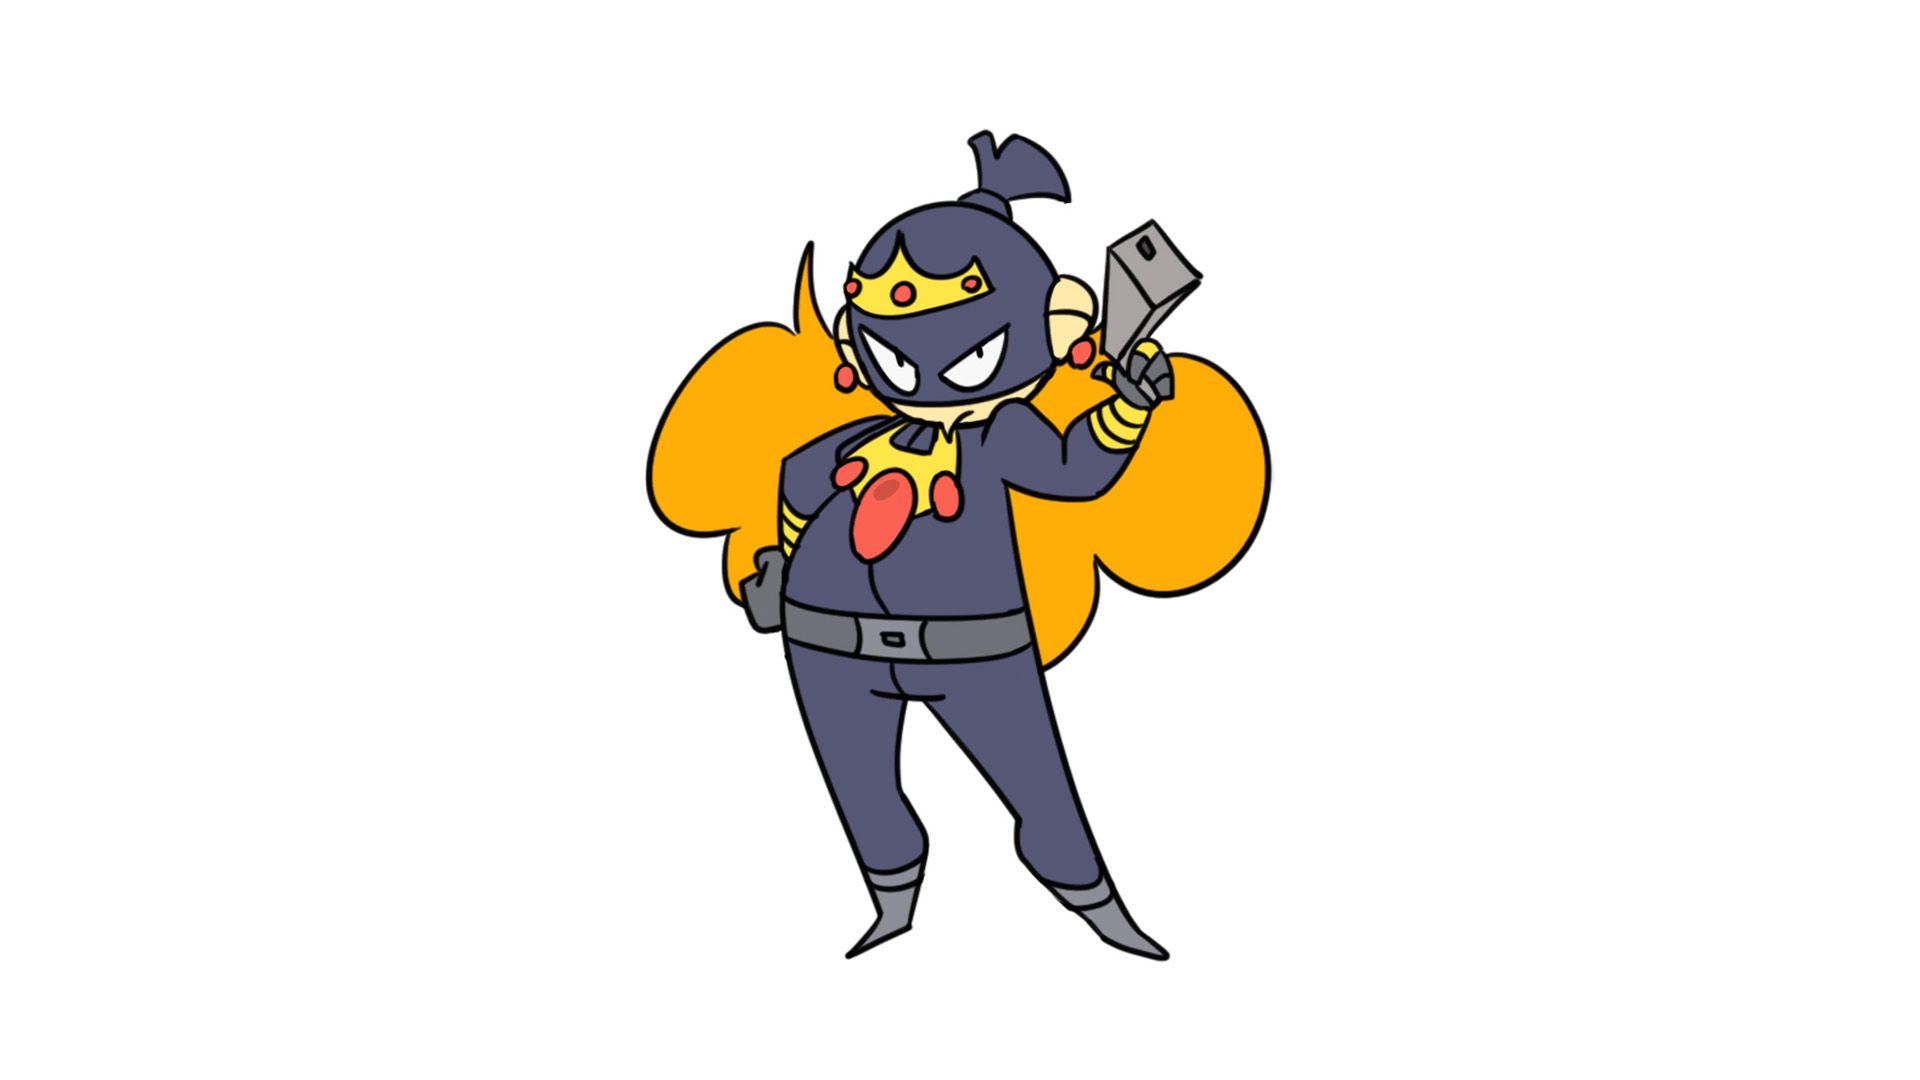
After getting the first round of feedback, I got a general idea on what Penny’s final design will look like. Her body will maintain the proportions she had in her concept art, except her mouth will be visible. This will allow her expressions to be more readable. Also, her big eyebrows were removed to make her face less cluttered. Additionally, some details in her suit were removed to simplify the design. These final rough sketches were done in Photoshop.


Finally, after the final design was chosen, I drew Penny’s turnaround. This was a crucial step, as it will be used as reference when making the rig later on. Unlike the previous sketches, a turnaround had to be done precisely. Lots of guidelines were used to make the body parts align correctly. Like the final sketches, this was also done in Photoshop.
Beat Boards
The first boards for the film were beat boards, or rough sketches of the main plot points.
As the story was being written, these sketches were made to check if the plot points flowed well together. These were messy and were often subjected to change or be deleted. I drew these on my iPad in Procreate.
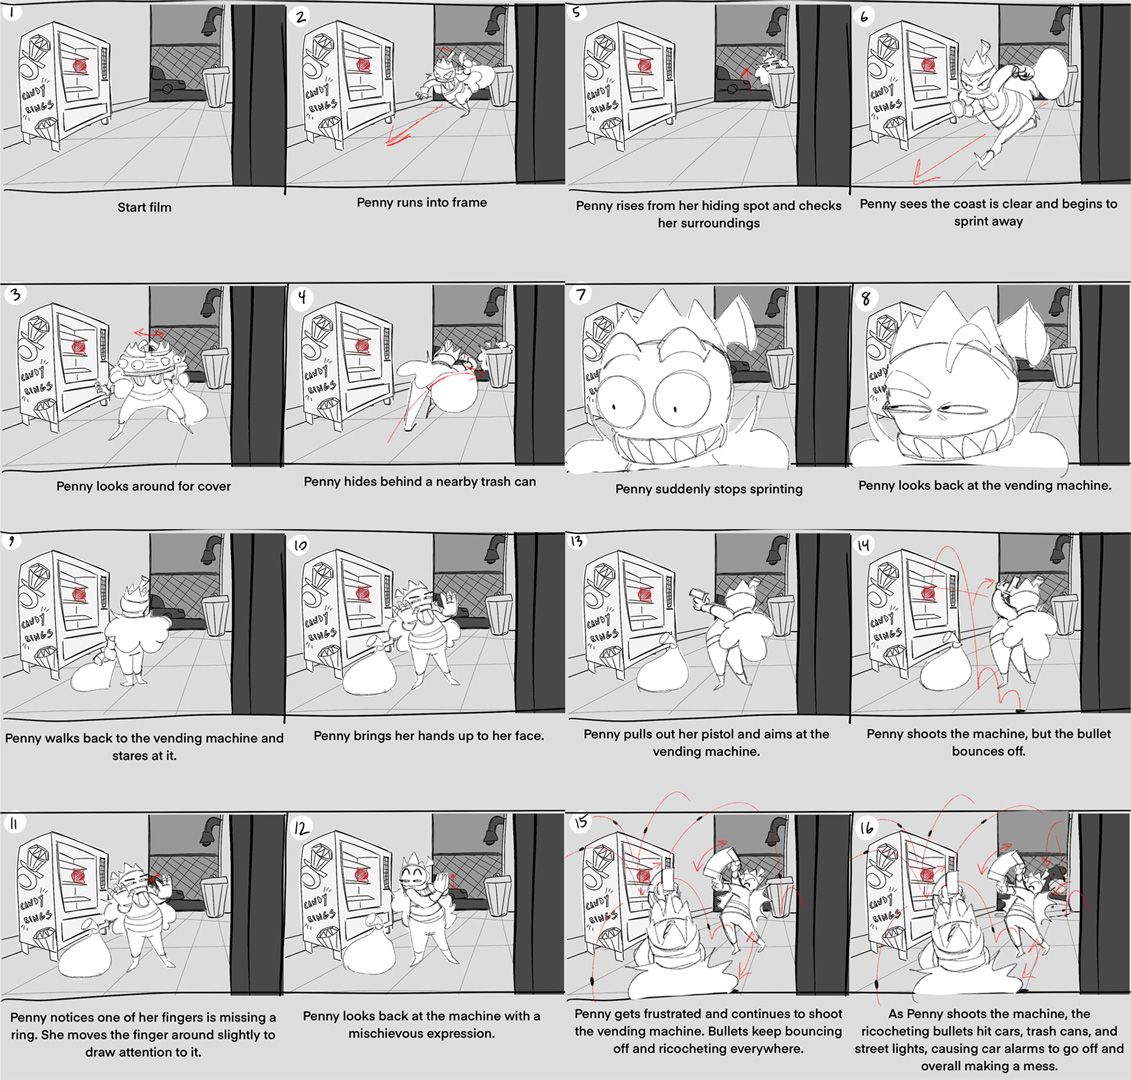
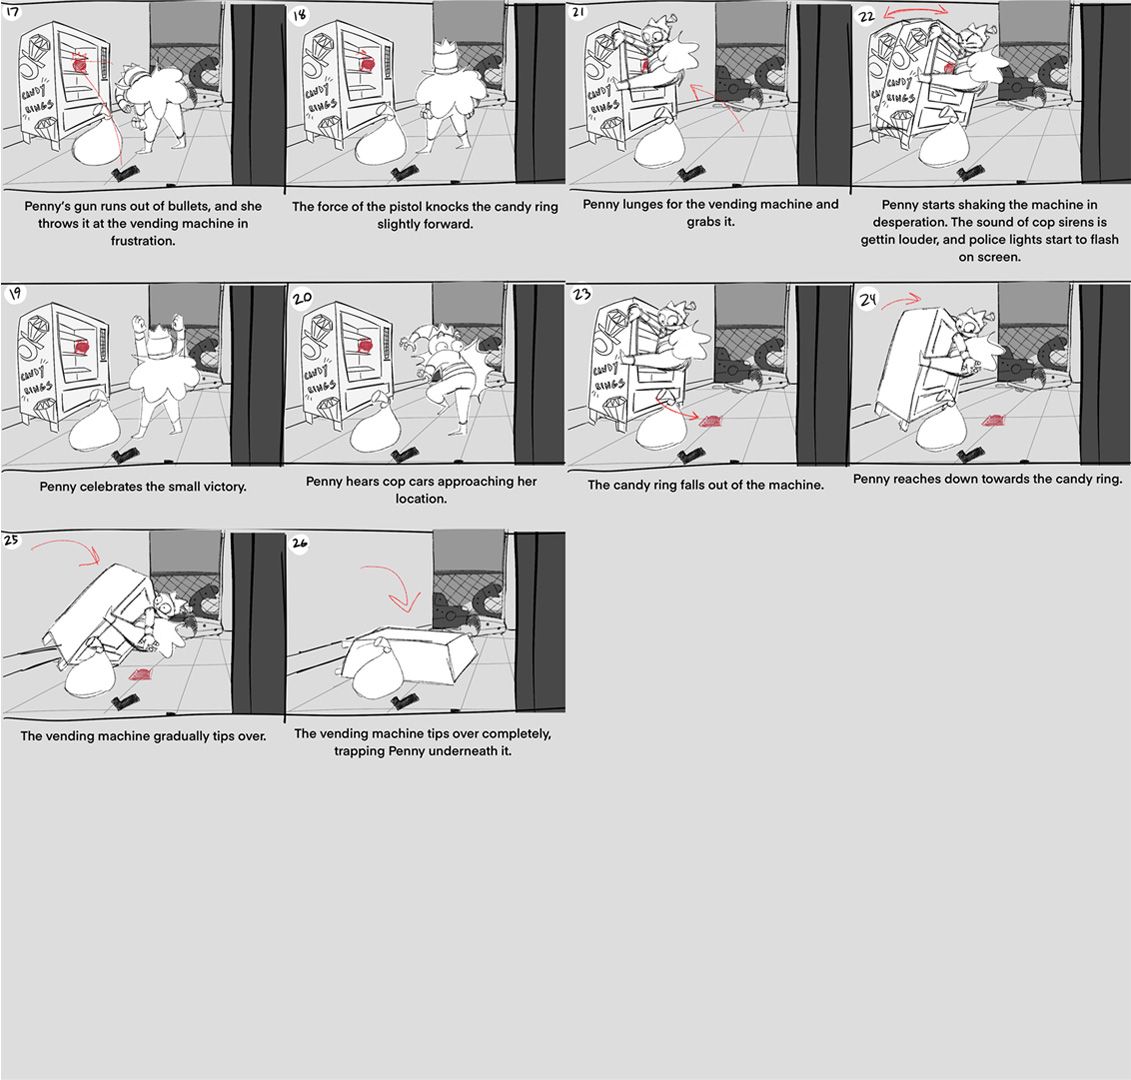
Storyboards
Once the story and designs were set in stone, I began to create the storyboards.

These work like comic panels that display the main movements of the film. Unlike comic panels, however, storyboards have a much higher quantity. Every movement needed to have a board, including individual steps and expression changes. In a studio, this allows the animation team to understand the exact movements a character needs to do.
For my boards, I used Toon Boom’s Storyboard Pro. This program is specifically designed for making storyboards and animatics. It’s like a regular drawing program, except you can add panels and move a camera around. It also has some tools that can speed up the process, which is a big plus! Using these and my beat boards as reference, I sketched out the shots of the film over roughly 2 weeks. This was challenging at some points, as I had to learn how to draw fast rather than make perfect drawings. As I sketched, I also had to send my work to my instructor for feedback on the poses and scene composition. When my instructor and I were happy with everything, I moved to the animatic phase.
The animatic is the final stage of the storyboarding process. Here, the boards are edited into a ‘mock-film’.
For this step, I had to edit the exposure of the boards to match the timing of the film, as well as add some audio. Luckily, Storyboard Pro has a timeline feature that allows users to do exactly that. I could even add transitions into my scenes if they called for them! However, just because the boards are complete doesn’t mean there’s no room for improvement. Several rounds of feedback are still needed to make sure everything flows together. Some redraws may be necessary as well. Despite these setbacks, this took less time compared to storyboarding. In only a few days’ time, both my instructor and I were happy with the animatic.
Building the Character
The last phase of pre-production was building Penny’s rig.
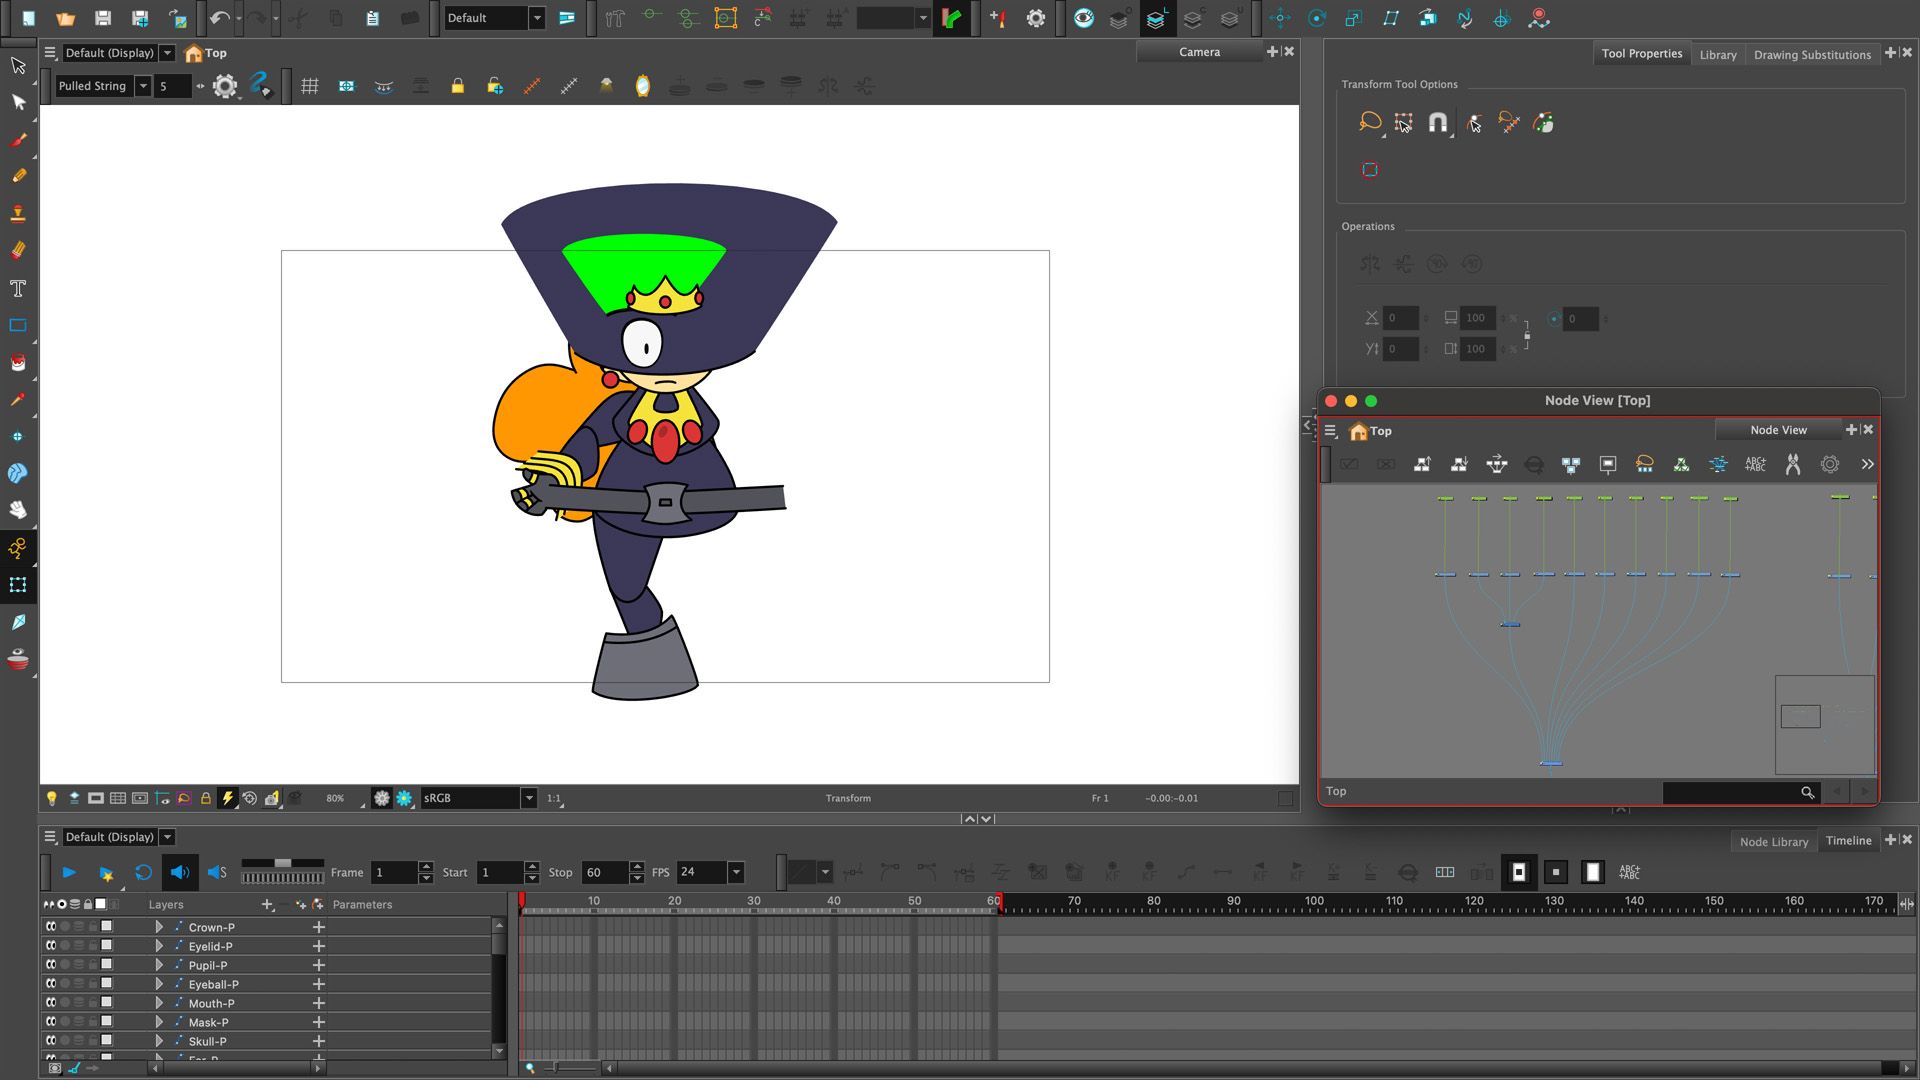
This is the digital puppet used for the animation later on. This was made in Toon Boom Harmony, a program mainly used for building and animating rigs. The first thing I did was create the rig’s building blocks: the drawings. This was done using the turnaround and Harmony’s node view. Under the node view, I created a drawing node for every individual part of Penny, starting with her head. After that, I selected a node and drew its part in the main camera using the shape tool. I then organised the drawings by rearranging their order in the node view. In Harmony, nodes layer top to bottom by going from the left to the right. After all the nodes were drawn and layered properly, I repeated the process with the torso and limbs.
At this point, the rig only had one eye, arm and leg, as those would be duplicated later on. Finally, I organised the rig with composite nodes. They take all the information that’s given to them and compresses it into one object. It doesn’t physically change the rig , but it does tidy things up by limiting the amount of wires.
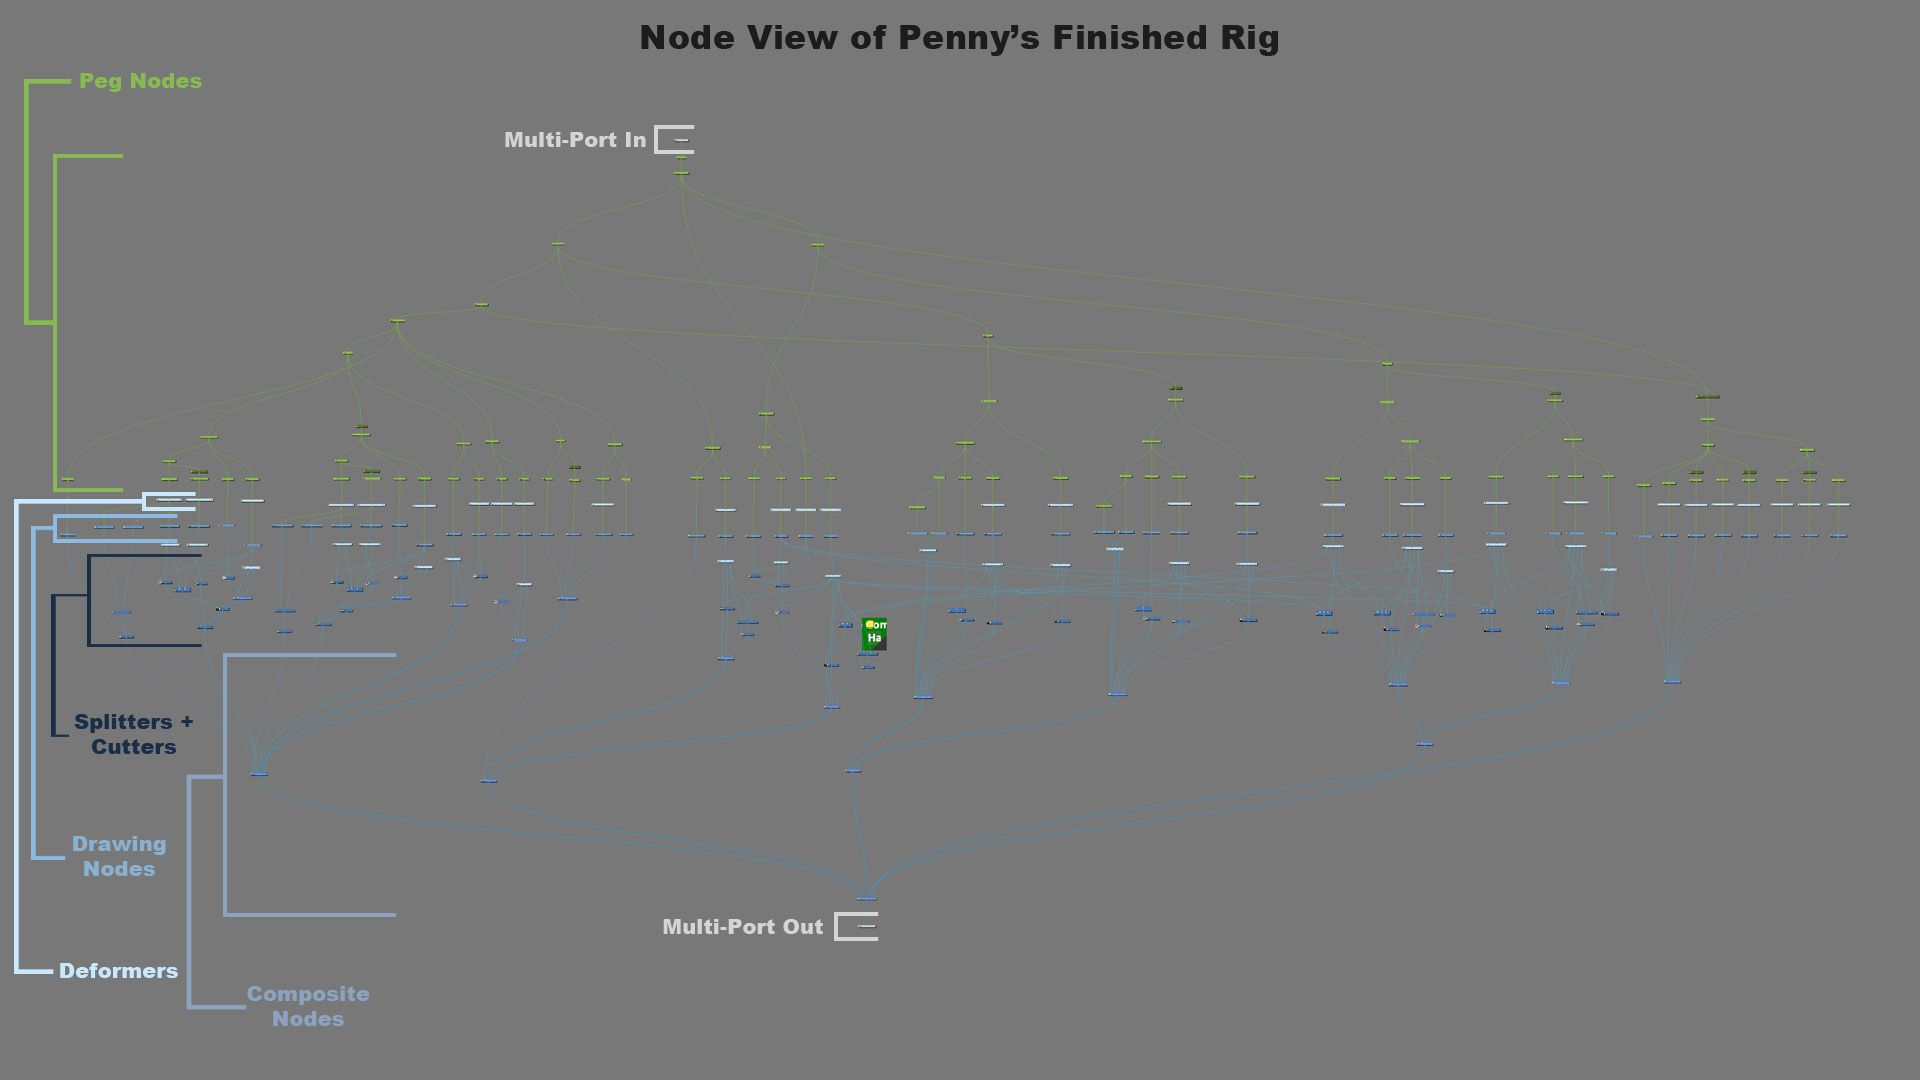
The next step is adding the pegs. Peg nodes are important in rigged animation. They allow drawing nodes to be manipulated but not permanently altered. This was done very easily. All I did was select every drawing node and press CTRL SHIFT P. This automatically gave every drawing a peg. Afterwards, I connected the rig by joining pegs together with parent pegs. A lot of thought had to be put into them, as I had to plan on how Penny would move in the animation. For instance, I wanted to be able to move her wrist, then the forearm and wrist, then the entire arm. To do this, I connected a peg between the wrist and forearm pegs, then the parent peg and the upper arm peg. I kept doing this until I made an entire peg hierarchy that covers the whole character.
After connecting all the pegs, I then had to adjust their pivot points. This is so they can rotate and scale properly. To do this, I used Harmony’s rotate tool, which adjusts the placement of an object’s pivot. Luckily, I can copy and paste pivots too, so I didn’t need to adjust every pivot in the hierarchy manually.

After all that, I moved on to the finer details. One of the biggest pieces of this was using cutters and splitters. Splitters split a drawing’s line art and colour layers. This allows them to be manipulated individually. Cutting masks are like clipping masks in Photoshop. They allow parts of the rig to only appear within certain drawings. This means they cut out anything that leaves its pixels. For instance, these tools allowed the bracelets to clip into the forearm’s colour.
After that, the next big step is adding the envelope deformers. Unlike with pegs, deformers allow you to distort the drawing’s shape itself. This allows the rig to distort with perspective, and can create more fluid smear frames. To add deformers, I needed to select the drawing and press the ‘rigging tool’ button. After that, I added the deformer points around the object. I finished by adjusting the contour points so the deformer went along the curvature of the shape. It’s a lot at first, but it gets easier with experience. The deformer also inserts itself into the node view for you, which is pretty handy!
I was then ready to finalise the rig. This includes duplicating the eye, arm and leg, adding special nodes, and troubleshooting. I then highlighted everything in the rig and pressed CTRL G. This put the whole rig into a single group node.
Creating a Turnaround
The final step is to create the other poses shown in the turnaround.

Luckily, I didn’t have to build any new rigs. Instead, I needed to manipulate my current rig to match the different profiles. To do this, I needed to adjust the deformers, pegs, and layering of the rig to match each angle of the body. This process goes by pretty quickly. However, there are still a few things to keep in mind to help prevent further issues:
First, make sure the pivots are lined up with where they should be on the reference image. You can’t change the pivots this time, since they’re already set with the front-facing view.
Secondly, for objects that are too complex for deformers, use extra drawings instead. This is done by selecting the object you want redrawn and pressing ALT SHIFT D to duplicate it. Then, erase the colour and create the new drawing. This can be done by adjusting the old lineart or erasing it and redrawing the new one. It's suggested to keep the original line art on another layer as reference. This allows the pivot point to be roughly in the same spot.
Finally, know when to work smart. For instance, for the back ¾ angle, reuse the front ¾ pose, flip it, then adjust the layering. Building a rig can already take a while. So, learning when to reuse materials is key for working in the fast-paced industry.
Those are the main essentials. As long as you keep those in mind, creating the turnaround is a pretty easy process. When I finally finished my own turnaround, I selected the group in the node view and exported it as a .tpl. This finally concludes the pre-production phase.
After a short break, I began the post-production phase of the project. This phase focuses on creating the final visuals and audio of the film. It starts with the development of the main layout and ends with the final export of the film. Like the pre-production phase, this also took 3 months to finish.
For post-production, the first step is to design the backgrounds from the storyboards.


I first had to make a scene layout, or an isometric map of the film’s location. This allows the background and prop artists to get a good idea on what the entire setting looks like. To make these layouts, I sketched two drawings of the main area in Photoshop. One covering the setting and the other including the large parking lot in one of the backgrounds. I also included a top-down angle of each layout to get a better idea of how everything works together.
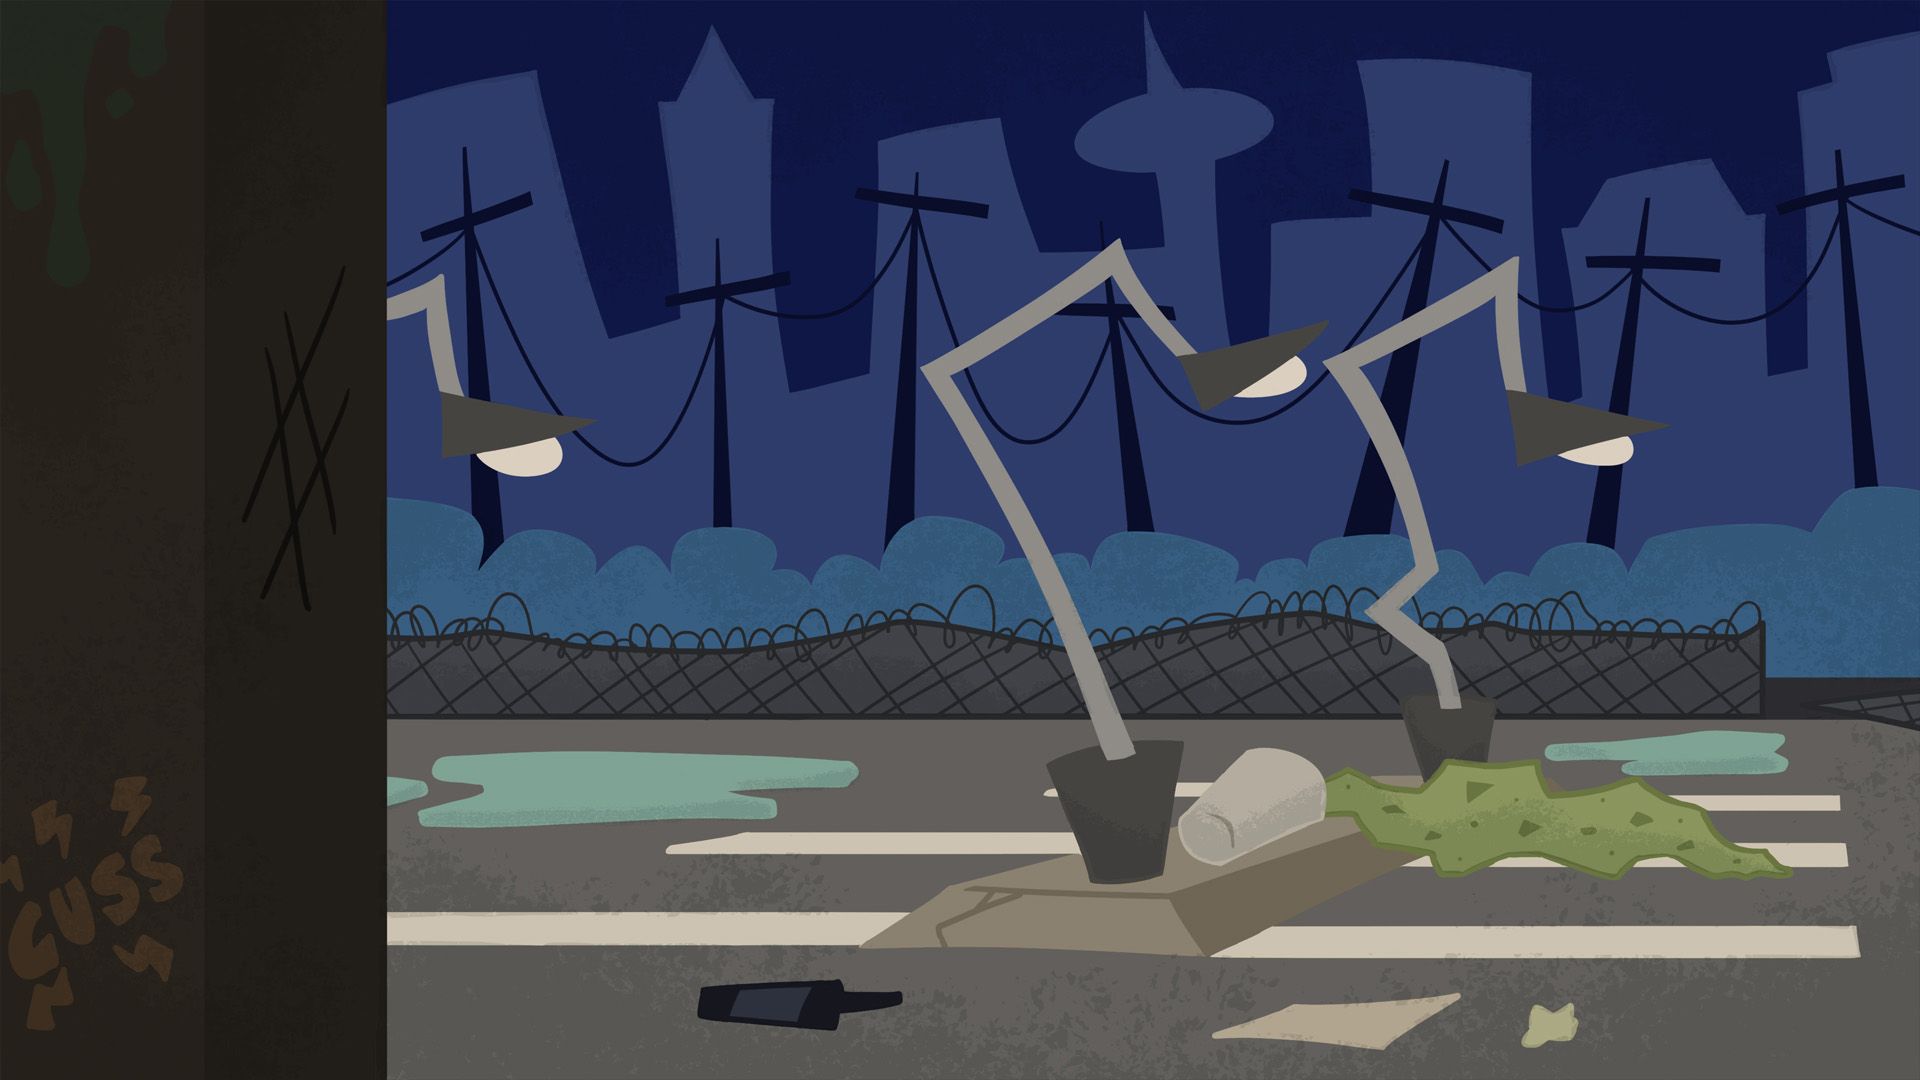

Once the layouts were completed, I then drew the actual backgrounds in Photoshop. Using shots of the storyboards as reference, I sketched out every angle needed for the film. As I did this, I used the angular style based on my art direction. When I was happy with that, I did the line art and color. I tried to make the pallet darker and duller to make Penny and the important props stand out. For the finishing touches, I added some paint splatters. These were common in the backgrounds I was inspired by. This incorporated more texture and enhanced the grungy feel of the setting. This process wasn’t too challenging, especially compared to the previous steps. The script didn’t need a lot of backgrounds either, which sped up the process.
Prop Design
While the backgrounds were in production, I started on prop production as well. In this step, I created concrete designs of the props based on the drawings I made in the storyboards.

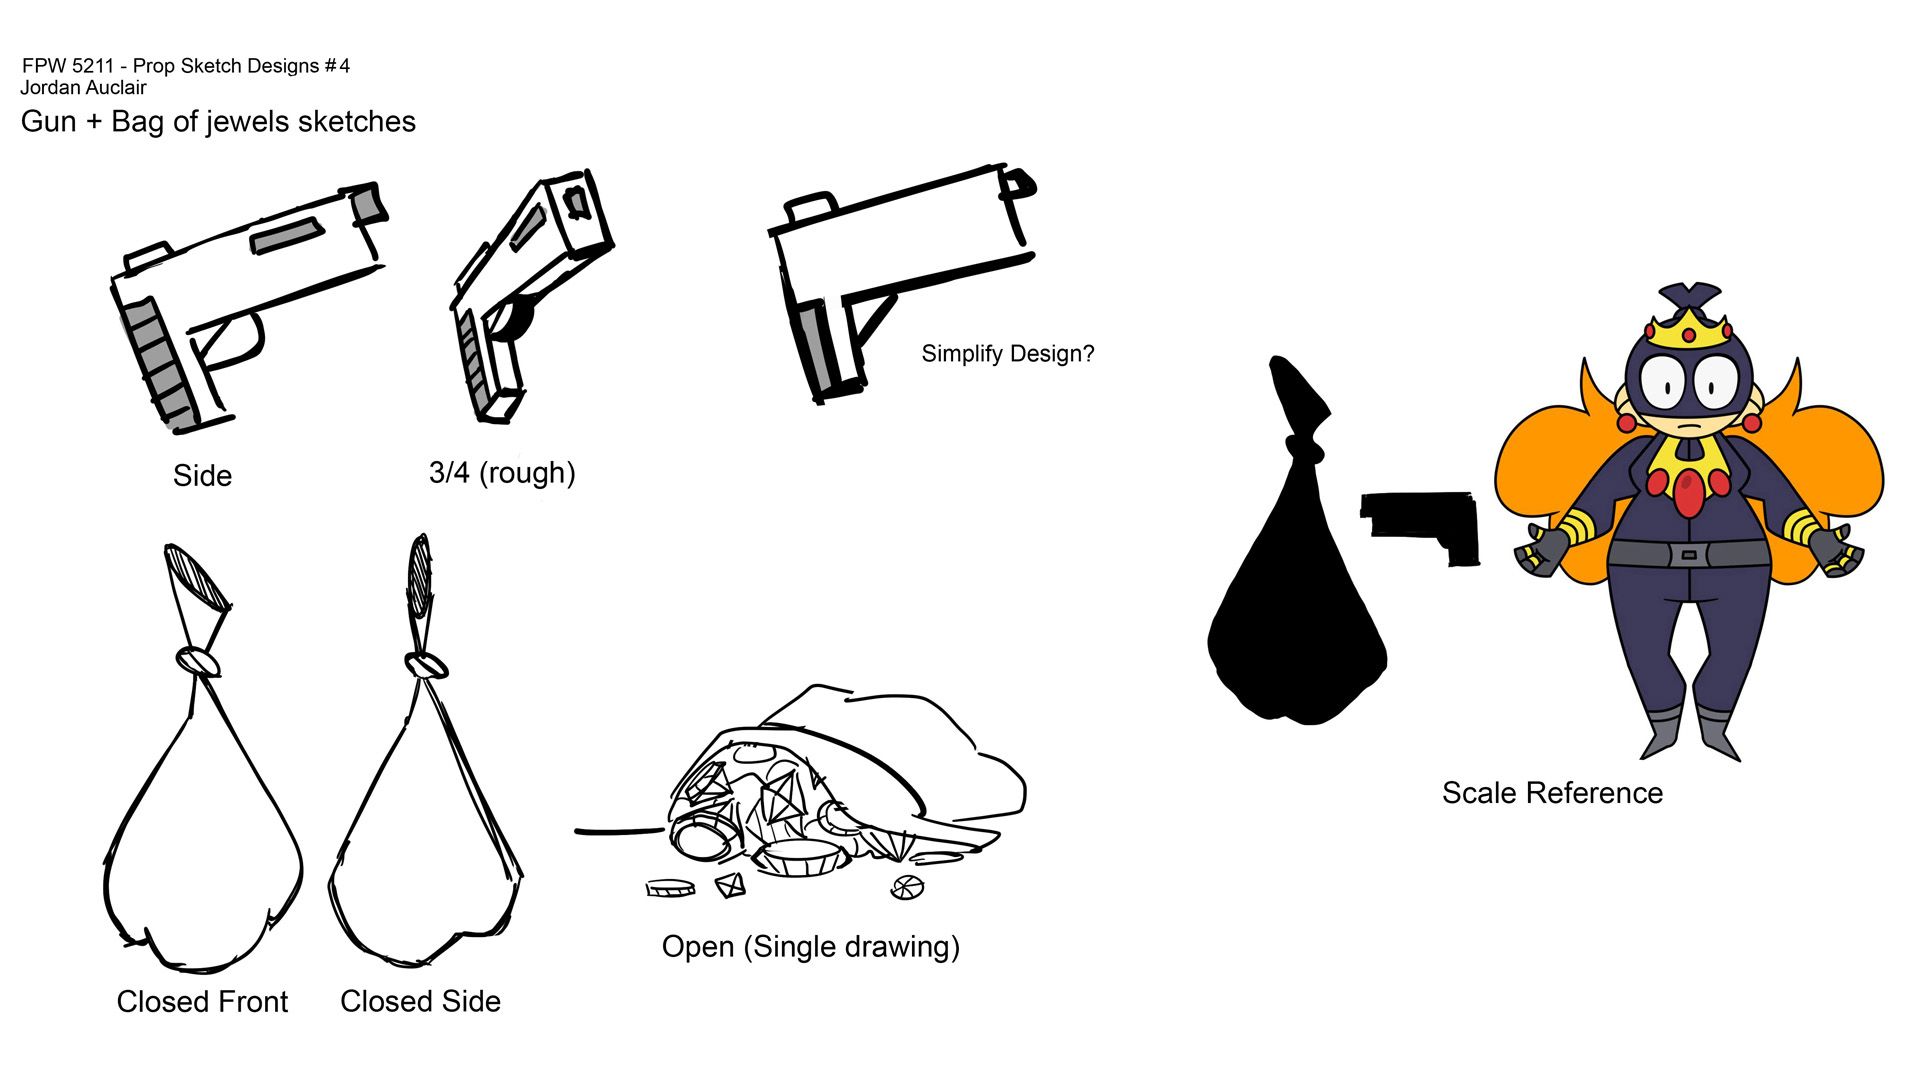
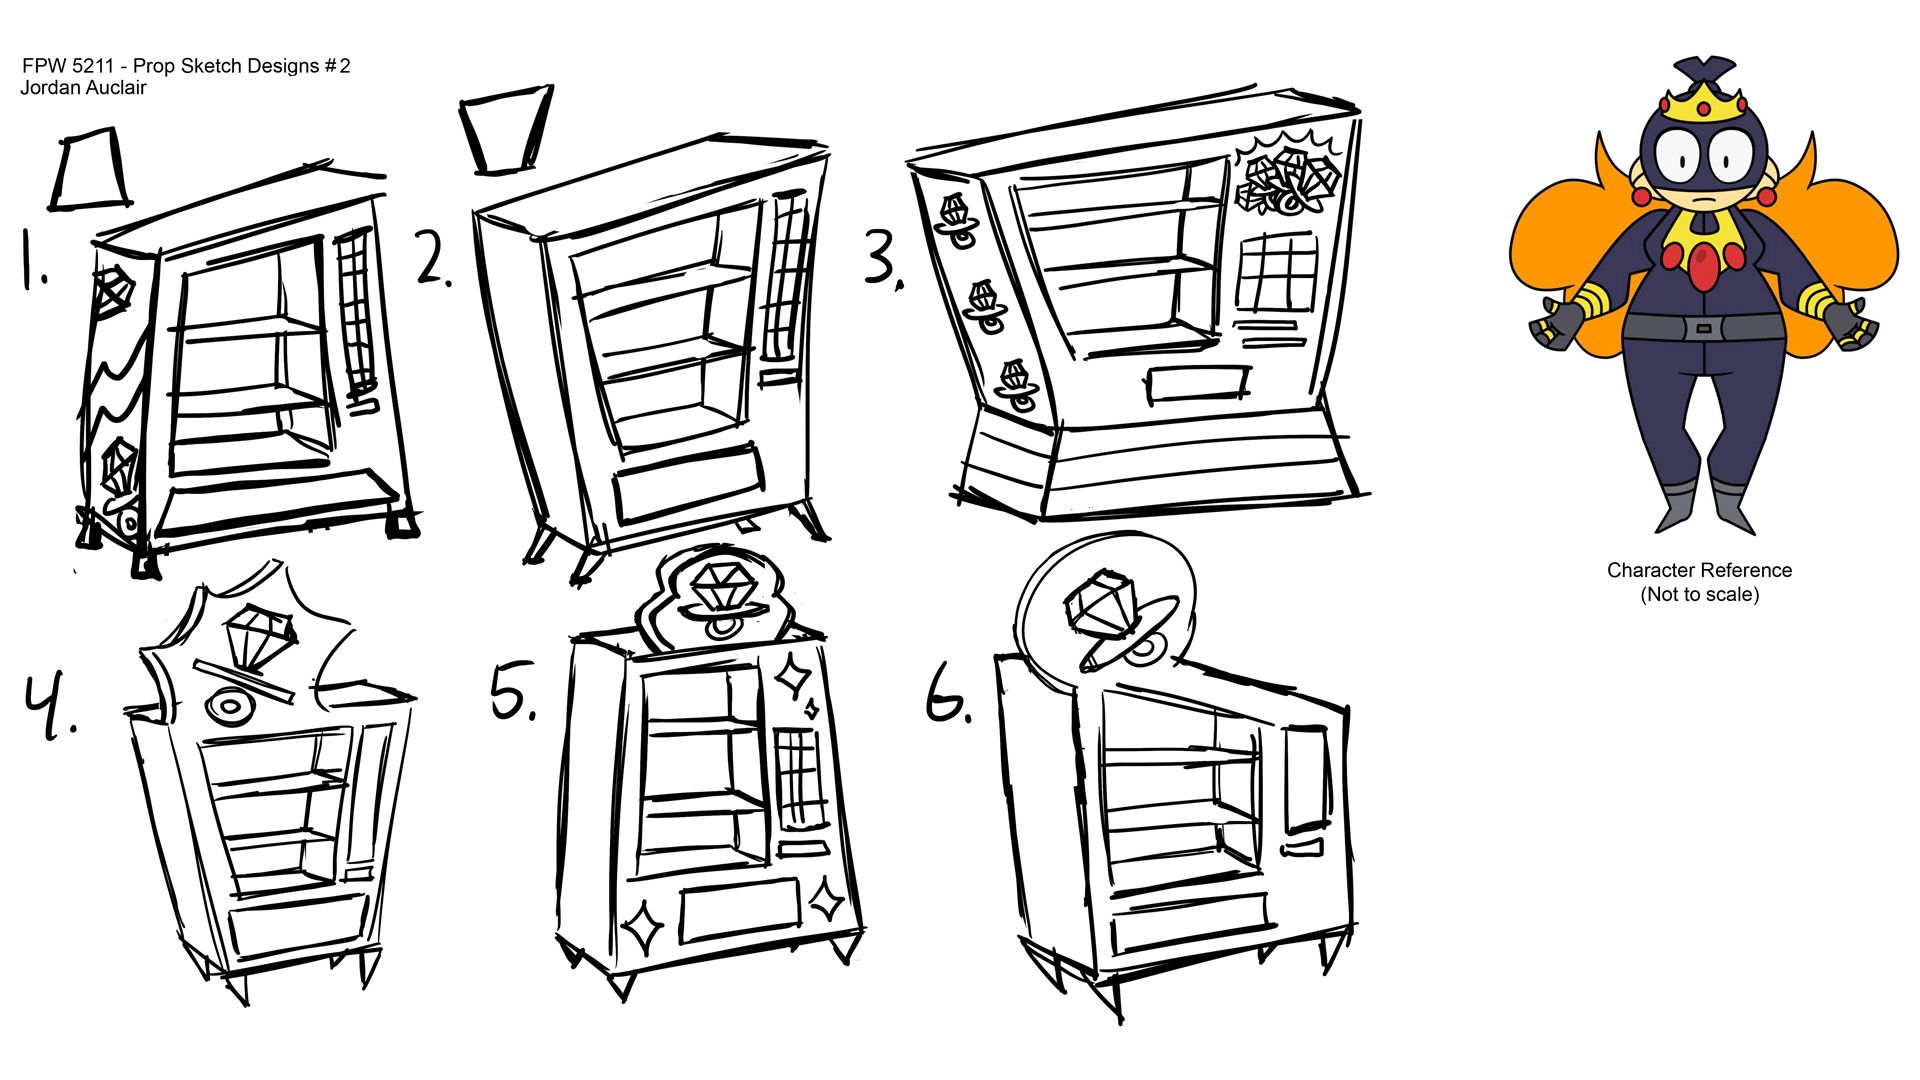

This includes the vending machine and its ring candy, as well as any items Penny holds onto in the story. The process was like designing a character. I had to sketch out a few explorations in Photoshop and use feedback to figure out which one is most appealing. Like the backgrounds, I used the art direction as a guideline to make them fit with the style of the film. Using exaggerated, wonky shapes for the props was especially fun to do! A bit more effort was put into the vending machine and candy, as those were more unique and had a bigger role in the plot. The vending machine was especially interesting, as I had to figure out the shape of the prop and the side design. Once the designs were solidified, I moved on to rigging.
Prop Rigging
Like creating a character, props also need to be rigged in order for them to be intractable.

Unlike with Penny, I had to use many methods for each one. For props that needed to change shape as they moved, I used the same method as rigging a character. This includes props such as Penny's bag of jewels. Since the bag had a simpler design, the process was way quicker and the final rig was nowhere near as complex. For props that were one solid shape, such as the gun, I instead drew everything in one drawing node and only added one peg. The close-up of Penny’s hands was a mix of the two. Only the wiggling finger had its own peg and deformers, while everything else was one drawing.
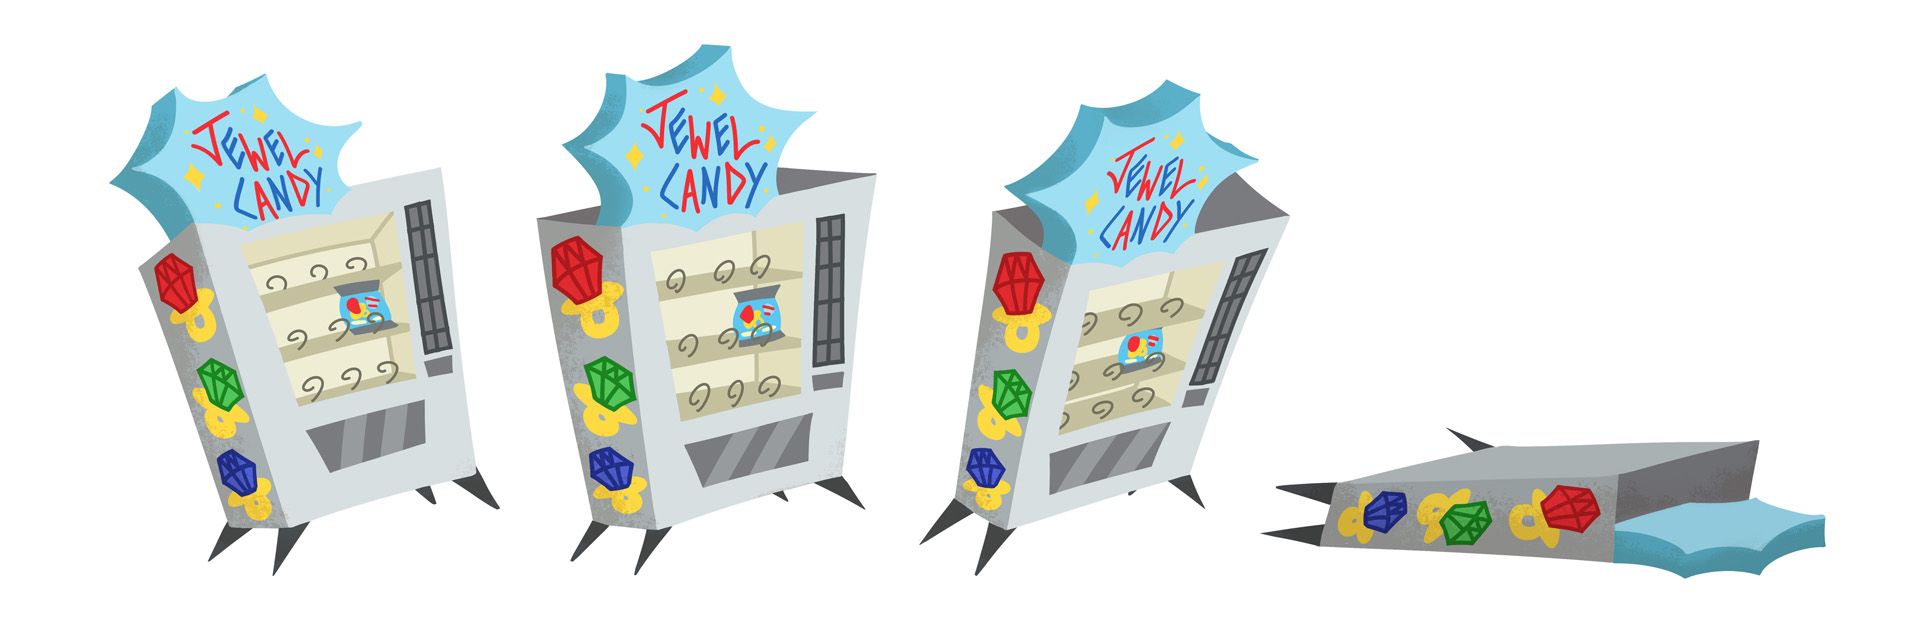
The vending machine was a special case. Initially, I was planning on making a rig with deformers. This is because it changes shape as Penny shakes it back and forth. However, one of my instructors brought up the idea of making the machine a set of drawings instead. This was a huge time-saver, as I didn’t have to build a whole new rig anymore. I then drew the vending machine drawings in Photoshop. This is great because Photoshop files can be imported into Toon Boom Harmony.
The Schedule
Before animating anything in Harmony, I first needed to create an animation schedule.
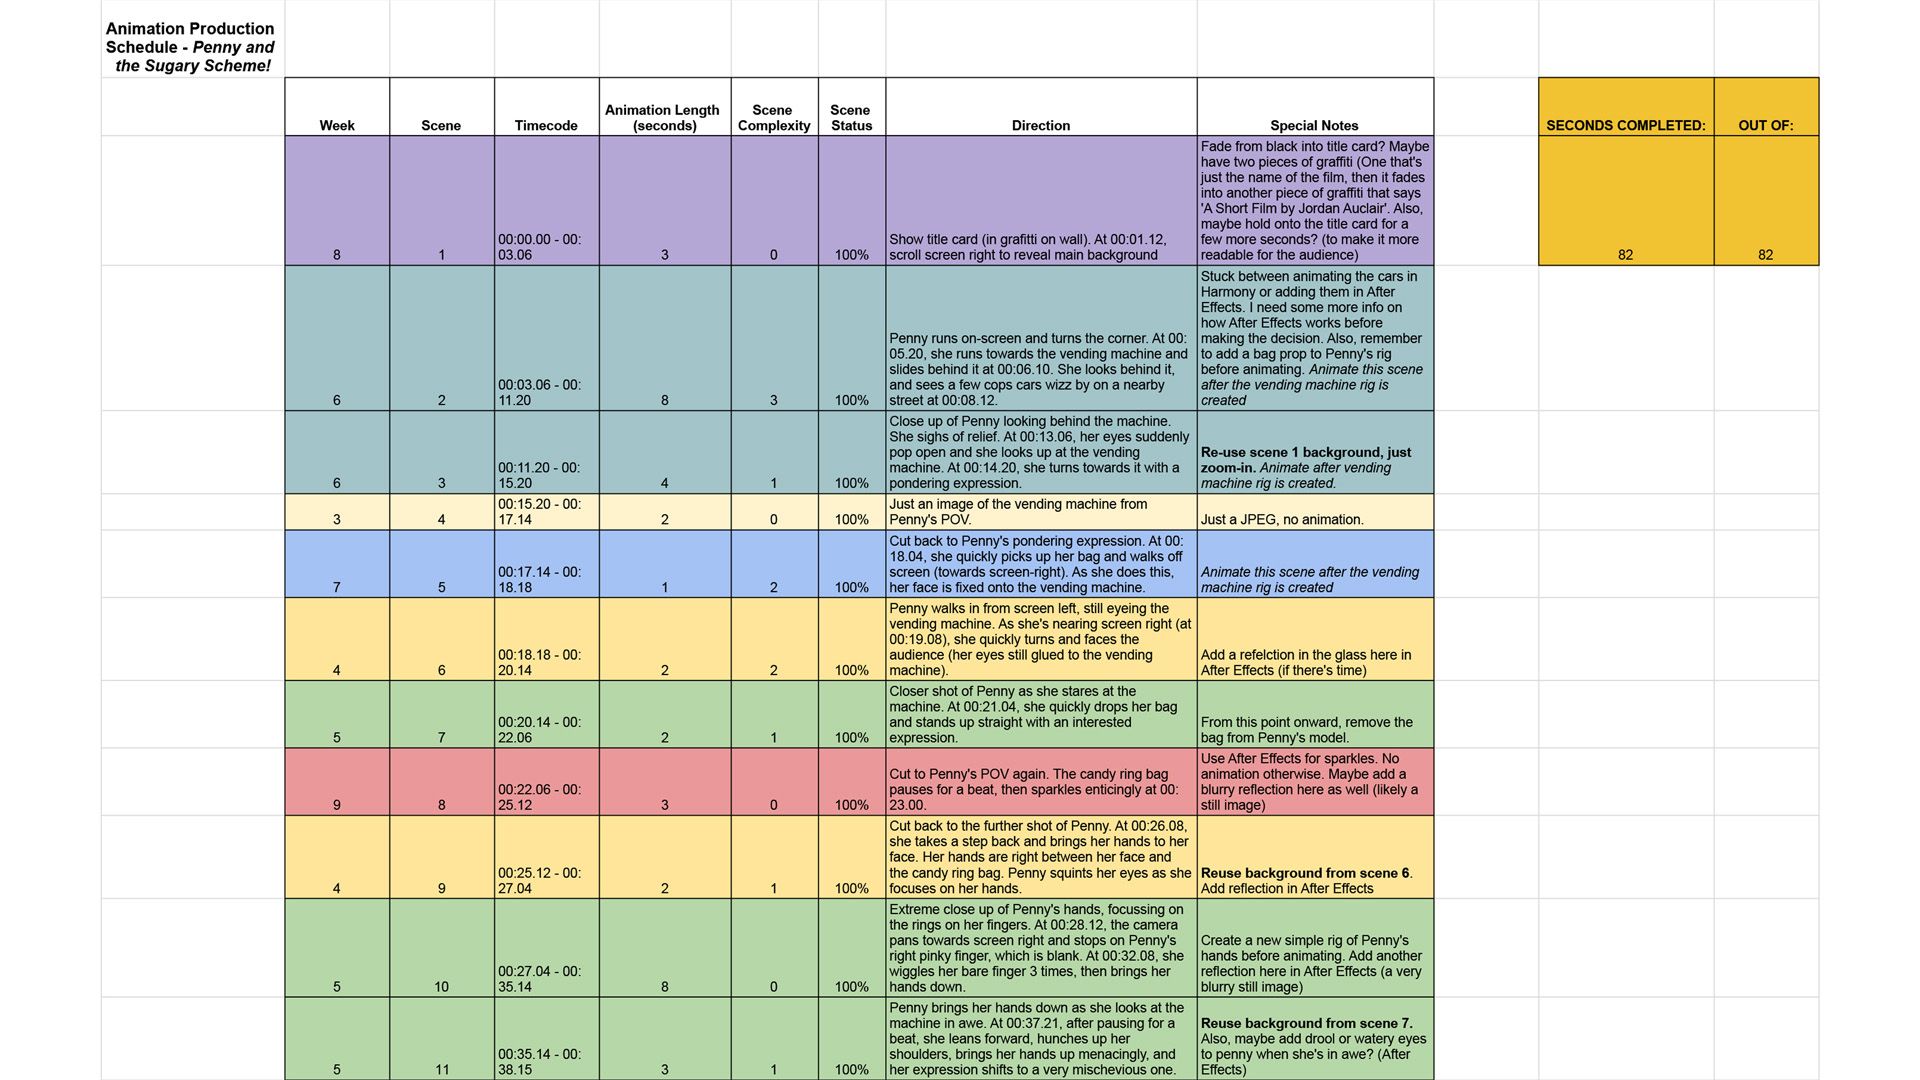
This document covered each shot’s length, complexity, completion, and other important notes. I also had to organise which scenes to do each week to make sure I had a good balance in my workload. This was an essential step for the animation process. It keeps a high quantity of work in order, which is necessary for larger animation projects.
After the completion of the schedule, I can finally begin animating!

After importing everything into the scene, the first step is to create the key poses. These are the main poses a character does in a shot, and are usually the ones shown in the storyboards. So, using the boards as reference, I manipulated Penny’s rig until it matched the pose. Once the pose was complete, I hit F6 on the keyboard to lock in the changes into one frame. If I put the frame in the wrong spot, I could also click and drag the frame to move it anywhere along the timeline.
Even though this step is simple, there’s still some things to keep in mind to make the process run smoothly. First, some options only work when certain screens are highlighted. For instance, 4 and 5 flip any selected parts of the rig horizontally and vertically. However, this only works when the mouse is hovering over the camera view. Otherwise, the rig completely breaks until you flip it again. Secondly, you need to get used to redrawing the rig’s hands, especially when they have a simple structure. Luckily, redrawing the hands isn’t too tricky with practice. It just involves duplicating a hand and adjusting the line art.
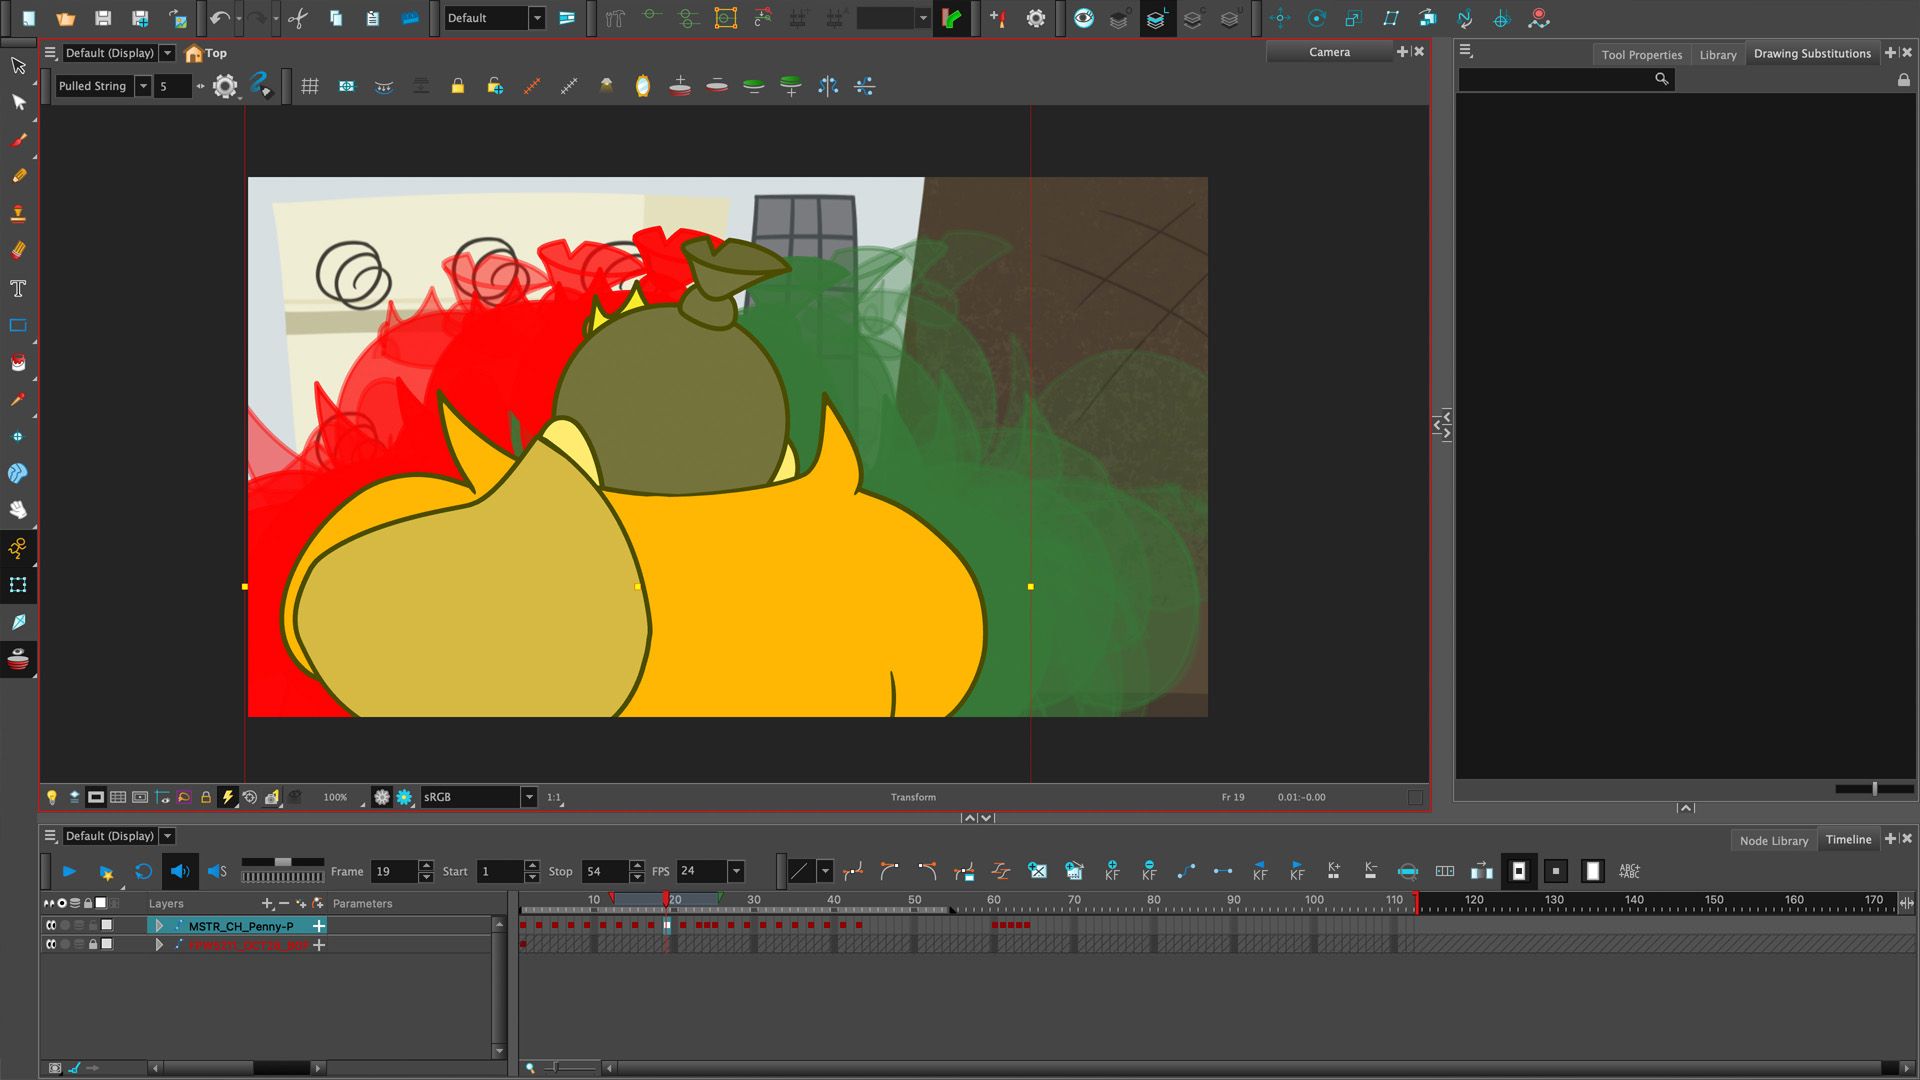
Once the key poses are completed, the next step is to create the breakdown and inbetween keys.

Breakdown poses work as transition frames that help make the movement less abrupt. Creating them is like creating key poses, except I needed to be aware of the poses that came before and after it. Inbetweens are the filler frames that smooth out the animation. Unlike with key poses and breakdowns, Harmony can make these frames itself! By pressing CTRL K, Harmony can move the rig from the quickest path between two points. It can also favor certain poses with the ‘Set Ease for Multiple Parameters’ button. This is perfect for slow-ins and slow-outs. After the frames fit the movement I want, I lock them in by hitting F6 for every second frame. I do this because I’m animating on 2’s, where a new image appears every 2nd frame.
The final step is adding the finishing touches. This involves adding any extra movement such as overlapping action and fixing errors. Harmony is obviously not a flawless program, so it’s bound to make mistakes that need to be corrected later on.
The most common issue is the motion of the body not going in the correct arc. Since Harmony makes the quickest path between poses, the rig moves in a straight line from A to B. This ends up looking stiff and unnatural. I fix this by manually tweaking the rig on every problematic frame until the body swings the way I want it to.
Another big Harmony issue is ‘pancaking’. This term describes when the rig flattens and un-flattens between two poses. This is caused when one pose is flipped with the 4 or 5 key. Then, Harmony ‘pancakes’ the rig to quickly flip it between poses. The best way to fix this is by copying and pasting the unflattened poses over the flattened ones. This will un-pancake the rig. After that, the poses can be manually adjusted into proper inbetweens.
After all that, I went over the animation again to get rid of any popping, layering issues, or other small fixes. Once everything was polished, I rendered the shot into an .mp4 and moved on to the next one in the schedule. I then put all the shots together in one animation pass using Adobe Premiere Pro.
The last step in creating the visuals is the compositing.
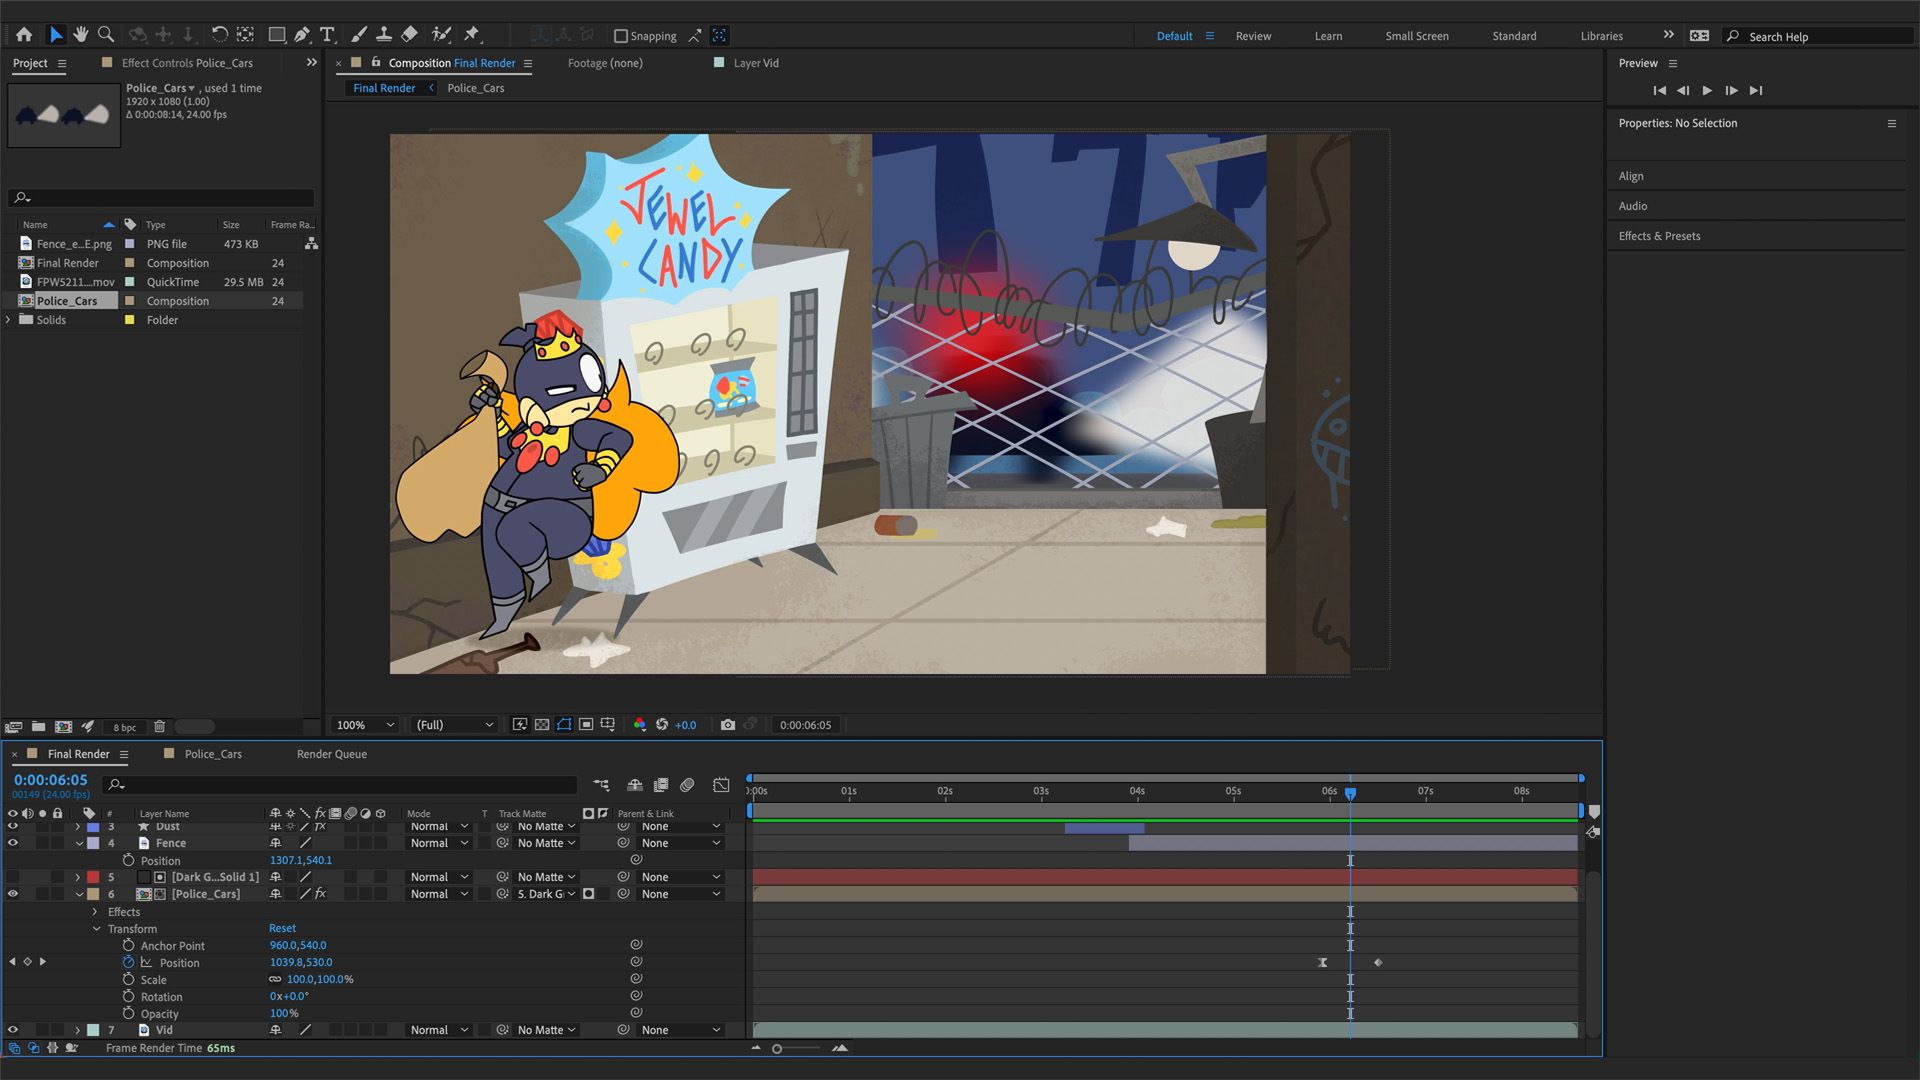
This involves adding the effects to shots that need them. For this part, I worked with my composition instructor and used Adobe After Effects. The special effects include anything that couldn’t be animated in Harmony. This includes gun flashes, smoke, sparkles, and speeding police cars. These were made using After Effects’ shape tool and timeline feature. With these, I created any shape I needed then animated it by keying its position, opacity, or size in the timeline. I could also duplicate parts of the background and turn it into a mask. This allowed me to put objects behind parts of the background, like police cars behind the fence. Additionally, I could also edit the background directly, such as making the lamp in the background shatter. After polishing the effects, I exported the shot into a new .mp4 to use in the film’s final pass. Afterwards, I created the credits in After Effects as well. This was a very simple process, as I used the timeline feature to adjust the opacity of the text to make it fade in and out. After that, I finally finished all the visuals for the short film!
After completing the visuals, the last step was working on the audio.

First, I imported all the edited shots and credits into Adobe Premiere Pro. I chose this over After Effects because I’m a bit more familiar with its audio editing feature. After piecing the film together, I brought in the music and sound effects. These were picked out as I was working on the composition. The music and some sound effects came from YouTube’s audio library. Additionally, the rest of the sounds came from CAT’s own sound library. Editing the audio was very straightforward. Like Storyboard Pro, sounds can be dragged right into the timeline. Their volume can be adjusted as well. Also, effects like fade-ins and fade-outs can be added from Premiere's Effects tab. The entire audio process took only a couple of hours.
Finally, I exported the whole movie as an .mp4. I then uploaded it to YouTube, Vimeo, and various student film festivals like the Rookie Awards.

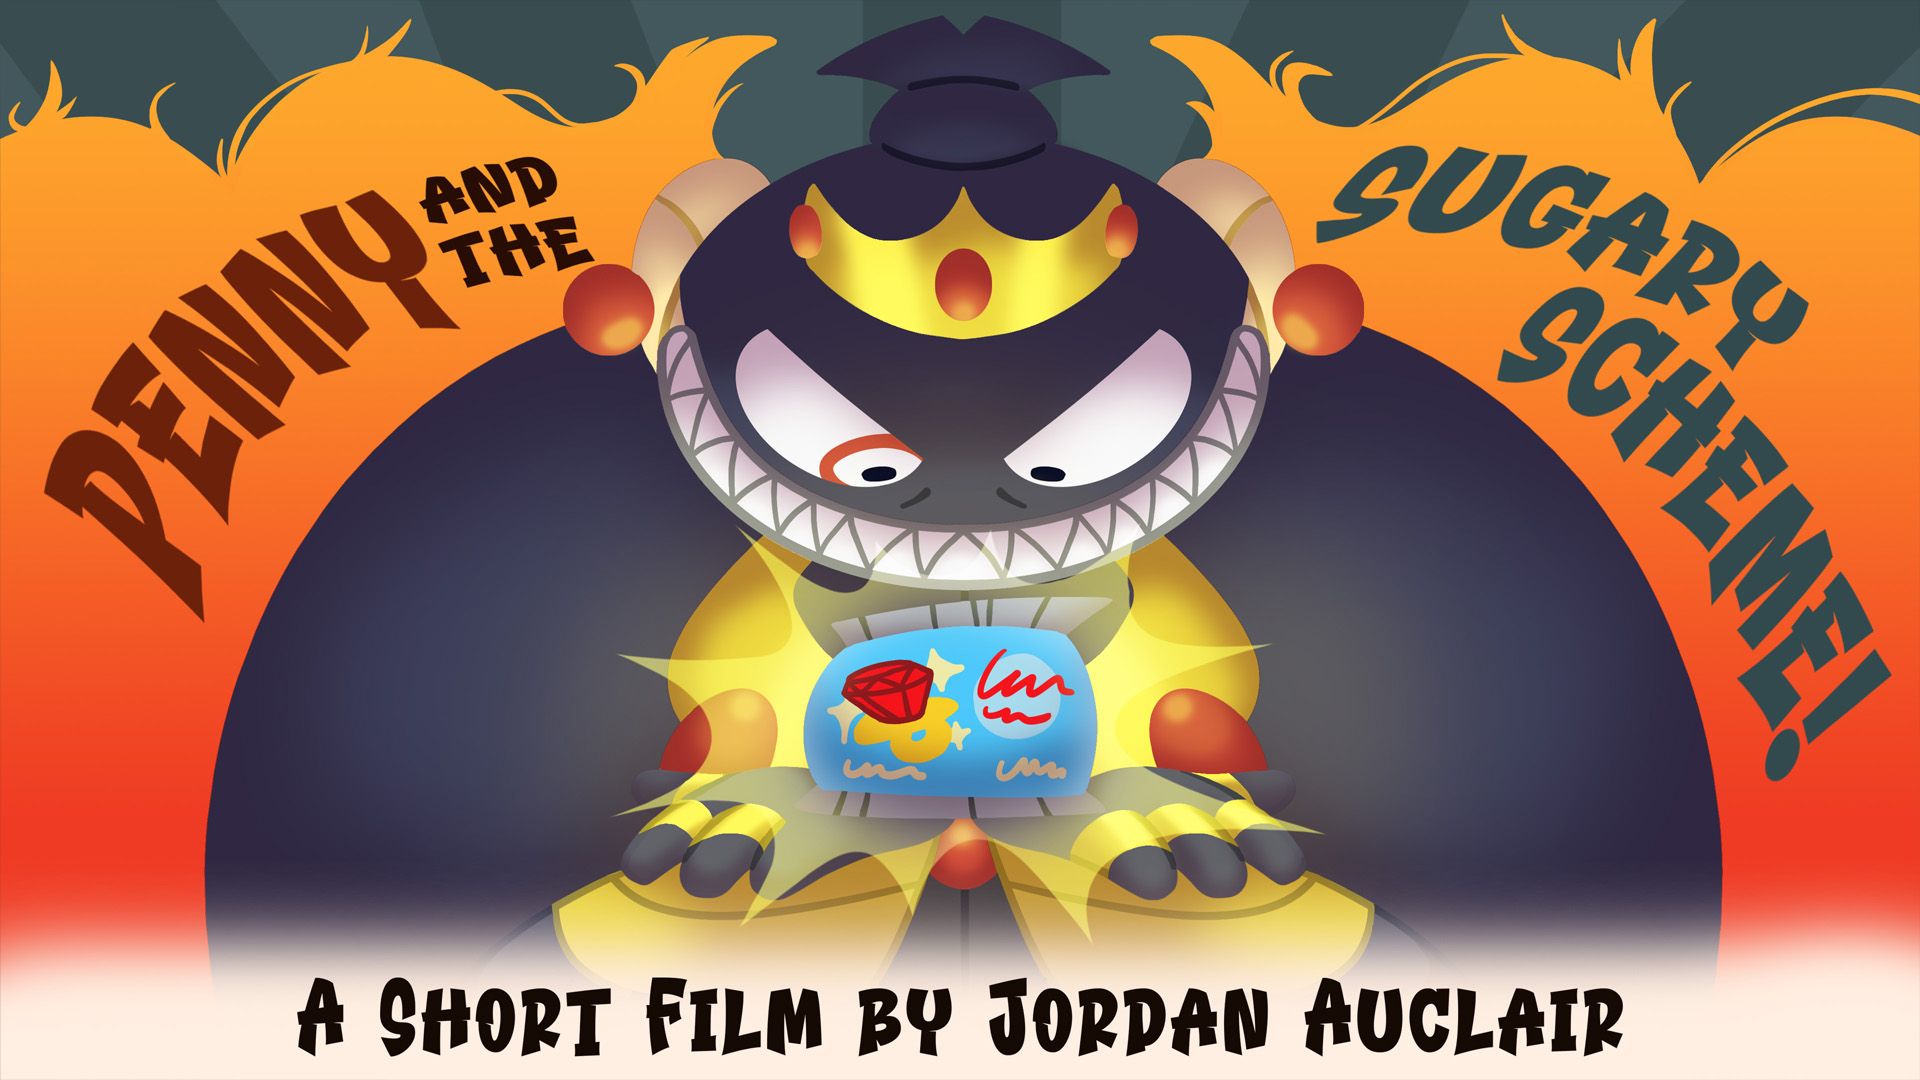
I also drew a thumbnail in Photoshop to make the film look nicer as a whole. It has a more detailed, painterly style based on old Looney Tunes shorts to help reinforce the style of the film.
That covers everything I went through to put Penny and the Sugary Scheme! into fruition. I’m happy to say this is one of my favourite projects so far! I’m very proud of the result, and it was great to experience every step of the animation pipeline. I hope this has been an informative read for those unfamiliar with rigged animation. You can find more of my work on my Rookies profile here.