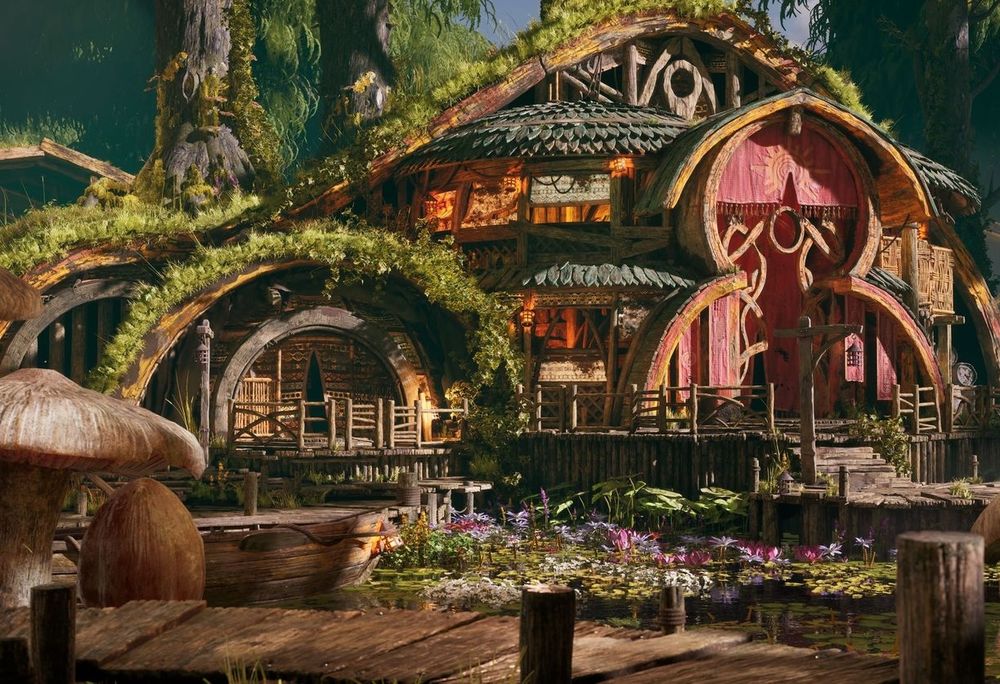
A Detailed Game Environment Built in Unreal Engine 5.3
Discover Raghav Verma's journey of creating the enchanting "Swamp Haven" environment during his time at Think Tank Training Centre.

Discover Raghav Verma's journey of creating the enchanting "Swamp Haven" environment during his time at Think Tank Training Centre.
Raghav is a 20-year-old Environment Artist from India with a passion for creating fantasy worlds for games. While he doesn't have a compelling backstory, his motivation is simple yet powerful: he loves to see people's reactions to breathtaking scenes. Read on to learn about how he assembled his epic environment whilst studying at Think Tank Training Centre called, "Swamp Haven".
Today we will be taking a look at how I created my mentorship project named “Swamp Haven”. I will be going over the process I followed, the challenges I faced and the techniques I used to achieve the final game environment as shown below.


Before I explain things, I made every single asset in this scene and that includes the foliage. No Megascans assets were used.
Brief: The entire process will proceed as follows: Modeling in Maya, detailing in ZBrush, baking in Substance 3D Painter, creating procedural textures in Substance 3D Designer, generating trees in SpeedTree, assembling shaders and assets in Unreal Engine, and final composition in Adobe Premiere Pro.
First step is to find a concept and research all the references regarding it.
Research is crucial to anticipate the technical and artistic needs of the project. I like fantasy worlds hence I went with the following concept.

Having finalised my concept and my goals of the concept, I decided to research and gather references about it. This stage includes brainstorming designs and finding architectural references which resemble the concept. This is how the PureRef file looked like after a proper research.

Now that the ideas are set, I start blocking out the scene in Maya with a fixed camera that closely resembles the camera in the concept.
I use Maya’s generic human assets to get a size reference for the assets as shown below.

After doing everything in Maya, it is exported to Unreal to get our first look at how the scene would look in the engine.

Now it’s time to start working on the assets in the scene. Since the scene contains numerous individual assets that need to be distinguished from each other, such as the planks and support poles, I planned to texture the assets within the engine itself using a custom shader. All the assets in the project, except the hero props, are textured in the engine using baked information. Here’s how it was done:


These masks are utilised by my Multi-Purpose Master Material in Unreal Engine to enable on-the-fly adjustments. This shader allows for instanced meshes with variations, ensuring that every plank looks different from the others.

Here’s a video which shows how I can use the material/shader above to change the moss/dirt buildup on my assets:
Here’s what the gym (library of the assets used in the project) looks like:

Mushrooms
These mushrooms utilise detail textures, adding details that are sized accurately according to the texel density of the object. Here’s a visual example of a mushroom using a 2k texture compared to another mushroom with the same texture but with a detail texture on top of it.


Trees
The trees for this project were also made completely inside SpeedTree. Once a procedural tree was set up according to my liking, I was able to create variation in the shape and sizes.


Shingles
The shingles in my scene uses the aforementioned masks along with engine-generated data, such as distance-based approximate AO (based on distance fields and distance to nearest surface), to create accurate and realistic buildup. Here's another example demonstrating how this works for the shingles in my scene:

Here’s a video showcasing how it is working in real-time in the engine:
On top of all of this, I also utilise world position based random tint on each asset which adds another layer of distinction to these meshes. This can be seen in the video below:
Water Shader
Water in this project was an important aspect for the swamp. For the player to notice little details I added some useful features to my water shader that I made from scratch that helps an artist in art direction and the player to feel immersed.
Here’s how the water shader looks like:


All these details can be changed on the fly using the parameters that I made for this shader. Here’s a video to showcase how these parameters offer flexibility:
The Dome Tents
The dome tents depicted below presented another challenging aspect of the environment. I had to devise a design that resembled the concept while also being physically feasible and suitable as a flexible game asset. To achieve this, I developed a modular design that enables the construction of the tent in the game engine with various permutations.


These modular cloth parts were simulated in Marvelous Designer and then converted to low-poly in Maya.

These modular parts are further customisable to one's liking. In order to make them customisable, I utilised my hero prop master material which has a lot of customisable parameters like shown below:
A fun experiment that I came up with was this dirt/mud blob shader:
Foliage was a fascinating aspect of this project, and I thoroughly enjoyed every moment of it.

Here's how I created my foliage from scratch:

2. After doing the research for the types of foliage required in the scene, I start by laying out the base mesh in Maya on square mesh which has a layout of a 2k texture as shown below.

3. Then this base mesh is taken into Zbrush to add all the details as shown below.


4. Now that the high-poly mesh is done for the atlas, we bake and texture this high-poly on a flat square mesh with a 2k resolution in Substance 3D Painter as shown below.

5. This atlas plane is subsequently imported back into Maya for creating foliage cutouts and assembling the foliage types based on the researched references. 🌿🌱


6. This is how the cutouts turned out in Unreal after applying my foliage shader. Colours can be changed in the shader set-up for further art direction.


Tileable Textures as everyone knows are a key thing in game art.

I was fortunate enough to have been taught the fundamentals by Johnny Malcom about Substance 3D Designer. His teachings allowed me to design my own textures myself. Here’s a showcase of some of the cool Textures that I made in Substance 3D Designer:


I don’t have a comprehensive breakdown of these tileable textures, but I can share an overview of my substance graphs to showcase how the following textures were made:


Creating textures and shaders are my favorite part of game art and I absolutely enjoy this process. I encourage students and newcomers to implement procedural methods in their workflows in order to stay relevant in this changing industry.
One of the coolest things I learnt from my Mentor - Declan Hart (Principal Environment Artist at Digital Extremes), is creating nicely detailed organic high poly assets. Zbrush is a great tool for sculpting and I utilised it for creating the following high-poly sculpts.


As a passionate environment artist specialising in games and virtual-production films, I am currently immersed in an exciting project for an unannounced title with Netflix and Hulu. While fully engaged in this endeavour, I remain open to intriguing opportunities and collaborations. Feel free to reach out to me on LinkedIn if you're interested in having me join your team. Additionally, my other work and social profiles via my Rookies portfolio here.
Thank you for taking the time to read through the entire process; I hope you gained some valuable insights today.